Reconciling in QuickBooks Online can sometimes be challenging and confusing. However, by following a step-by-step process and understanding the mechanics involved, you can easily complete the reconciliation. This article provides a detailed guide on how to reconcile in QuickBooks Online.
Let’s begin by understanding the necessary actions and items required to reconcile bank statements in QuickBooks Online.
Step 1: Review the opening balance of the bank statement
The opening balance is the closing balance of the previous accounting period. For example, if you are reconciling the bank statement for July 2023, you need the closing balance from June 2023. Obtain the opening balance from the bank statement and ensure it matches the opening balance in QuickBooks Online for the current month. You can do this by accessing the previous month’s bank reconciliation. Here’s how:
- On the left navigation column, click on “Accounting” and then select “Reconcile.”
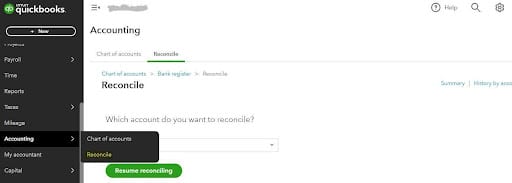
- Choose the account you want to reconcile, such as “BUS COMPLETE CHK” in our example.
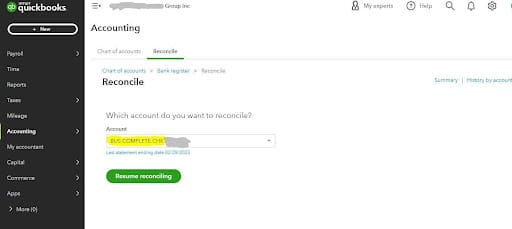
- Below the account name, you’ll find a blue link stating “Last statement ending date 2/28/2023.” Click on this link to access the bank reconciliation for the previous month.
- If you are reconciling the bank for the first time, you will see an option to “Get started” after clicking on “Accounting” and then “Reconcile.”
By ensuring that the opening balance of the current bank statement matches the opening balance in QuickBooks Online, you reconcile the last accounting period. It’s important to note that you must reconcile the previous accounting period or any discrepancies or errors will carry forward to the next period. QuickBooks Online will provide a message indicating that it can help you resolve the issue, as seen below. If this occurs, click on the link stating “We can help you fix it.”
Once the bank’s opening balance and QuickBooks Online match, you can proceed with the reconciliation of the current month.
Step 2: Start the reconciliation
To begin reconciling, follow these steps:
- Go to “Accounting” on the left navigation column and select “Reconcile.”
- Click on the green button labeled “Resume Reconciling.”
- The screen will prompt you to enter the ending/closing balance and the date of reconciliation.
- Find the ending/closing balance in the current accounting period’s bank statement, usually on the last page or line.
- Enter the last date of the accounting period as the date of reconciliation.
- After entering both fields, click on “Start recording.”
The screen below will appear and display a summary of transactions based on the ending dates. QuickBooks Online automatically adds up transactions entered before the ending date, including payments and deposits. If there is a difference, you need to review the bank statement to identify missing transactions or errors. Once you locate the difference, enter the transaction in QuickBooks to reconcile it.

Ideally, the difference should be zero with all bank entries in QuickBooks. However, due to reconciling items, this may not always be the case. The following are common reconciling items:
- Bank charges: These charges are usually unknown until the bank statement is received, so they are not typically entered in the books. If you notice a small difference, it could be due to missing bank charges.
- Uncredited checks: These are checks received and recorded in QuickBooks Online but not yet credited by the bank as of the closing date. You need to review transactions in the subsequent accounting period to see if the check is credited.
- Synced transactions: After you connect your bank with QuickBooks Online, you must map transactions into categories. QuickBooks Online will display these transactions during reconciliation, but you need to manually check and add them because they may not fall within the closing date. The yellow highlighted area below is where to click to add up transactions manually.

- Unpresented checks: These are checks paid to vendors and deducted from your books, but the vendors have not submitted them to the bank as of the closing date. You need to manually identify such transactions in the next accounting period and add them to the reconciliation. Add up transactions by selecting the yellow area highlighted below.

Once you have added all the necessary clearing items, the difference should be zero.
Why Reconciliation is Important for Commercial Real Estate (CRE)
Reconciliation is particularly important for Commercial Real Estate (CRE) businesses due to multiple types of properties and facilities in their portfolios. Because of this, it can be difficult to ensure all property-related transactions are timely and accurately entered in the books. However, regularly reconciling the bank helps ensure that books remain in good shape and have lower chances of error.
Let’s discuss in detail why reconciliation is important for commercial real estate:
- Financial Accuracy: Combined financial insights, dashboards, and reports on QuickBooks Online heavily rely on the data and transactions that you enter. Bank reconciliation is the only way to ensure that no errors have occurred, no transactions are missing, and the banking record is good.
- Lease Administration: Reconciliation helps to monitor tenants’ payment reconciliation, operating expenses, rent escalations, etc.
- Expense Recovery: Reconciliation is important to monitor shared expenses essential to sustain the financial viability of the commercial property. It helps commercial real estate owners with correct billing and improves relations with tenants by lowering the chance of disputes.
In addition, Reconciliation is equally important in property valuation (as it helps get accurate data), compliance, and audit.
How To Undo Bank Reconciliation in QuickBooks Online
There are several reasons why you might need to undo a bank reconciliation in QuickBooks Online, such as mistakenly marking an unreconciled transaction as reconciled, changing the reconciliation date, or wanting to re-enter the transaction. If you make a mistake during reconciliation and need to undo it in QuickBooks Online, follow these steps:
- Go to the “Accounting” tab on the left navigation column and select “Chart of Accounts.”
- Find the bank account with the issue.
- Select a range of transactions to undo.
- If a transaction is part of a reconciled bank reconciliation, it will show an “R” indicating it’s reconciled.
- Click on the box highlighted below until it turns blank, which means the transaction has been removed from reconciliation.

- Save and close the changes.
How STRATAFOLIO Can Help
We know commercial property management is challenging. If you would like to learn more about how STRATAFOLIO can help you manage your commercial real estate properties, watch our prerecorded 10-minute demo. Our software can reduce your valuable time and effort wasted by 80%.
If you know you want to take your commercial property management to the next level, schedule a 1:1 demo today and we can show you how STRATAFOLIO will elevate your organization’s specific goals and needs.