Before setting up ACH payments for your tenants, we recommend reviewing How ACH Payments Work in STRATAFOLIO, which explains payment processing times, verification, fees, and other important details that apply to both tenants and owners.
Get Started: Key Requirements for Autopay and Invoices
Timing of Invoice Addition
- Add, finalize, and sync invoices in STRATAFOLIO no later than one (1) day before the scheduled autopay date.
- If you add or sync an invoice on the same day as autopay, the system will not process that payment.
Invoice Date Requirements for ACH (Posting Date)
- The Invoice Date (posting date) must be on or before the scheduled autopay date.
- Example:
- Autopay Date = July 28, 2025
- Invoice Date = August 1, 2025 → Autopay will not process
- Invoice Date = July 28, 2025 (or earlier) → Autopay will process
- The Invoice Date signals to the system that the invoice is ready to be paid. If it is later than the autopay date, autopay will skip the invoice.
Why Would Autopay Not Run
- If autopay does not process because of timing or invoice date issues, the tenant must use the one-time payment option.
- Backdating an invoice after autopay has run will not trigger payment.
Checklist: Setting Up Invoices for Autopay
- Add, finalize, and sync invoices at least one day before autopay runs.
- Ensure the Invoice Date is on or before the autopay date.
- If autopay is missed, tenants must make a one-time payment.
How to Set Up an ACH Account as a Landlord
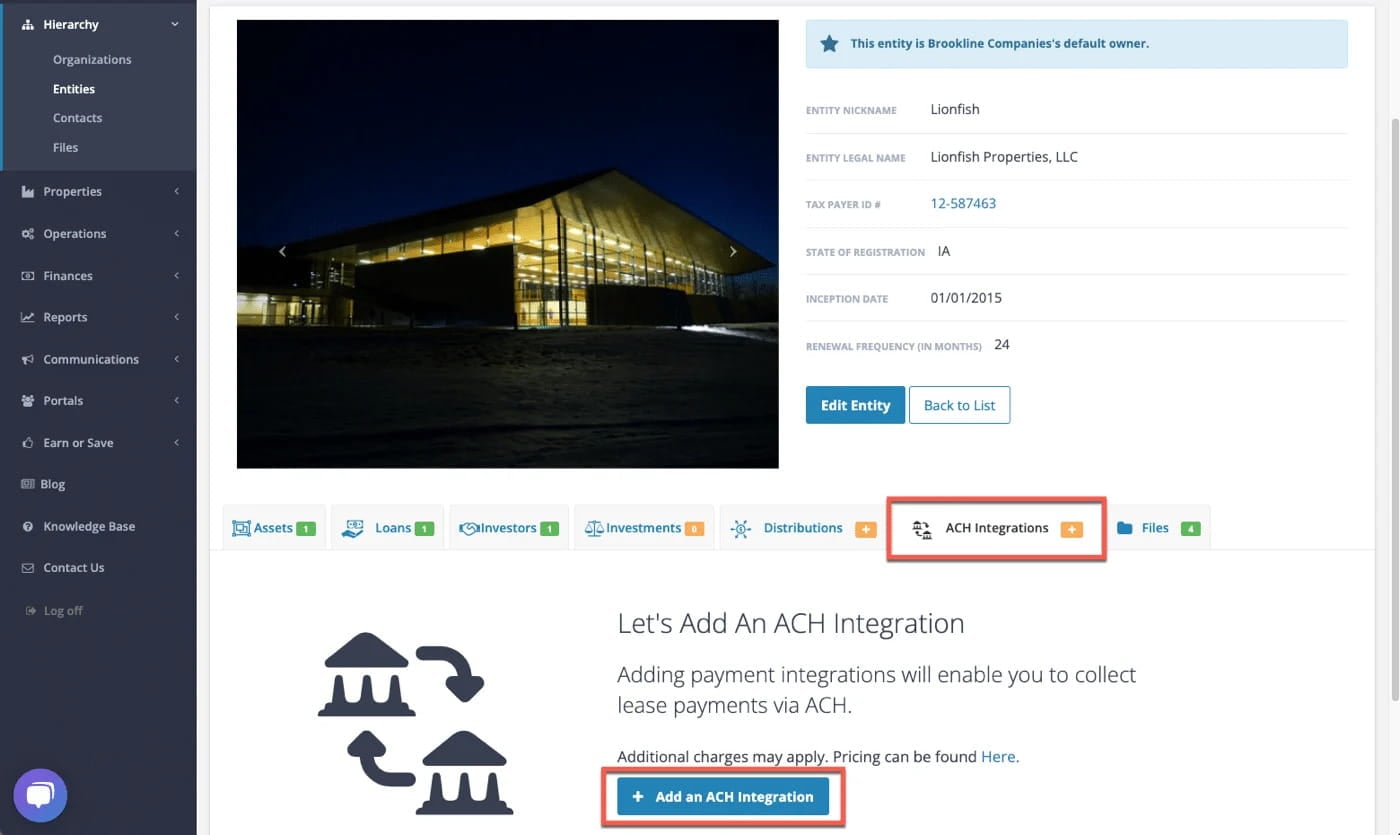
1. Add ACH Integration to Your Entity
The first step in setting up your organization to receive ACH payments is to add an ACH Integration to your Entity in STRATAFOLIO. If you have multiple entities, you will repeat this process for each one that will receive ACH payments.
First, navigate to Hierarchy from the left-side navigation menu and click on Entities from the dropdown, then select the “i” next to the Entity that you will add the ACH Integration to. This opens the detailed view of the Entity.
Next, select the ACH Integrations tab in the Entity’s detailed view, then click the Add an ACH Integration button at the bottom of the page.
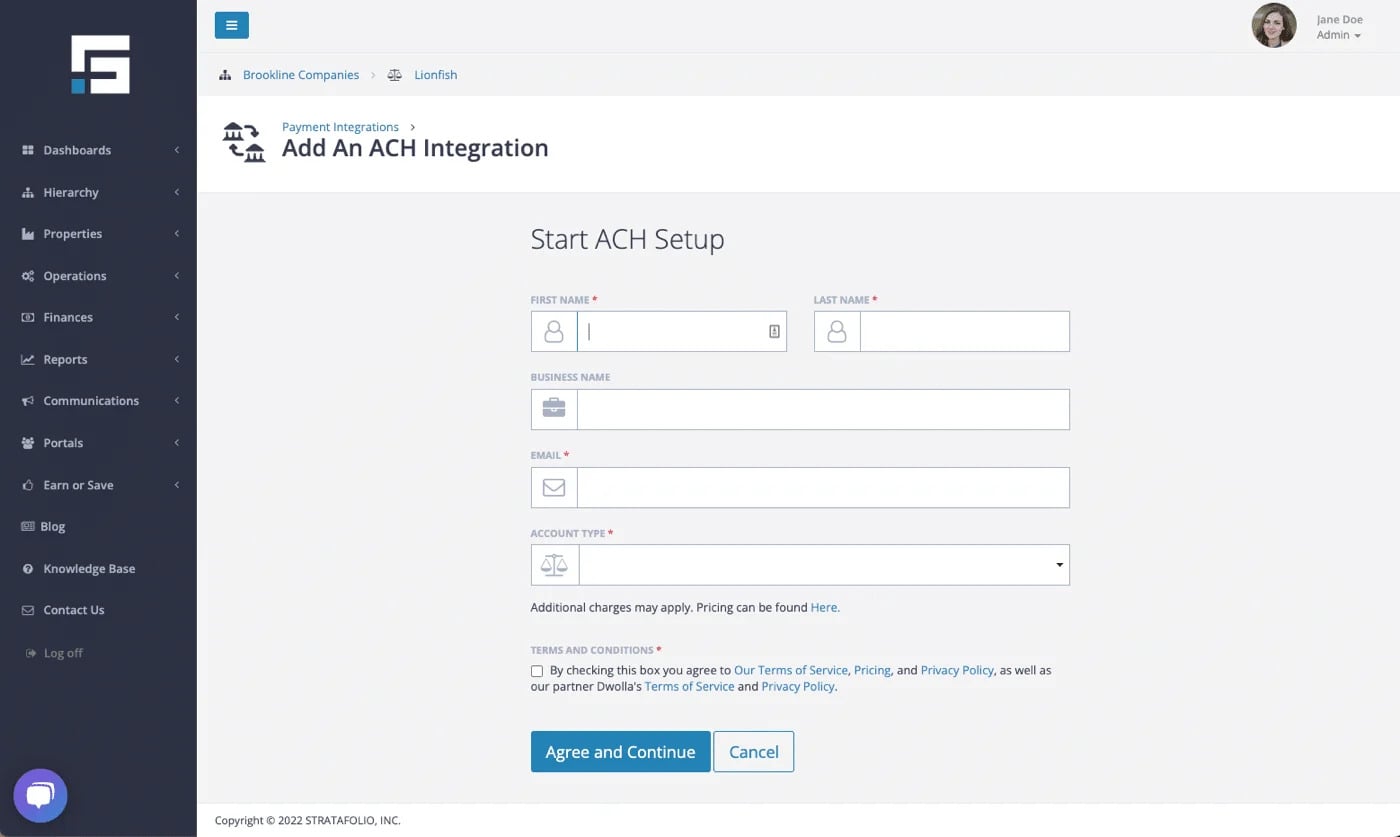
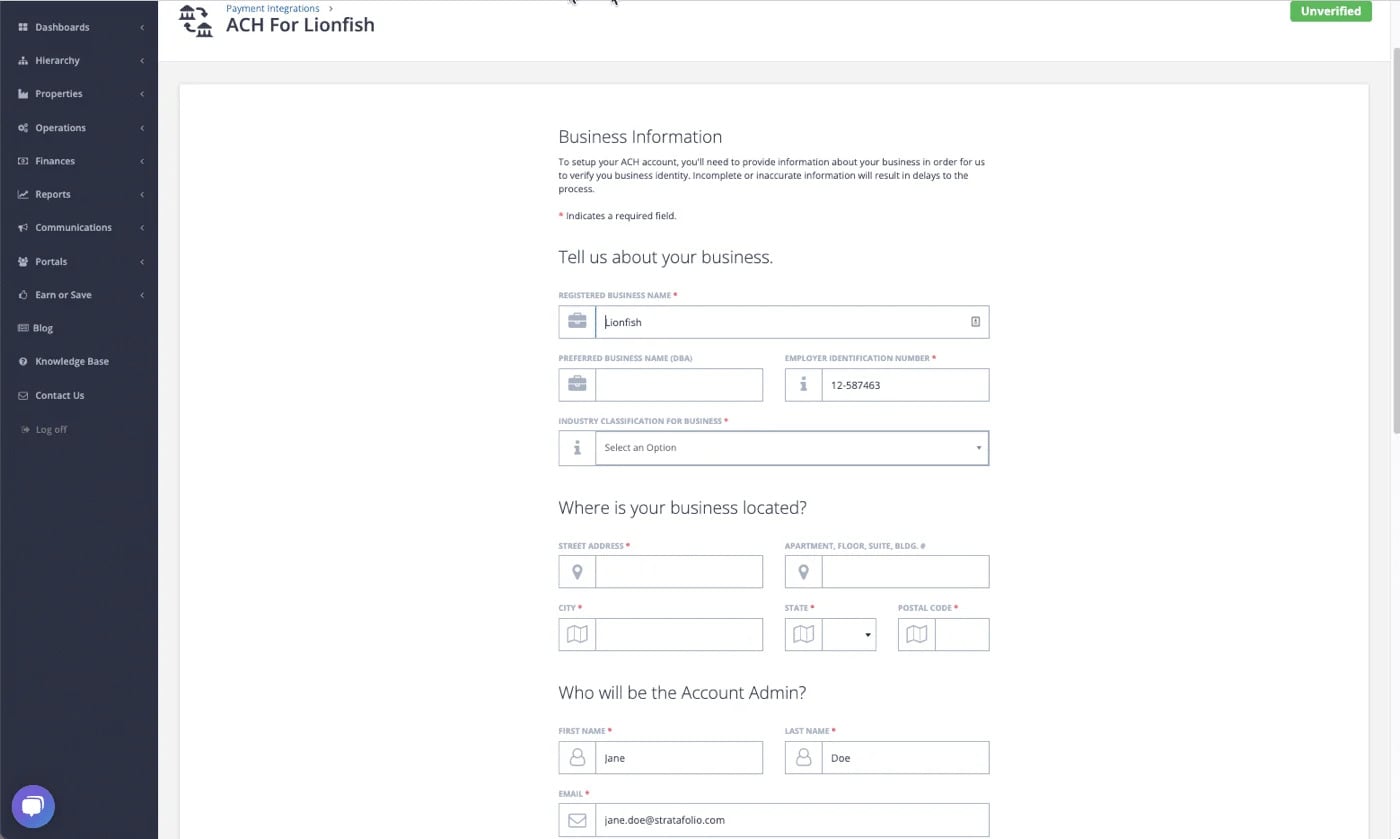
On the ACH Setup form, enter your first name, last name, business name, email, and account type. You must check the terms and conditions box to agree and continue.
The next page highlights two alerts:
- Verify
- Add a Funding Source
These marks will clear once the tasks are completed.

2. Add Funding Source or Bank Account
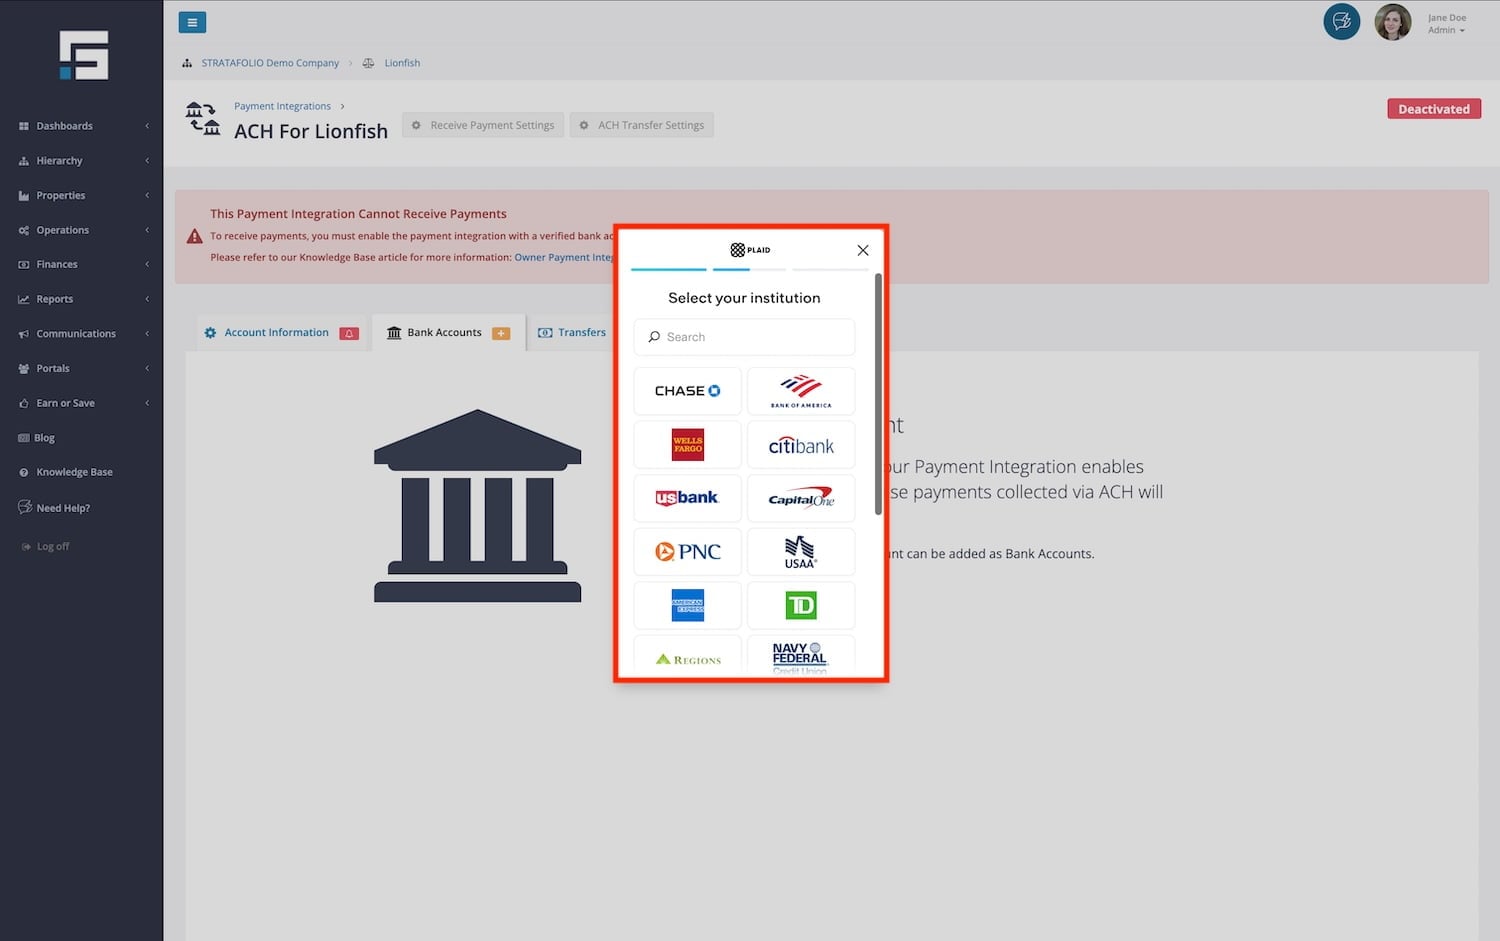
Once you have added an ACH Integration, you will need to add a bank account, also known as the Funding Source. The Funding Source is the bank account you would like to use to receive payments. Make sure you select the correct lending institution. Some lending institutions will list multiple listings for similar branches, or individual listings for personal or business use.
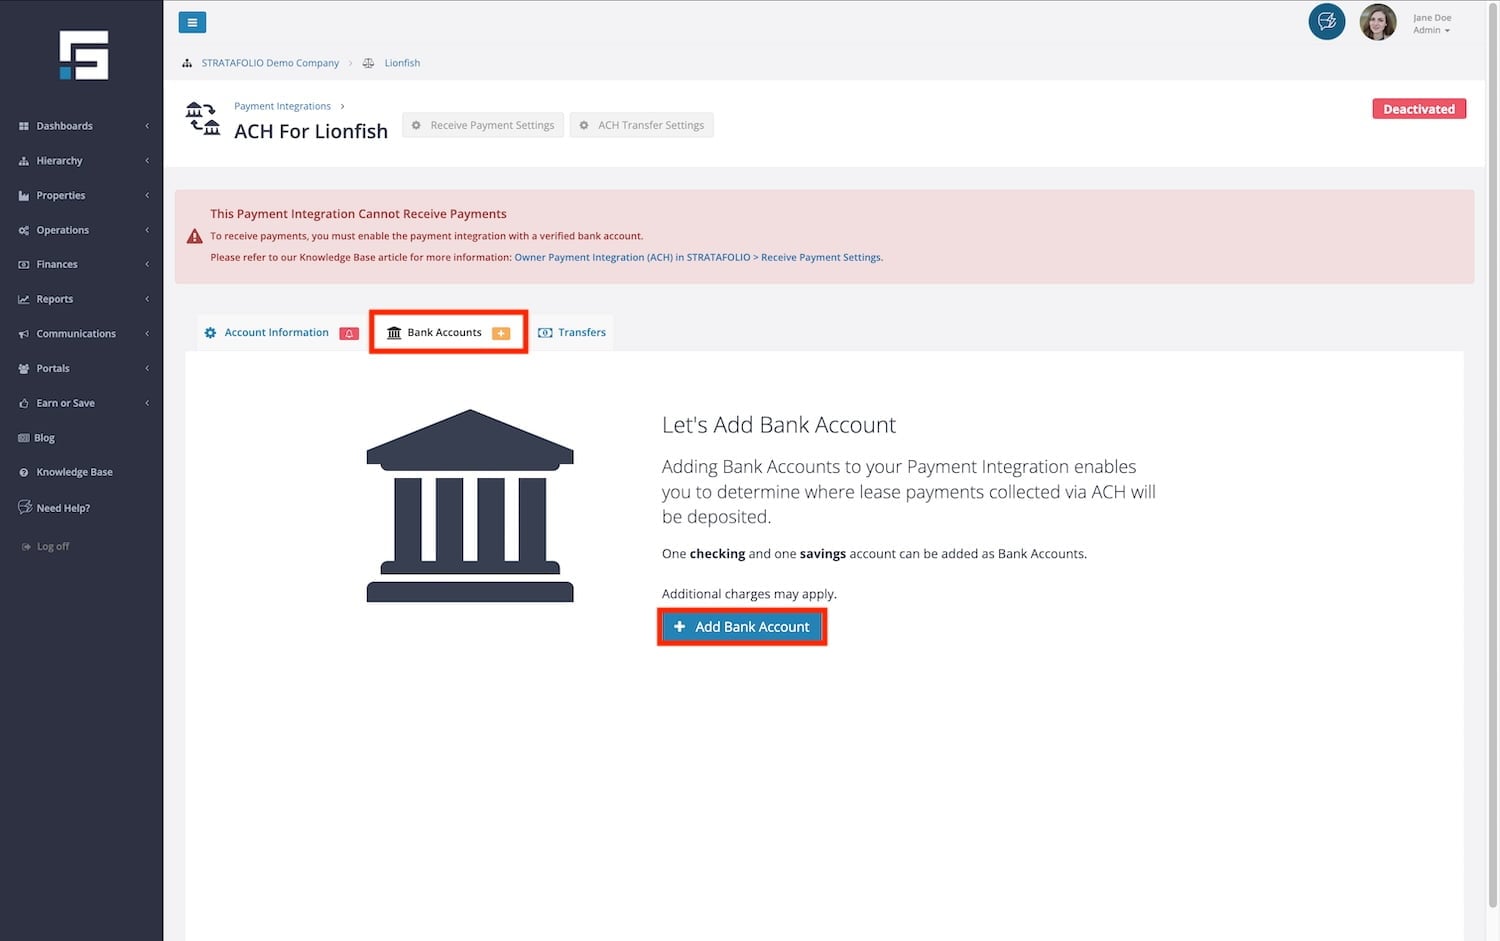
WARNING: When searching for your lending institution, ensure you select the correct link. Many institutions have separate links for personal and business accounts. If you select the personal account link instead of the business account link, the bank may reject your account. It is important to double-check before proceeding to avoid delays in the setup process.
STRATAFOLIO uses Plaid to make the setup safe.
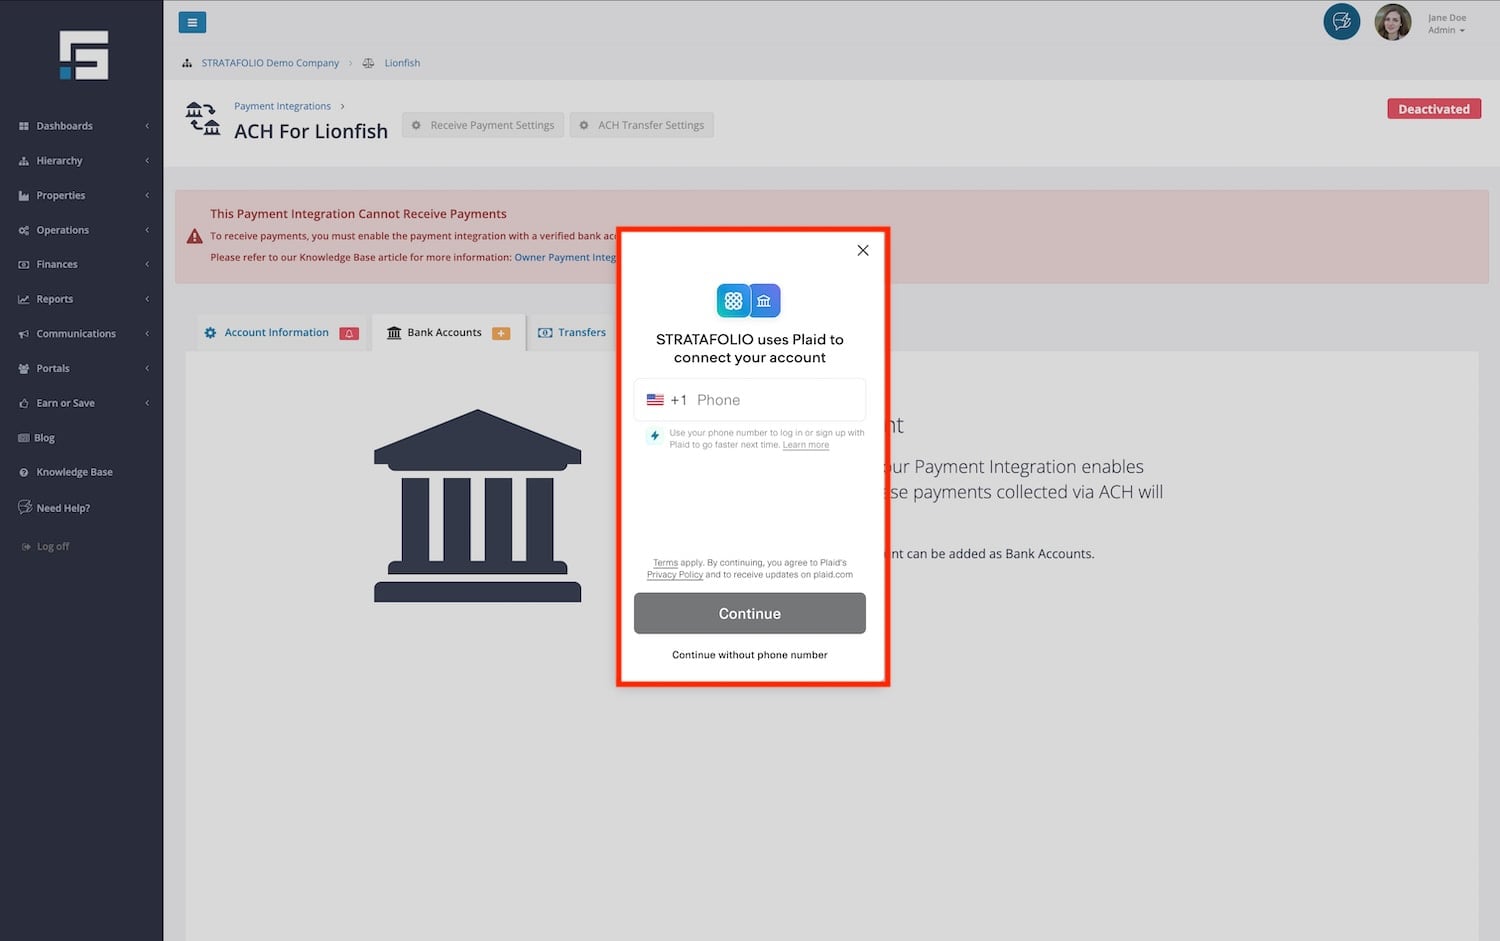
After selecting your institution, follow the next set of instructions on the pop-up.
If you cannot find your lending institution on the list or through the search function, you can still link it manually using your account numbers. Simply scroll to the bottom and select Link with account numbers. Continue with the next set of instructions on the screen.
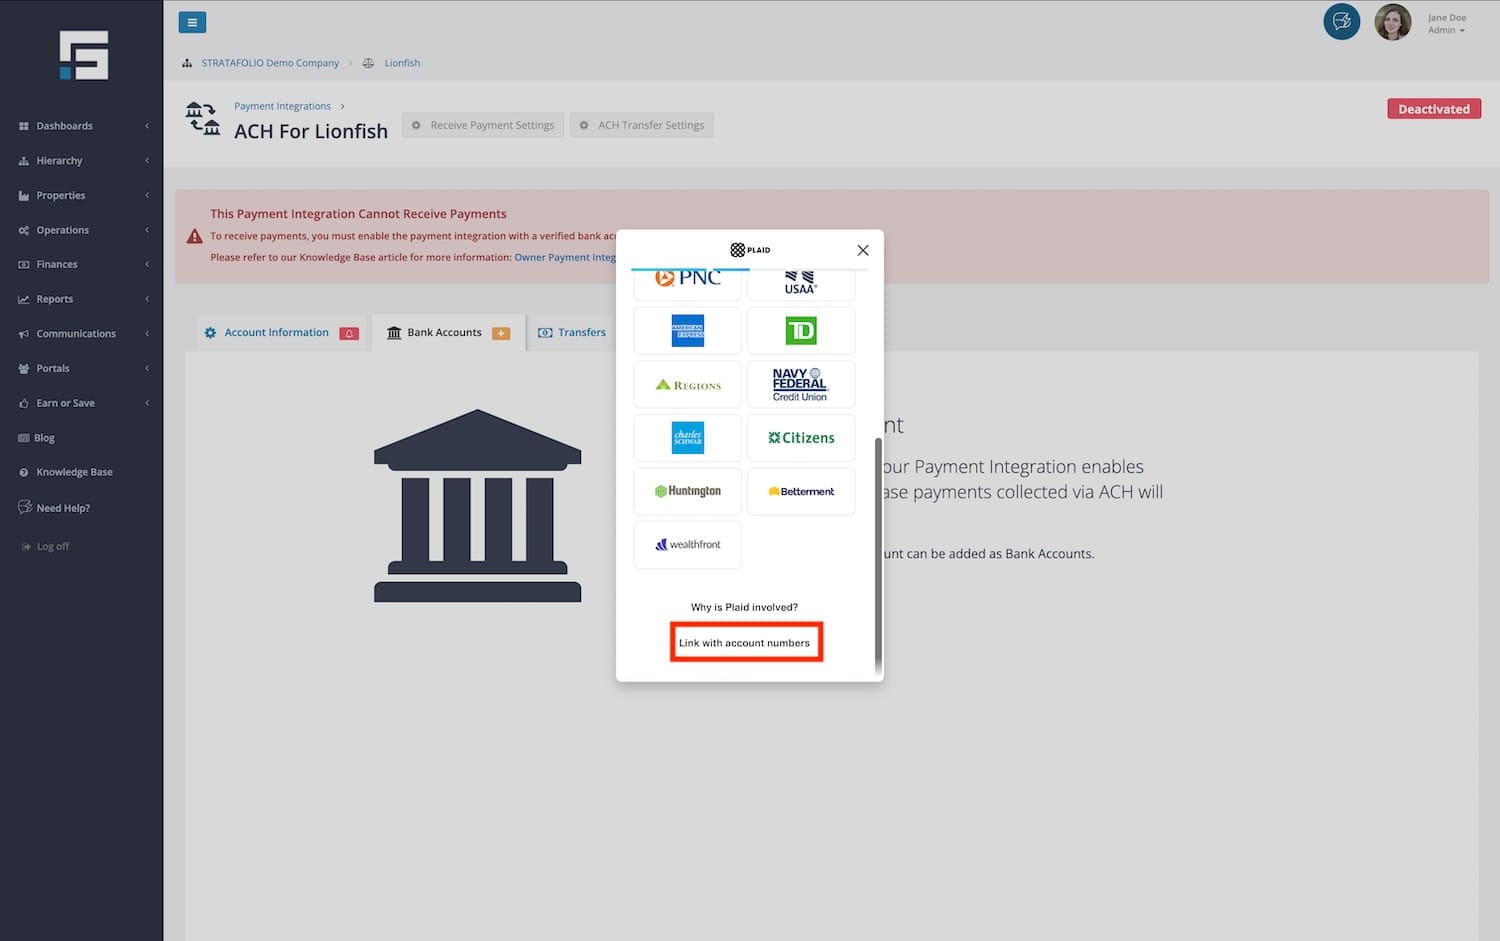
To add the accounts manually, you’ll need to:
- Provide the account number, routing number, and the first and last name of the account holder listed on the account you’ll be using.
- Once you verify and approve, you’ll receive two micro-deposits in the amount of $0.99 cents or less in the account number provided within a few days. A few days later, that amount will be removed.
- Once you receive the micro-deposits, you’ll return to STRATAFOLIO to verify your account by entering the two deposit amounts. If the amounts match, your account will be verified and activated.
You can also add additional funding sources.
3. Verifying the Account
The next step in setting up your ACH account is to provide us with information about your business in order to verify its identity.
IMPORTANT: Premium Account Requirement for ACH Payments
ACH payments require that at least one party in the transaction has a Premium payment account. Because tenants can choose between Standard and Premium payment accounts, the receiving landlord account must be set up as a Premium account for ACH transfers to process successfully.
As part of setting up a Premium account, additional compliance information may be required for the receiving account, including a completed Form W-9. This information may be necessary to meet federal reporting requirements when payment activity reaches certain thresholds.
If the information required to maintain a Premium account is missing or incomplete, ACH payment capabilities may be temporarily restricted until the required information is provided.
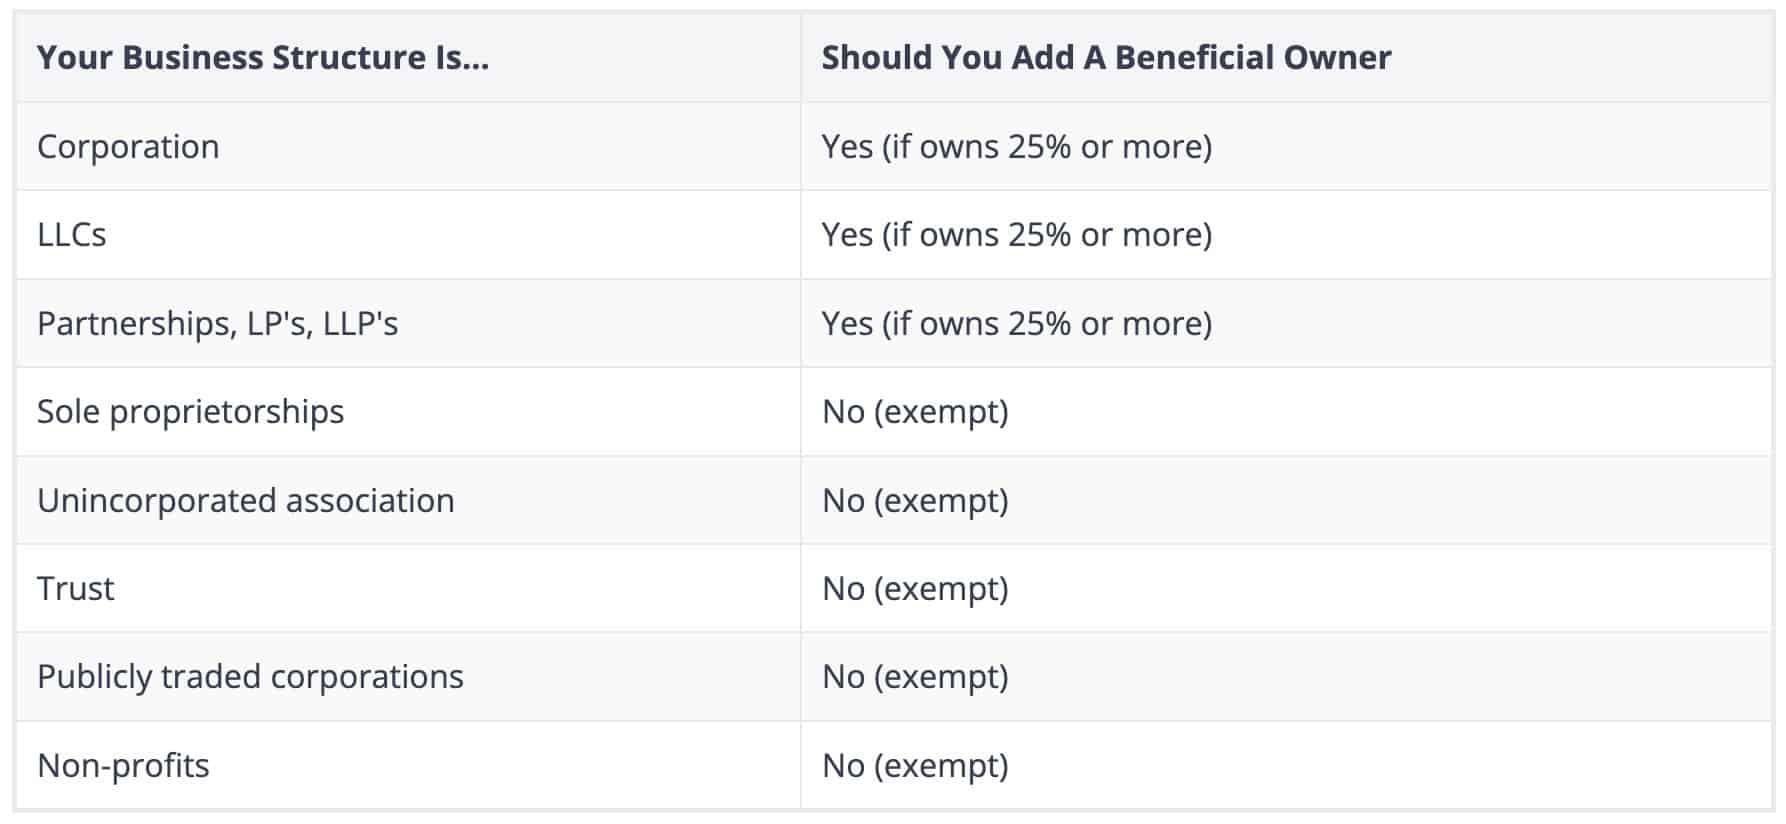
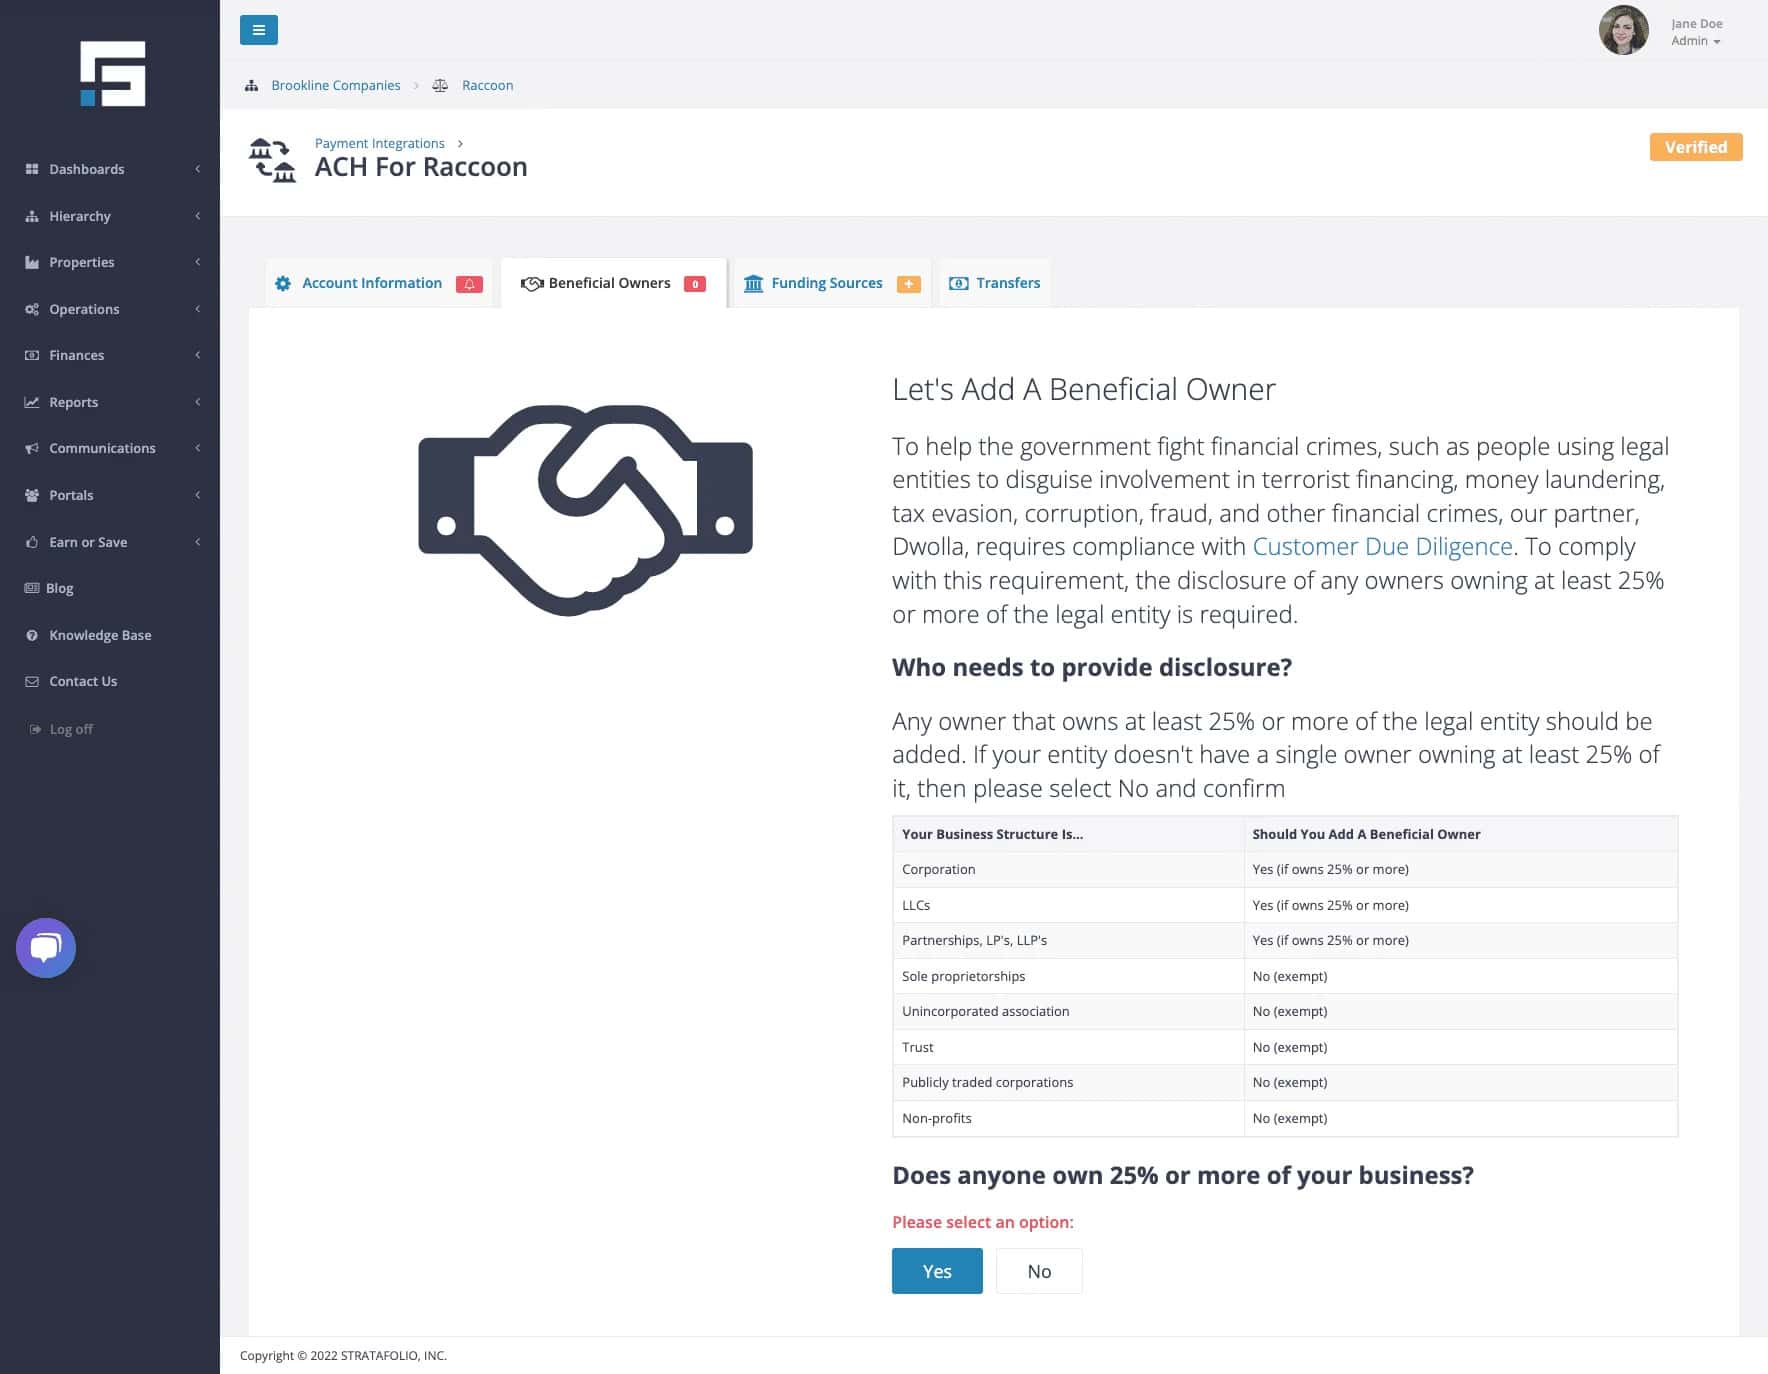
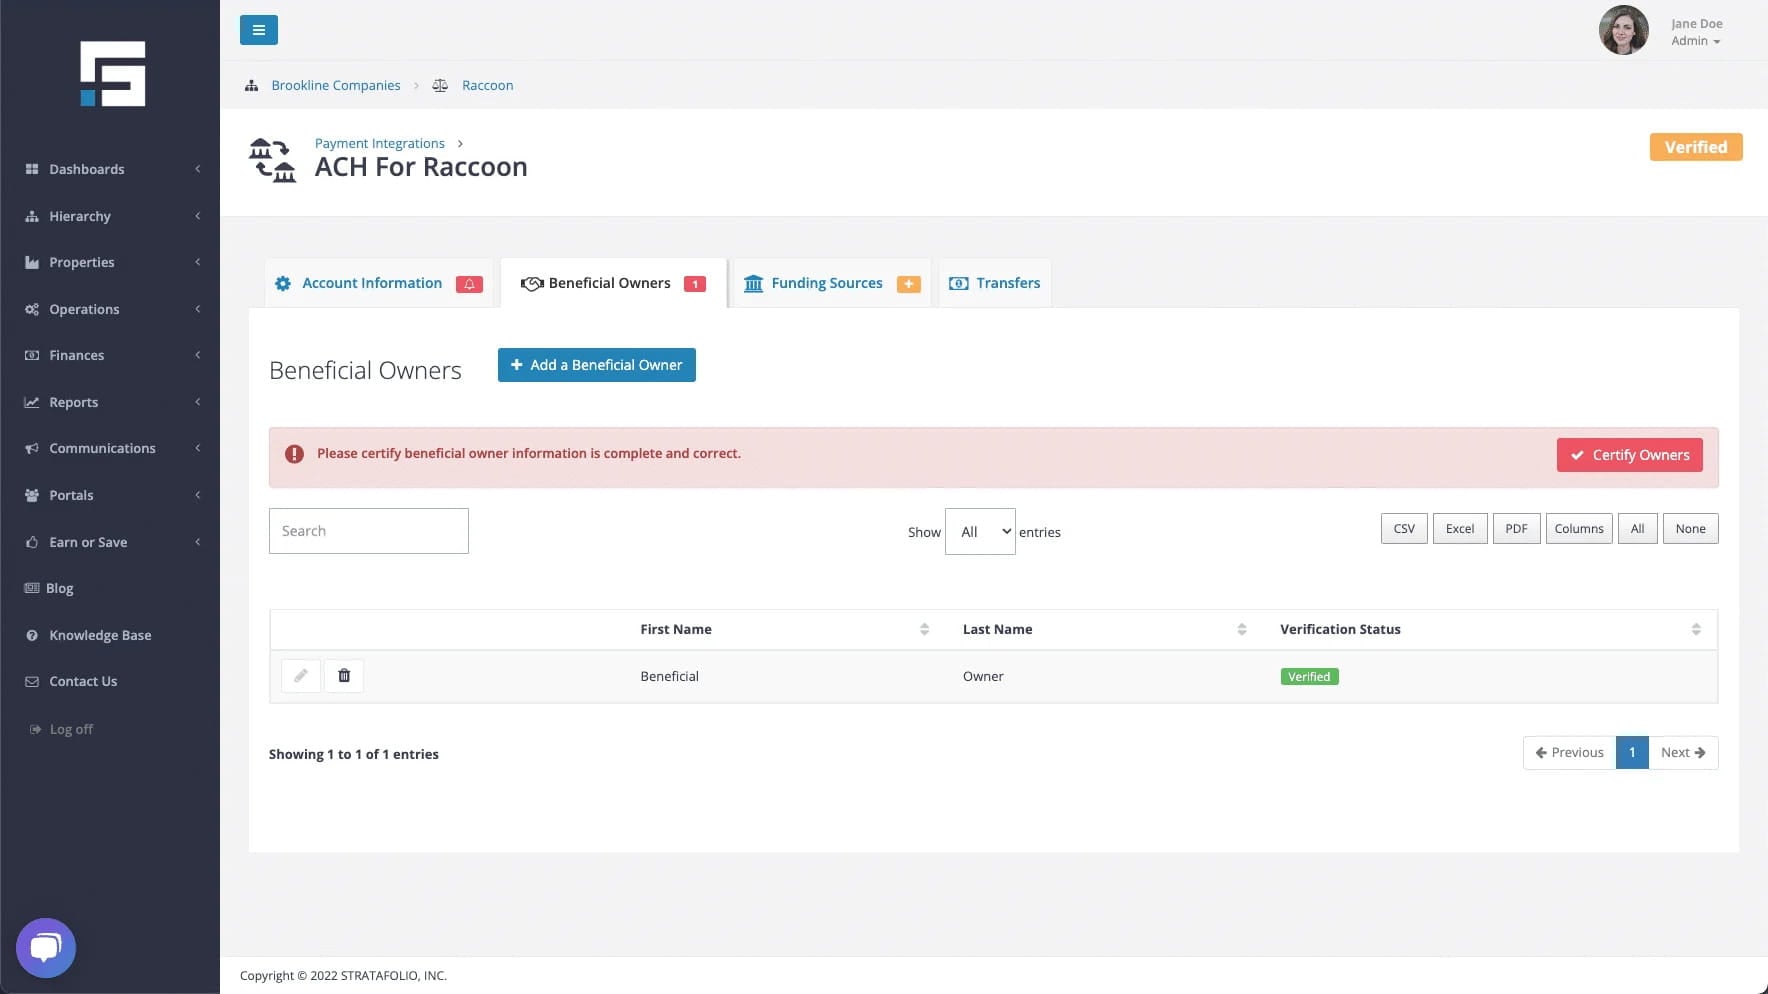
4. Beneficial Owners (depending upon your type of legal entity)
Depending on which type of legal entity you selected in Step 1, you may or may not have to add a Beneficial Owner. To help the government fight financial crimes, such as the use of legal entities to disguise involvement in terrorist financing, money laundering, tax evasion, corruption, fraud, and other financial crimes, our partner, Dwolla, requires compliance with Customer Due Diligence. To comply with this requirement, the disclosure of any owner who owns at least 25% of the legal entity is required.
Who needs to provide disclosure?
Any owner who owns at least 25% or more of the legal entity should be added. If your entity doesn’t have a single owner who owns at least 25%, please select No and confirm.
After you have verified your account and added your ACH source, and only if you selected Corporation, LLC, Partnerships, LPs, or LLPs in Step 1, you will see a new tab called Beneficial Owners appear.
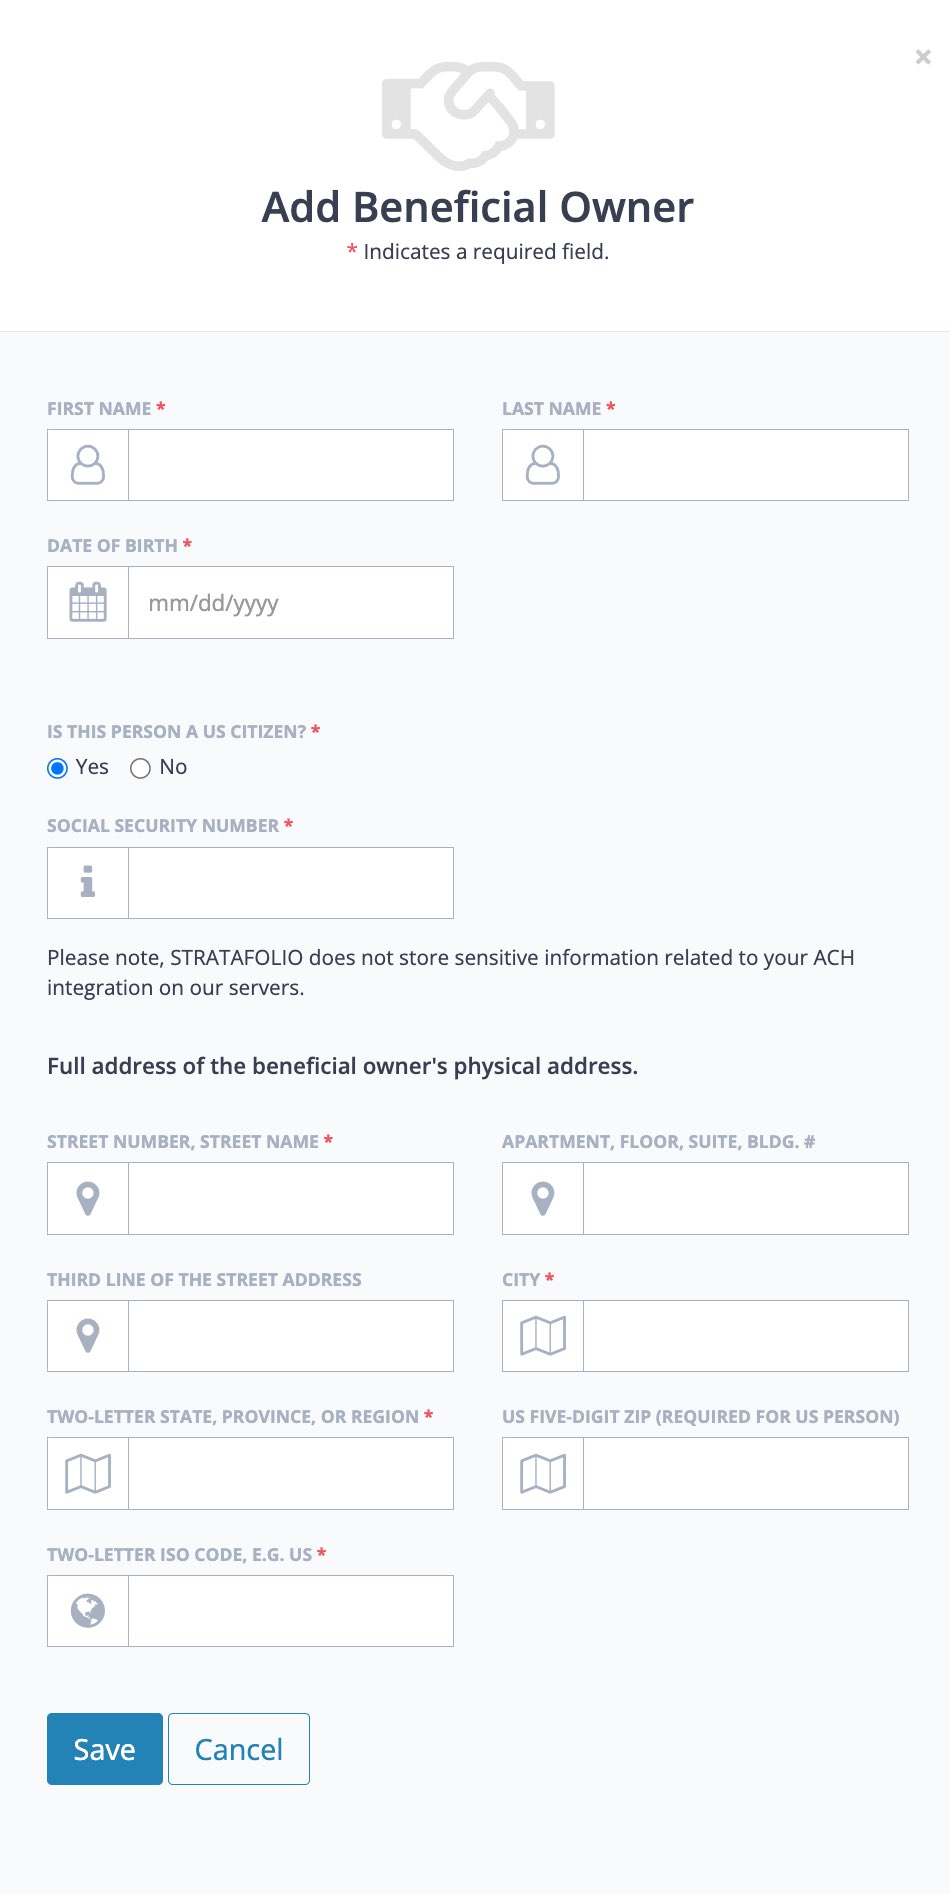
Follow the steps to add up to four Beneficial Owners to your account. If you need to add at least one beneficial owner, then they’ll need to fill out the information below:
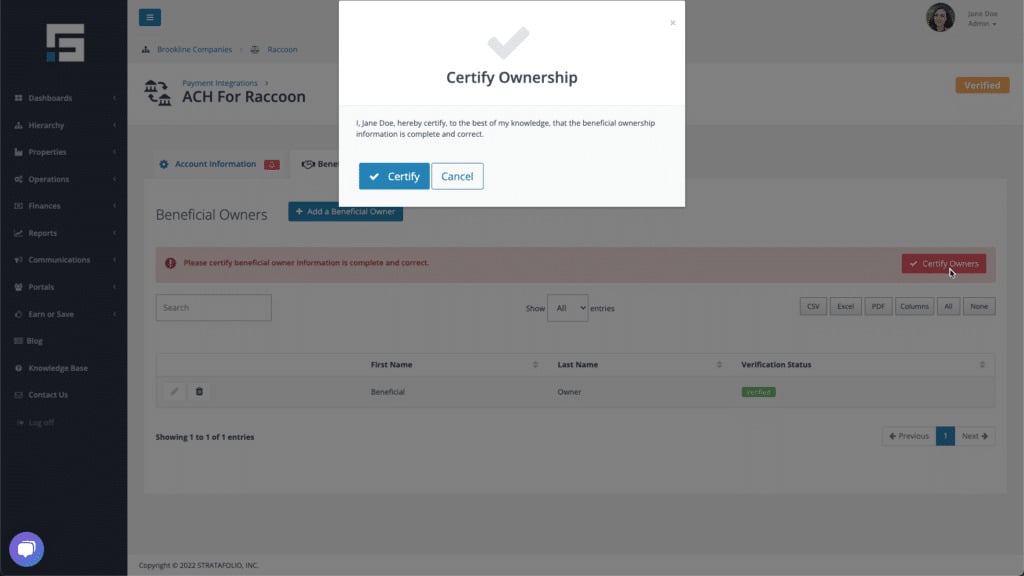
Once you are done adding the beneficial owners, or if you select you don’t have any beneficial owners, then you’ll need to certify that the information is complete and correct.
5. Receive Payment Settings
Once you have added a Funding Source and added Beneficial Owners if it applies to you, return to the ACH Integrations tab to select the bank account where you want your Tenant payments to be deposited. In this step, you will select the funding source you set up in Step 1 and the party that will pay the Tenant fees.
NOTE: This is an entity-wide setting. All tenants within an entity will be treated the same.
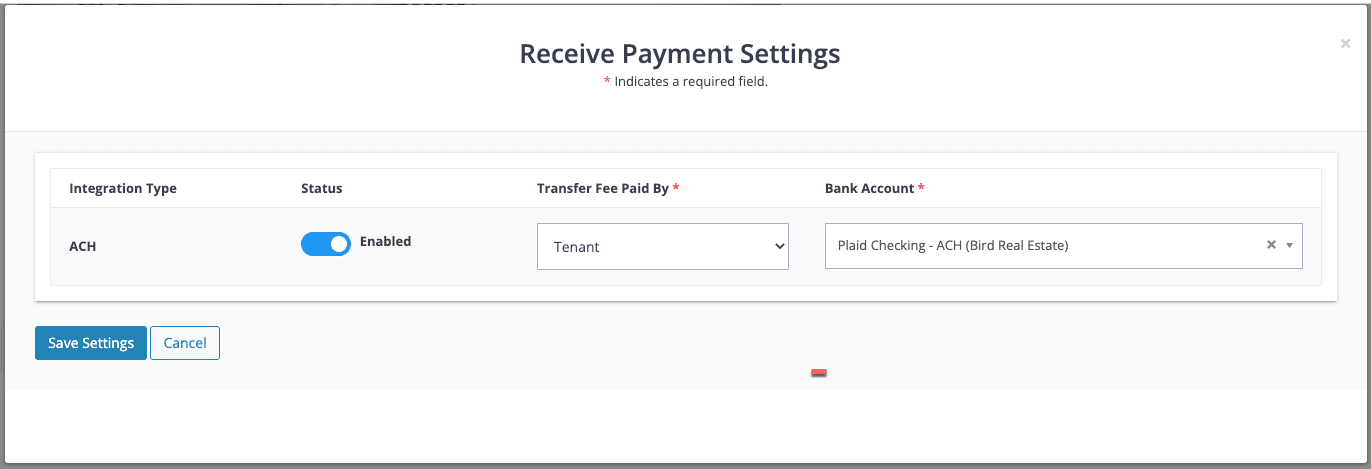
To verify that you’ve completed the setup properly, go back to the ACH Integrations page and you should see the Checking is Enabled and the status is Verified.
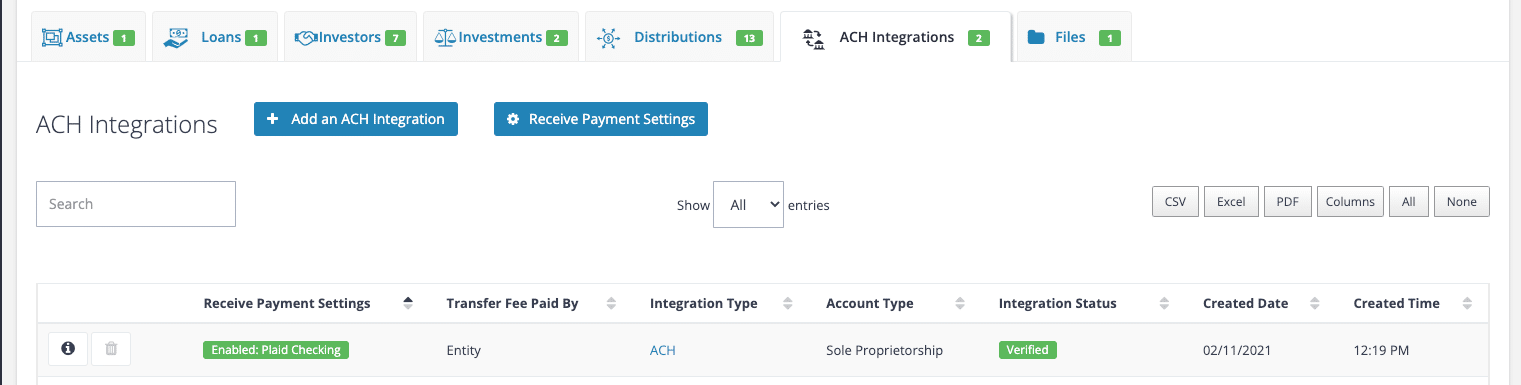
Note: It can take 4-6 business days for the transfer to be deposited into your bank account.
6. Invite Tenant to the Tenant Portal in STRATAFOLIO
Once the Landlord account is set up, the Tenant can be invited to the portal to complete their setup. Depending on the amount of the payment they wish to make, they can set themselves up as Standard users or Premium users. We require different information for each, as explained in the ACH for Tenants article.
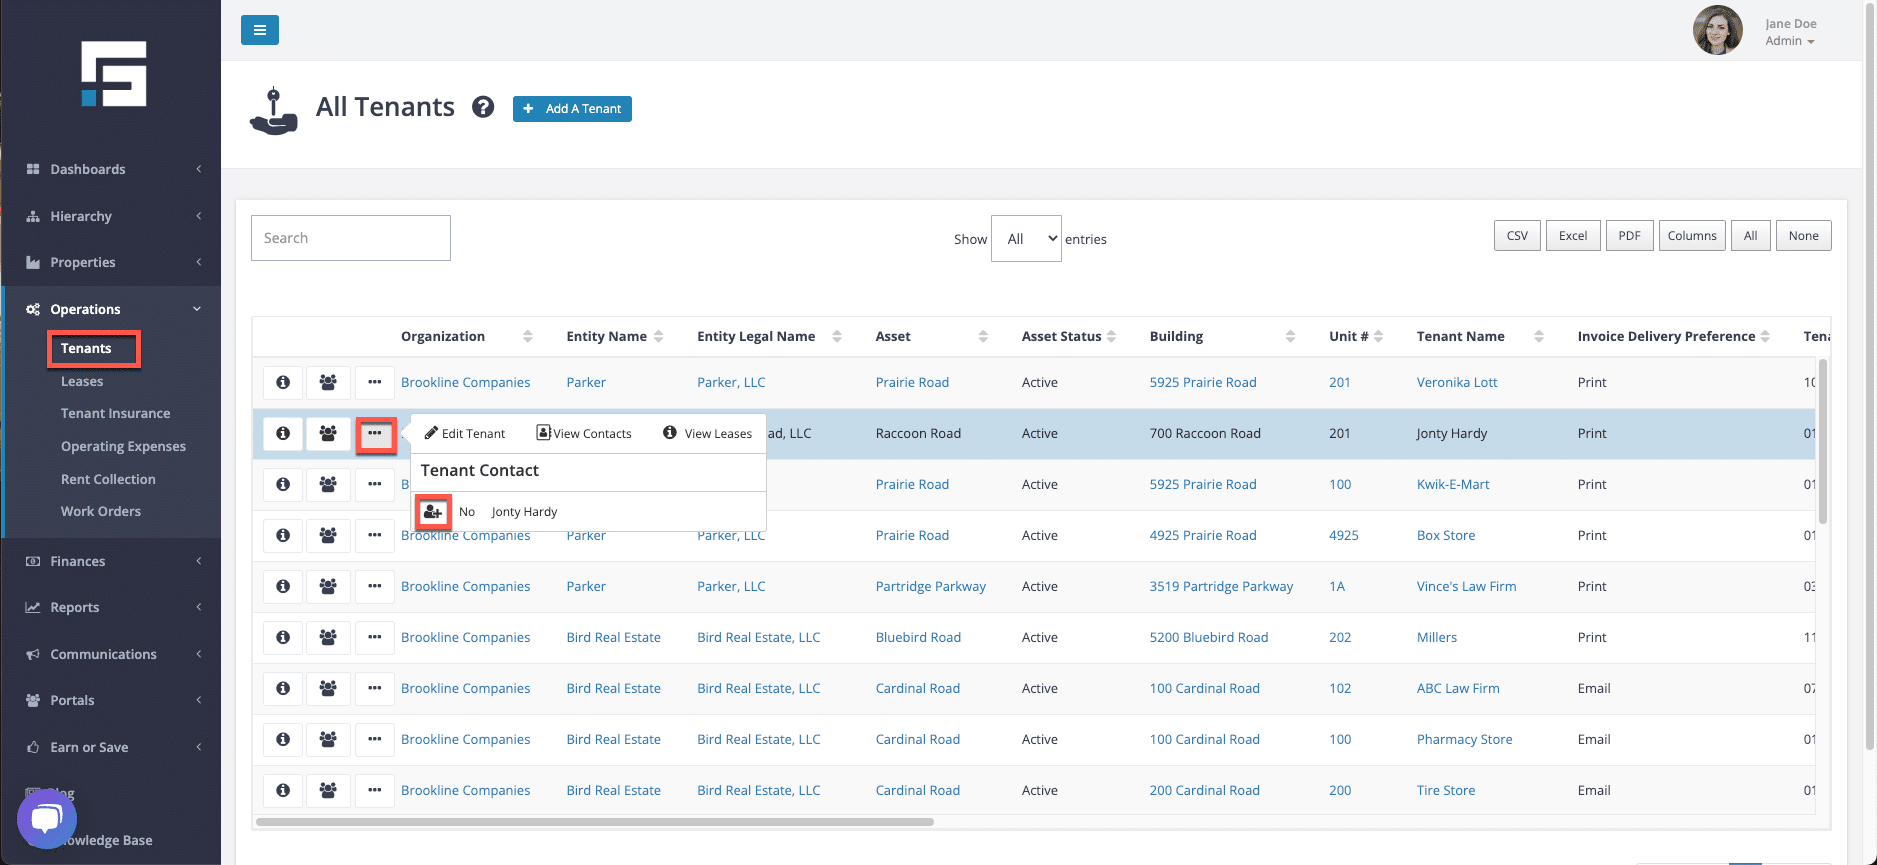
If the Tenant has not yet been given access to their Tenant Portal, as a Landlord, you must make sure they have access by selecting the contact associated with your tenant and selecting the Send Invite to Tenant or Investor Portal button. This will send your Tenant’s contact an email where they will be able to create a STRATAFOLIO account, giving them access to their Tenant Portal. You can invite them from the Tenants button within the Operations drop-down.
For specific information on the tenant setup, or to send it to your tenant for step-by-step instructions, visit the Tenant Payment Integration article in the STRATAFOLIO Knowledge Base. They will also be able to access certain lease details such as files you have shared with them, lease rates (including scheduled escalations), invoices, and past payments.
Notes on ACH for Landlords
- Tenants cannot make payments unless their lease is active and an invoice exists in STRATAFOLIO.
- Payments usually take 4–6 business days to deposit after processing.
- Step 2 (Adding a Funding Source) and Step 3 (Verifying the Account) can be completed simultaneously. Additionally, both Step 2 & Step 3 have to be 100% approved in order for you to enable the ACH for the tenant.
How Do I Fix Rent and CAM Invoices Not Showing
If rent or CAM (Common Area Maintenance) invoices are not appearing for a tenant or unit, it’s usually due to a configuration issue in the lease setup, invoice generation, or user permissions. This article will help you identify and resolve the issue quickly.
Step-by-Step Troubleshooting Guide for ACH as a Landlord
Verify the Lease and Tenant Association if Invoices are Not Showing
Rent and CAM invoices will only generate when the lease is properly connected to both the tenant and the unit.
- From the left-side navigation menu, go to Operations → Leases.
- Select the i icon next to the lease.
- Confirm that the correct Tenant and Unit are linked.
- If the association is missing, edit the lease and connect the proper records.
TIP: Missing associations are one of the most common causes of missing invoices. STRATAFOLIO relies on this connection to create rent and CAM billing schedules.
Check Invoice Generation Settings if Invoices are Not Showing
Invoices are generated according to your billing schedule. If an invoice period hasn’t been generated yet, it won’t appear in the system.
- From the left-side navigation menu, go to Operations → Rent Collection.
- Locate the tenant.
- Select Add Invoices to manually add the missing invoice(s).
- Ensure all applicable income items (Base Rent, CAM, Insurance, Taxes) are included.
NOTE: Any items with a $0 amount will not appear on invoices but may still be included in the CAM Reconciliation Report.
Confirm Tenant Portal Access and Permissions if Invoices are Not Showing
If tenants report not seeing invoices:
- Verify that the tenant has Portal Access enabled.
- Navigate to Contacts → Tenants → Portal Access and ensure the toggle is set to Active.
- Double-check that your user role has permissions to view invoices.
- Administrators and Managers can view all invoices.
- Readers and Tenants may have limited access.
Adjust Filter Settings in Rent Collection if Invoices are Not Showing
Filters in STRATAFOLIO can sometimes unintentionally hide invoices.
- On the Rent Collection index view, select the dropdown filter.
- Remove any restrictive filters (such as specific buildings, date ranges, or statuses).
- Refresh the page to reload all available invoices.
Verify QuickBooks Sync (if applicable)
If your organization syncs invoices from QuickBooks, confirm that the sync has completed successfully:
- Navigate to Hierarchy, then Organizations, and click the i icon next to the main Organization record. Next, go to Integrations → QuickBooks.
- Ensure your connection is active and synced recently.
- Select Sync Now if needed to pull the latest financial data.
Connect the Lease to an Accounting Customer (QuickBooks Integration)
If invoices are missing despite proper lease and tenant setup, the most common cause is that the lease is not linked to an Accounting Customer in QuickBooks.
To fix this:
- Navigate to Operations → Leases from the left-side navigation menu.
- Open the affected lease and select Edit Lease.
- Scroll to the Invoicing section.
- From the Accounting Customer dropdown, select the correct QuickBooks Customer/Tenant.
- If your company uses Classes in QuickBooks, select the appropriate Class as well.
- Select Save.
- After saving, choose the Invoices tab in the Lease or Rent Collection page to confirm the invoices now appear.
NOTE: You must repeat this step for each lease missing an Accounting Customer. Invoices cannot be added or synced until this link is established.
If the Problem Persists with Processing ACH Payments
If invoices are still missing after completing these steps, your account may need to be reviewed by our onboarding or data support team. Please submit a ticket to the Support team for further assistance.