STRATAFOLIO offers simple, streamlined invoicing in our software. First, our software seamlessly pushes all invoices to your QuickBooks Online accounts, typically within minutes. Also, since STRATAFOLIO integrates all your QuickBooks accounts in one place, you can use bulk invoicing to add invoices across all your QuickBooks accounts with just a couple of clicks. Finally, when you add invoices in STRATAFOLIO, the system automatically captures rent changes and escalations, ensuring you never miss any. This article walks you through adding an invoice in STRATAFOLIO that syncs seamlessly with QuickBooks.
Why You Should Invoice Your Tenants
It is best practice to add monthly invoices for all your tenants in your QuickBooks. This does not mean you have to send the invoices to the tenants, but that they should have an invoice added. This helps with the following:
- Verifying that you are invoicing the tenant for the correct amount of Rent and NNN Charges
- Make sure that you are not missing any escalations of rent
- Checking to make sure that the tenant is paying their invoices on time
- It is better business practice to show a paper trail for all Rent and NNN Charges if ever needed
In STRATAFOLIO, we show all payments collected from the tenants on a cash basis. This is another reason to ensure you add invoices to your QuickBooks or STRATAFOLIO each month. We will not display Sales Receipts or A/R reports, so the Invoices are the best way to track all payments due to your organization.
How to Invoice in STRATAFOLIO
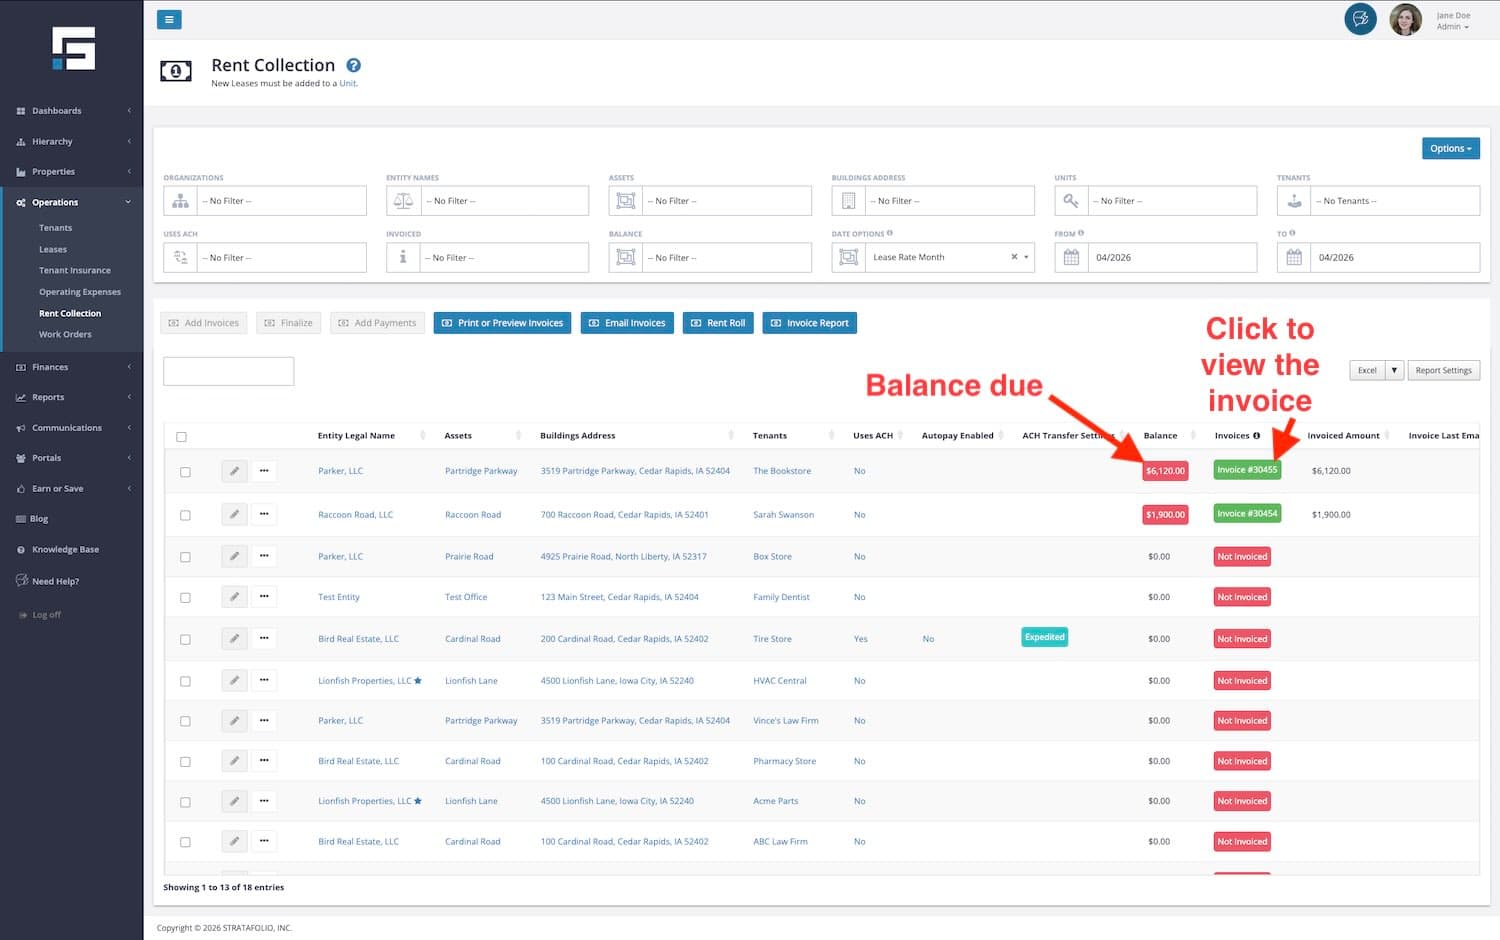
To begin invoicing through STRATAFOLIO, navigate to the Rent Collection page by navigating to Operations, then Rent Collection in the left-hand navigation panel.
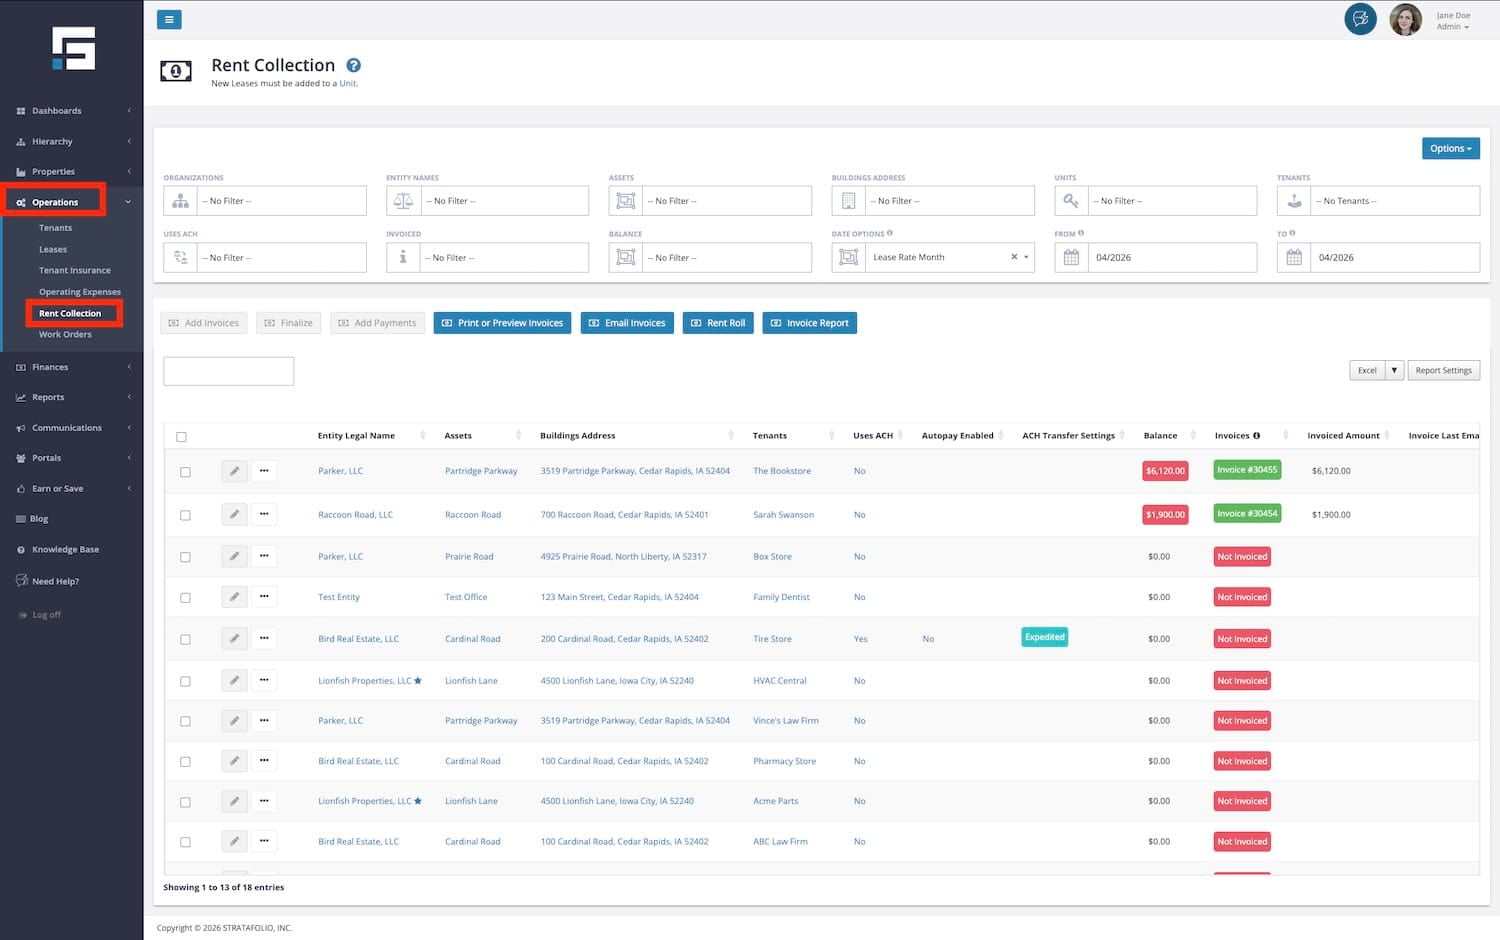
Rent Collection Page
The Rent Collection page offers a wealth of helpful information and search options. You can search by Organizations, Entities, Assets, and more, as well as by invoice status (not invoiced, draft, sync error, sync in progress, or finalized) and invoice balance (overdue, current, or credit). The Rent Collection page also shows the balance due for each invoice, and you can select the invoice number to open a detailed view of the invoice.
Verify That You Have Not Yet Added the Invoice Before Adding Invoices
TIP: When you first navigate to the Rent Collection page, the dates will always default to the next month, starting on the 16th of each month. Example: If today’s date is May 3, the default dates on the Rent Collection page will be May 1 to May 31. If today’s date is May 16, the default dates will be June 1 to June 30.
The first step is to verify that the Date Options and then the From and To date filter options at the top of the Rent Collection table cover the correct range for the invoicing period, so you can check whether the system has already generated an invoice for the selected period. If not, proceed to add the invoice.
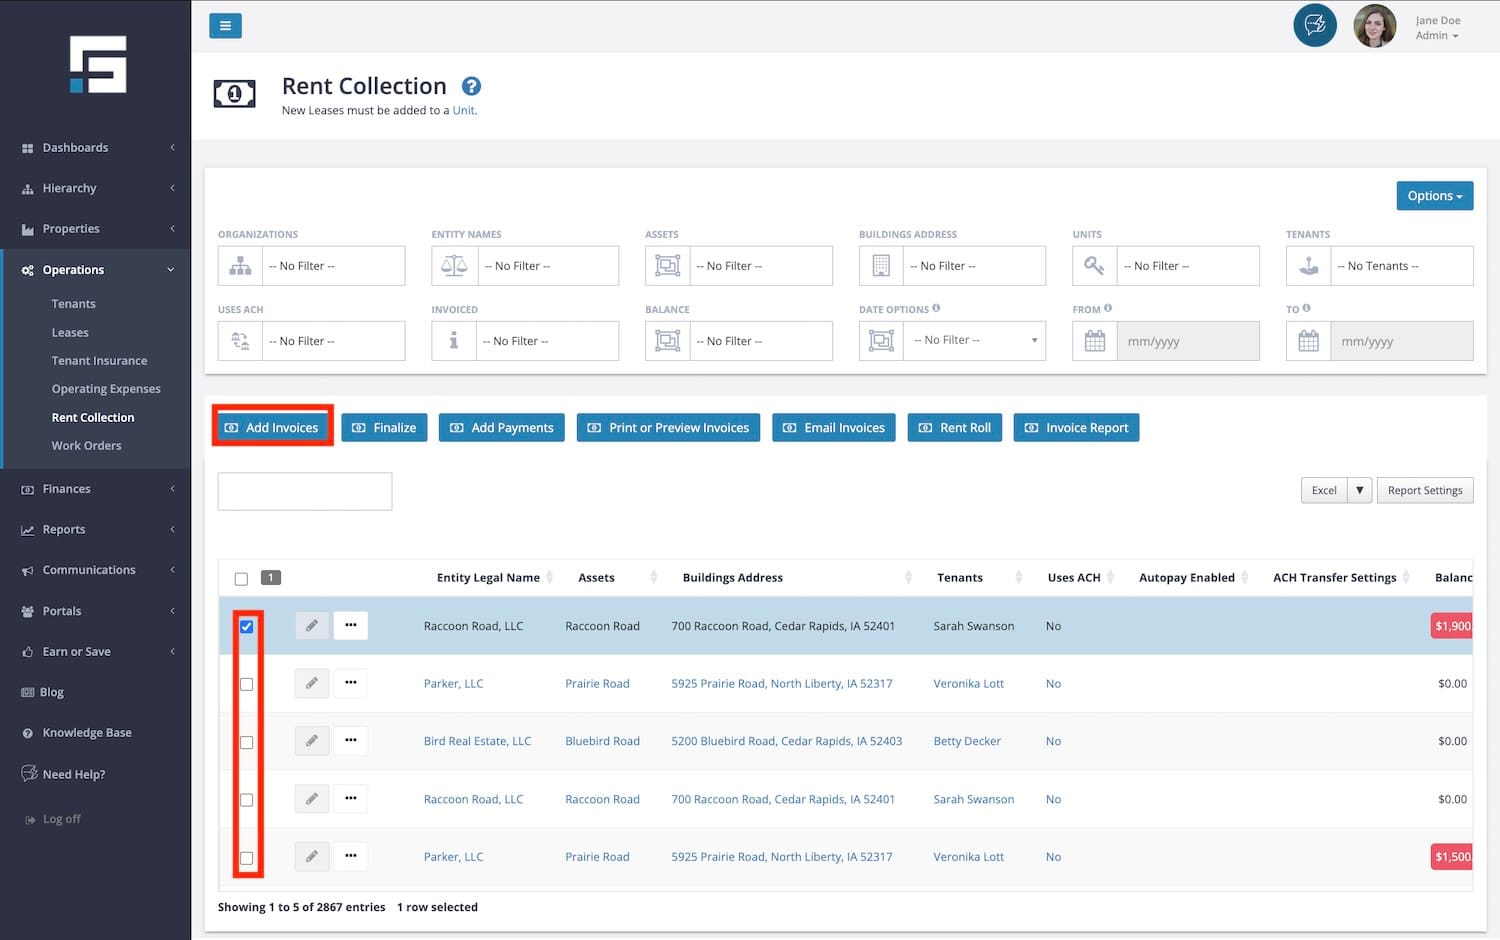
Select Invoice(s)
- Select the checkbox next to each lease, or select all the leases shown in the table by selecting the checkbox in the table header. Filter the table view using the Date Filter dropdown menus at the top, and show invoices for the month associated with the lease rate period.
- You can add a single invoice to a single lease, allowing you to update more items when creating that invoice. We explain this in more detail in the Creating a Single Lease section below. Or, you can select multiple or all your leases at once and generate invoices in bulk for the selected leases. The Bulk Invoicing section of this Knowledge Base, provided below, also explains this.
- Each one of the selected leases will generate a separate invoice containing all the correct charges and OpEx for that period. such as (income item, rent rate, CAM amounts, etc.).
- Once you have selected the lease or all the leases you want to add an invoice to, select the Add Invoices button.

How to Create a Single Invoice
If you select one invoice using the steps above, the Add Lease Invoice pop-up window will open. This window automatically fills in most fields with the information you provided for Lease Rate and OpEx when you entered the lease into STRATAFOLIO.
A description of each field is below:
- Invoice Date (required) – The posting date used in QuickBooks. It is NOT the due date. It defaults to today’s date, but you can adjust it as needed, for example, to the 1st of the month to align with the invoice date.
- Due Date (required) – This is the date the lease specifies for payment, such as the 1st of the month.
- Accounting Software Customer (required) – The Accounting Software Customer is the Customer in the QuickBooks account and selected in STRATAFOLIO when you entered the Tenant’s information.
This section of the invoice includes the information you already entered for the Lease in STRATAFOLIO.
- Income Item (required)- This is the Income Item you created in QuickBooks for posting this line item. The system automatically populates the Income Item based on the lease information you set up in STRATAFOLIO.
- Classification -If applicable, the system will automatically fill in the Classification based on the lease information you enter in STRATAFOLIO. Ensure that this aligns with the Class you set up in QuickBooks for posting this invoice.
- Description – Add a description if desired. For example, “July 2021 Rent.”
- Amount (required) – The system will automatically calculate the Amount based on the lease rate and/or the operating expenses for the selected time period. You can adjust this amount if necessary. The amount for Rent and OpEx will reflect any escalations entered for that lease period.
TIP: Remember to update the Lease Rate and OpEx whenever there is a change to the lease!
- Add Line Item Button – If needed, choose this to add an additional line for billing. For example, a one-time payment for utility reimbursement or a late fee.
- Invoice Message – Add a message if needed. This will appear at the bottom of the invoice. If you do not input anything in this field, whatever is on the QuickBooks template will be on the invoice. Otherwise, if you put a message here, it will override the invoice template in QuickBooks.
- Statement Message – Add a message if needed. This will appear on the statements created in QuickBooks.
- Save Draft – Select Save Draft to save the invoice(s) without syncing them with QuickBooks. This option allows you to add the invoice and return later to make changes. Or,
- Save and Finalize to save the invoice(s) and sync them with your QuickBooks accounts. When you select the Save and Finalize button, a confirmation pop-up appears, asking you to confirm you want to finalize the invoice.
NOTE: Once you finalize an invoice, STRATAFOLIO will sync it with QuickBooks, and you will need to make any further changes in QuickBooks.
TIP: After you create an invoice, it can take a short time for a new invoice and any related payment information to appear on the Rent Collection page. If you do not see your update right away, this is completely normal and does not mean anything went wrong. The page will catch up on its own, so there is no need to re-enter anything. You can refresh the page after a few minutes to see the latest information.
How to do Bulk Invoicing
With bulk invoicing, you can send an invoice online across multiple QuickBooks accounts in just a few clicks.
Select more than one lease, then select the Add Invoices button 
NOTE: All information you enter on this page will apply to all selected invoices.
- Invoice Date (required) – The posting date used in QuickBooks. It is NOT the due date. It defaults to today’s date, but you can adjust it as needed, for example, to the 1st of the month to align with the invoice date.
- Base Rent Description – If desired, add a description. For example, “July 2021 Rent.” This will be the same on all invoices.
- Invoice Message – Add a message if needed. This will appear at the bottom of the invoice. If you do not input anything in this field, whatever is on the QuickBooks template will be on the invoice. Otherwise, if you put a message here, it will override the invoice template in QuickBooks.
- Save Drafts – Select Save Drafts to save the invoice(s) without syncing them with QuickBooks. This option allows you to add the invoice and return later to make changes. Or, Save and Finalize to save the invoices and sync them with your QuickBooks accounts. When you click the Save and Finalize button, a confirmation pop-up will appear, asking you to confirm that you want to finalize the invoices.
TIP: Just created an invoice? Give it a few minutes. It can take a short time for your new invoice and any payment information to show on the Rent Collection page. There is nothing extra you need to do, and refreshing after a few minutes will show the latest update.
How to Finalize a Draft Invoice
If you select Save Draft instead of Save and Finalize when creating a single or bulk invoice, the system will mark it as a Draft and highlight it in red in the Invoices column.
- You can only edit draft invoices in STRATAFOLIO until you finalize them.
- You must finalize draft invoices in STRATAFOLIO to sync them with QuickBooks.
Select the invoice from the list, then choose the Finalize button
After you select the Finalize button, a pop-up will appear, prompting you to confirm that you want to finalize the invoice.
Your invoice will not show in QuickBooks until STRATAFOLIO completes a sync with your account. If you are using QuickBooks Online, this will usually happen within minutes. If you are using QuickBooks Desktop, you need to run the Web Connector and sync the account to finalize it, so it appears in both STRATAFOLIO and QuickBooks.
This article serves as a step-by-step guide to creating invoices for small business owners and commercial real estate managers who want accurate, efficient billing. Other articles that may be helpful include: How to Turn Off Custom Transaction Numbers in QuickBooks Online, Adding Invoice Payments in STRATAFOLIO, and Tracking Paid & Overdue Invoices in STRATAFOLIO.
Creating Monthly Routine Invoices
To maintain a consistent invoicing schedule:
- Generate invoices for upcoming months using the same steps as above.
- When selecting the billing period, adjust the dates to match the future month(s) you need to bill.
- Save each invoice once the details are correct.
This lets you prepare rent invoices in advance and ensures STRATAFOLIO creates all future billing periods and has them ready according to your schedule.
How Do I See if STRATAFOLIO Emailed a Tenant an Invoice
STRATAFOLIO gives you multiple ways to confirm whether a tenant has received their invoice via email. This feature is important for ensuring you bill tenants correctly, for resolving questions about whether a tenant received an invoice, and for maintaining clear accounting records.
You can verify invoice email activity in three different methods within STRATAFOLIO:
- In Rent Collection, using the “Invoice Last Emailed Date” column
- In the Invoice Activities tab, when you open an invoice directly
- In the Lease record, when you open the Invoice
Ensure Contacts Can Receive Invoice Emails
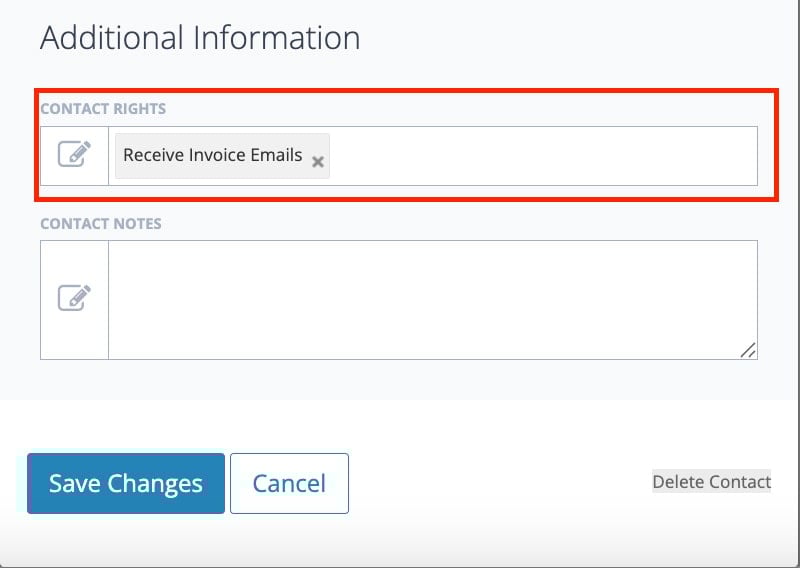
Before you can email invoices, you must enable the ‘Receive Invoice Emails’ permission in the tenant’s associated contact under Contact Rights.
- If this box is not checked, STRATAFOLIO will not send invoices to that tenant’s email.
- When you try to email invoices, STRATAFOLIO will alert you to any errors.
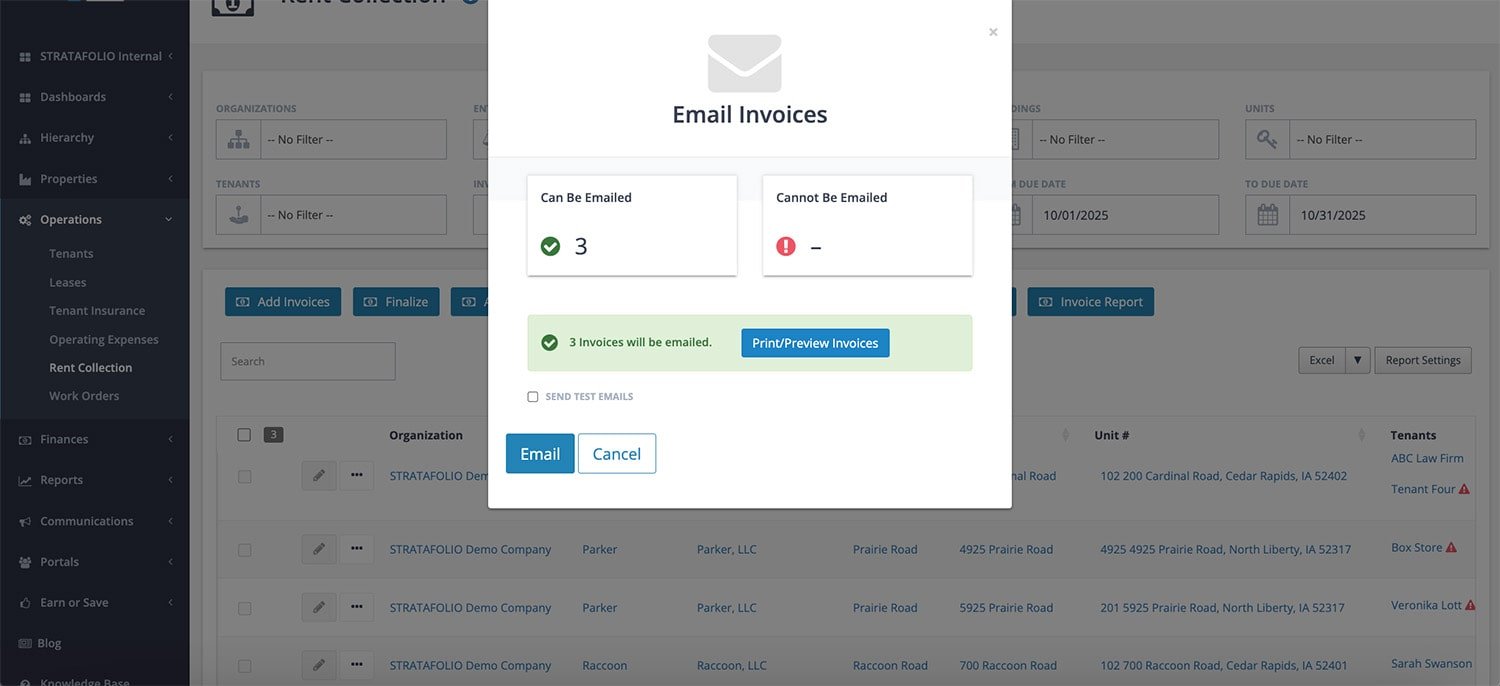
For example, the Email Invoices pop-up that shows when you attempt to email an invoice clearly indicates which invoices you can email and which you cannot. If you cannot email an invoice, an error message will appear along with the option to Download Errors for troubleshooting.
To check if the contact can receive invoices via email, simply navigate to Contacts under Hierarchy in the left-side navigation menu, locate the contact, and scroll to the right, and find the column that says “Contact Rights,” where you should see “Receive Invoice Emails” if this has been enabled.
Check if STRATAFOLIO Emailed an Invoice via Rent Collection
- Navigate to Operations > Rent Collection in the left-side navigation menu.
- Locate the tenant in the Rent Collection table.
- Scroll to the right (depending on your column order) until you find the Invoice Last Emailed Date column. This date confirms the last time STRATAFOLIO successfully emailed an invoice to the tenant.
- For more details, select the invoice number to open the invoice.
- In the pop-up window, select the Invoice Activities tab.
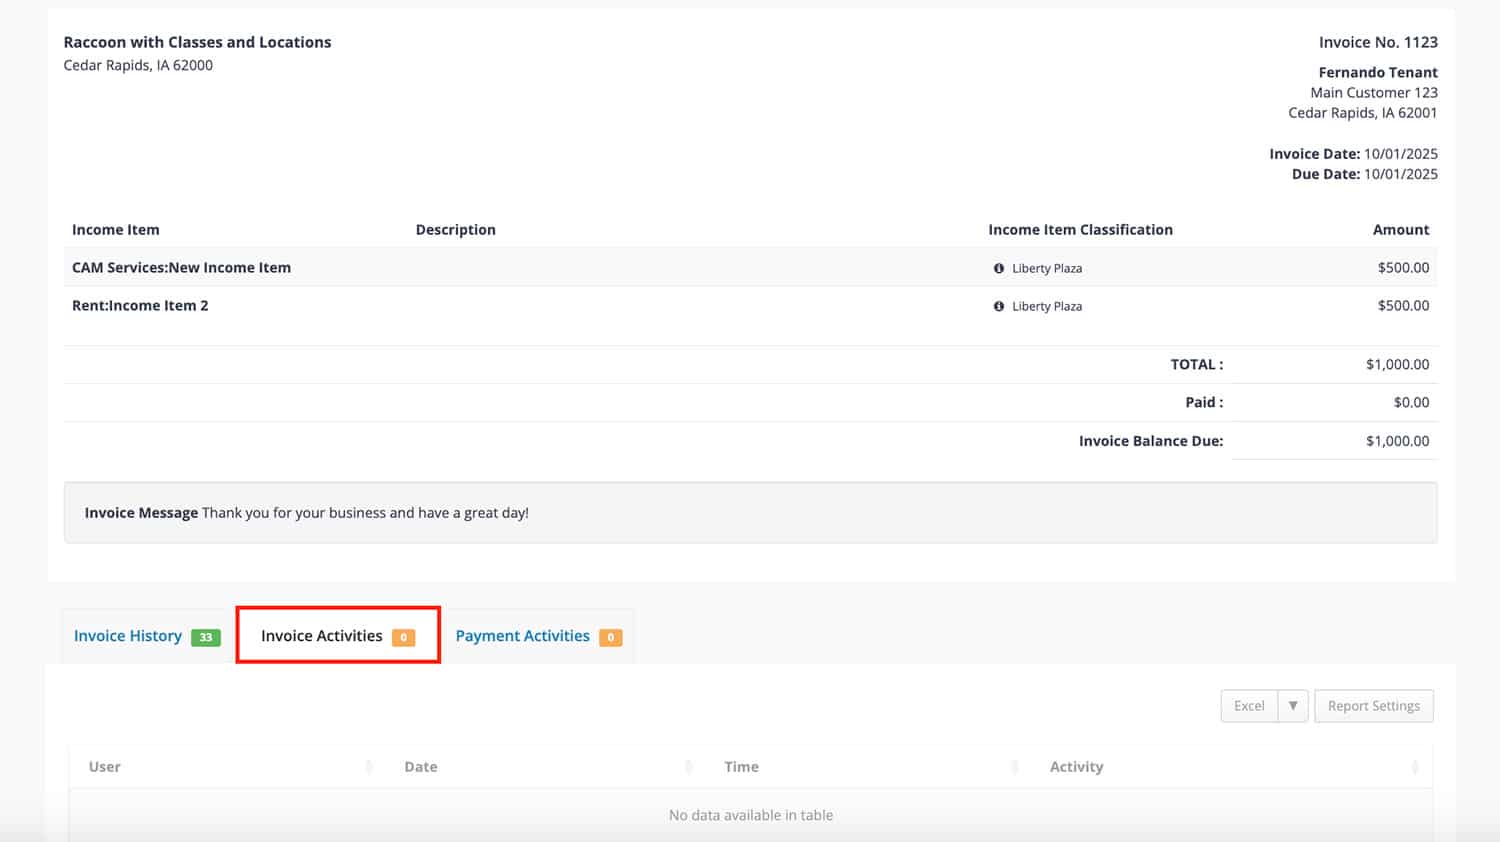
The Invoice Activities log provides a complete history, including:
- The date and time STRATAFOLIO emailed the invoice.
- The STRATAFOLIO user who sent it.
- The exact email address to which STRATAFOLIO delivered the invoice.
This makes it easy to confirm email delivery or identify if you still need to resend an invoice.
Check if STRATAFOLIO Emailed an Invoice via the Lease Record
You can also verify email activity from the lease record itself.
- Navigate to Operations > Leases in the left-side navigation menu.
- Locate the lease and select the i icon to open it.
- Select the Invoices tab.
- Open the invoice in question.
- Select the Invoice Activities tab.
As with Rent Collection, you’ll see a log showing the full history of invoice emails for that specific lease.
Check if STRATAFOLIO Emailed an Invoice by Opening It Directly
Anytime you view invoices in STRATAFOLIO, you can simply choose the Invoice Activities tab to check the log for when STRATAFOLIO last emailed each invoice.
What to Do if an Invoice Wasn’t Emailed
If an invoice does not send, STRATAFOLIO provides tools to quickly identify and resolve the issue.
Check Contact Rights
- Select the tenant’s associated contact profile. Navigate to Edit Contact to open the pop-up and see all the information on the contact.
- Confirm that you have enabled ‘Receive Invoice Emails’ under Contact Rights.
- If it is not enabled, update the setting and try resending the invoice.
Download Error Report
- When emailing invoices, if you see an error message, select the Download Errors button.
- The error file will provide details on why STRATAFOLIO could not send the invoice.
- Common issues include missing email addresses, incorrect permissions, or outdated contact records.
Verify Email Information
- Double-check that the contact’s email address is correct and up to date.
- Ensure the tenant has at least one valid contact set to receive invoices.
Resend the Invoice
- Once you’ve corrected the issue, return to the Rent Collection table and select Email Invoice again.
- Confirm delivery by reviewing the Invoice Activities tab.
Why Checking if Invoices Have Been Emailed Matters
- Improved Communication: Tenants receive invoices on time, reducing payment delays.
- Accurate Records: Invoice Activities provide a reliable audit trail for accounting purposes.
- Faster Troubleshooting: With error reporting and contact rights, you can quickly fix issues and resend invoices.
By using Rent Collection, the Lease record, or the Invoice Activities log, you can always verify if STRATAFOLIO emailed an invoice to a tenant. And if something goes wrong, STRATAFOLIO provides clear tools, such as contact permissions and downloadable error reports, to help you resolve the issue and keep your invoicing process running smoothly.