Tracking lease rates is essential to your business. This will help you avoid missed lease escalations.
It is important to enter all your Lease Rates in STRATAFOLIO, as it helps ensure you will be notified when leases are about to expire and rent escalations are due. Additionally, having the Lease Rates in STRATAFOLIO allows you to Invoice from STRATAFOLIO, saving you time and ensuring that escalations are automatically updated on the invoice.
How to Add a Lease Rate
Navigate to the Lease
In this view, you can track all past and current leases and their current lease rates. To add a lease rate, first navigate to the lease that needs to be updated. Start at the left-hand navigation panel and select Operations, then Leases. Next, select the i next to the Lease you want to update.

Add a Lease Rate
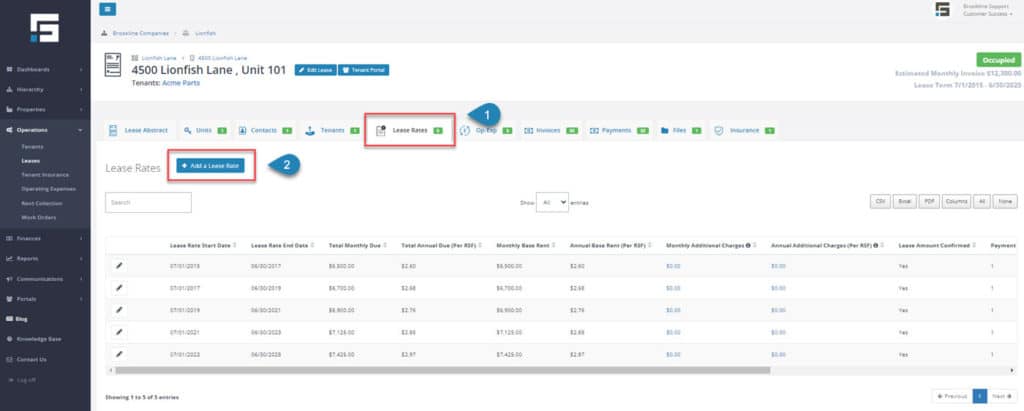
Once on the lease details page, navigate to the Lease Rates tab. On the Lease Rates tab, you will see a list of the lease rates already added to STRATAFOLIO. Click on the Add a Lease Rate button to add an additional lease rate.
NOTE: You can also edit any of the Lease Rates from this page by clicking the pencil button next to one of the lease rates.
Enter Lease Rate Information
The Add Lease Rate popup appears after clicking the Add a Lease Rate button. Three sections to the Add Lease Rate popup window are discussed, below. Red asterisks indicate the required information.
Section 1: Lease Rate
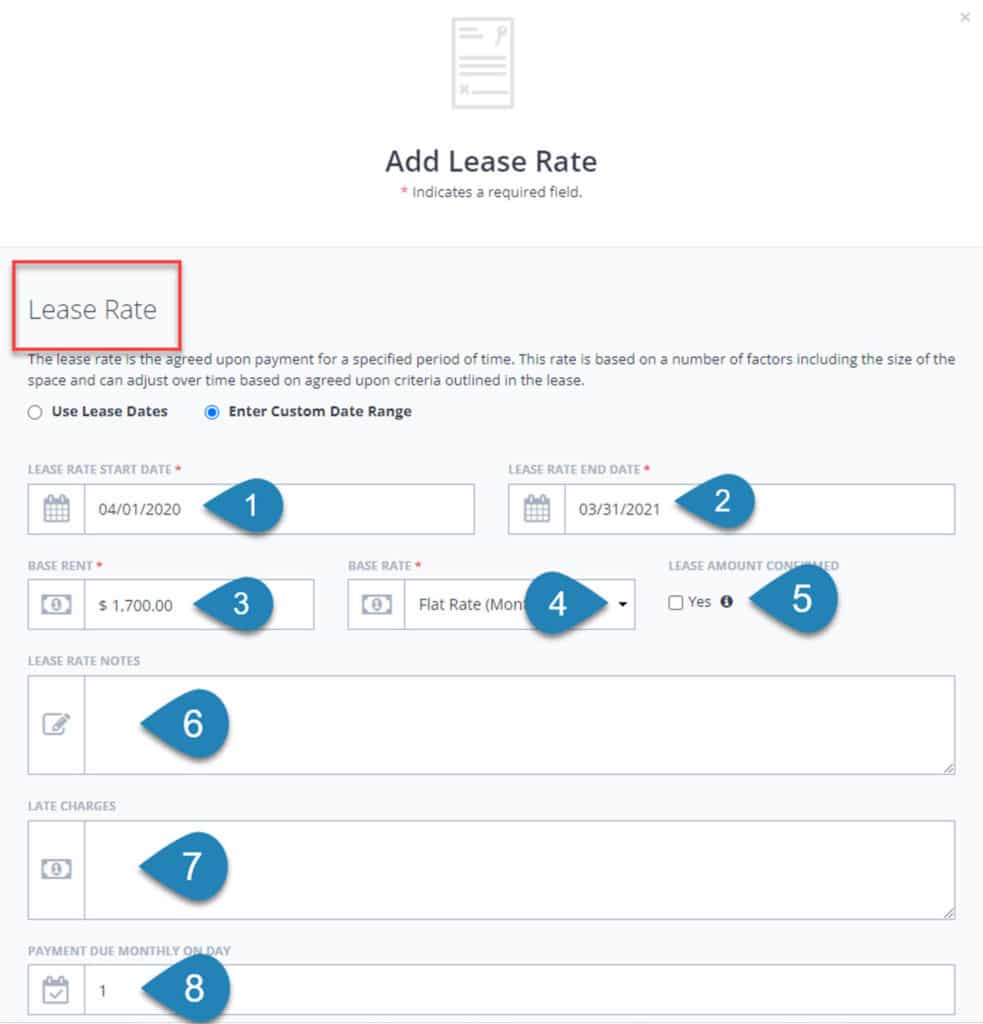
The first section requires basic lease rate information and offers space to include additional notes about the lease rate. Information to enter in this section includes:
- Lease Rate Start and End Dates – The start and end dates will automatically populate to the next 1 year from the prior lease rate entered. You can update these fields as needed.
NOTE: These dates must be within the dates entered for the Lease Term. (Find the Lease Term on the Lease Abstract tab in the image above.) - Base Rent and Base Rate – First, select the Base Rate that applies: Per RSF (Annually) or Flat Rate (Monthly). Then enter the corresponding Base Rent in dollars.
- Lease Amount Confirmed Button – Check this button to confirm the lease rate, or leave it unchecked to receive an email notification a month before the new rate goes into effect. Leaving the button unchecked will allow you to be notified and then update any lease rate escalations that may need adjustment due to negotiations with the tenant or changes to the Consumer Price Index (CPI).
- Lease Rate Notes – Use this box for any notes about the Lease Rate. It is often used to note where the lease rate can be found, for example, “Original Lease – Years 1-5.”
- Late Charges – Use this box for any notes about Late Charges for this lease. An example entry is: “Late Charges – $100 or 10% of the amount due, whichever is larger. NSF Fee – $25.00”. If no late fee is stated in the lease, “Late Charges – Lease is silent.”
- Payment Due Monthly on Day – Enter the day the payment is due. For example, “1” indicates that rent is due on the first day of the month.
Section 2: Invoicing
The next section is for Invoicing through STRATAFOLIO. In this section, you should select the Income Item that corresponds with the Income Item you have set up in your QuickBooks. This is the line item that you post the income for rent to in QuickBooks. If this was entered for a prior Lease Rate, it will automatically be carried into this new rate.
Advantages to Invoicing directly from STRATAFOLIO:
1. STRATAFOLIO will automatically capture Lease Rate escalations.
2. STRATAFOLIO offers bulk invoicing which allows you to invoice across all your QuickBooks integrations at one time.
3. STRATAFOLIO syncs the invoices with your QuickBooks accounts.
4. Accepting invoice payments in STRATAFOLIO streamlines the process and syncs with QuickBooks.
5. STRATAFOLIO offers an ACH Payment Integration, which streamlines the rent collection process.

Section 3: Additional Charges
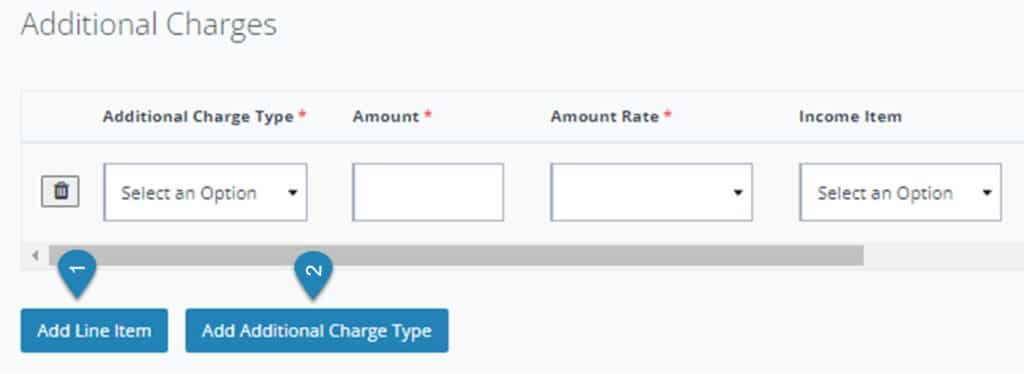
The final section in the Add a Lease Rate popup allows you to add Additional Charges to the rate. Examples include an extra monthly garbage fee for a restaurant, repayment of a rent deferment from a prior period, or a monthly additional parking fee. Additional Charges appear in a separate line on the invoice but are NOT part of operating expenses.
To add an Additional Charge to the invoices, click Add Line Item or Add Additional Charge Type. If there is already an Additional Charge Type created, select the Add Line Item. If not, you will need to create the item with the Add Additional Charge Type.
Once the Add Line Item is selected, add the required information for the Additional Charges:
- Additional Charge Type – Select from the drop-down menu the charge types that have been created. If none are correct, click the Add Additional Charge Type button to add a new charge type. Then come back and select the correct charge type.
- Amount and Amount Rate – Enter the amount and choose the rate: Per RSF (Annually) or Flat rate (Monthly).
- Income Item and Income Classification – Select the Income Item corresponding to the income item on the invoice in Quickbooks. If an additional charge is added, an example would be “Storage,” “Garbage,” or “Parking Rent.” Select the Income Classification if applicable.
- Note – Add a note if needed for this rate.
Saving the Lease Rate
Once all the above information has been entered, click the Add Lease Rate at the bottom of the popup window, wait for your page to refresh, and the new Lease Rate will appeared at the bottom of the list.
Lease Rates Tips and Tricks
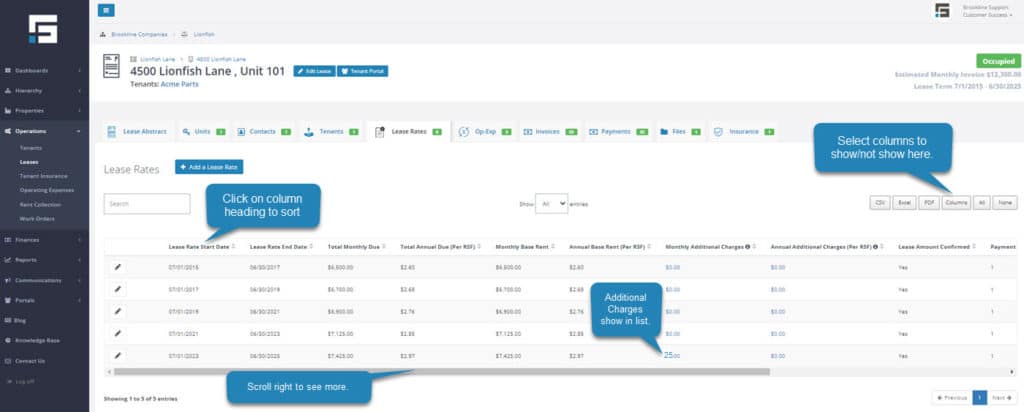
Some additional tips and tricks to make adding Lease Rates easier.
- After entering the first additional lease rate, you can follow the steps above and select Add New Lease Rate. This will enter the next rate to start on the day following the last rate entered. Each lease rate will be one year unless the end date is changed.
- On the bottom of the Add New Lease Rate page is a button for Create Another Lease Rate After Saving. If there are multiple lease rates to add, select this button. When saving the page, a new one will appear for you to enter the next lease rate. This is especially helpful when a lease escalates yearly!
- The lease rate end date can not go past the lease’s end date. If entering a date past the end of the lease, an error message will pop up for you not allowing the lease rate to be saved.
- The lease rate can not start before the lease starts either. The same error message will appear if the date is outside the lease start and end dates.
- When amending or renewing a lease, a new lease does not need to be entered. Update the lease terms before you can enter the new lease rates. See the Knowledge Base article How to Input a Lease Extention/Amendment for more helpful hints.
