
Today we are walking through a step-by-step process on how to set up a Chart Of Accounts (COA) for a real estate company using QuickBooks Online. Get your free copy of a sample chart of accounts for a real estate company at the end of this blog.
NOTE: This chart of accounts is focused primarily on companies that have residential real estate and works well for companies that have less than 10 properties. If you have more than 10 properties, you should consider using our other chart of accounts focused on larger, commercial portfolios and using classes extensively.
We had the opportunity to sit down once again with Amy Heinen from Quick Action Accounting. As an experienced accountant, Amy has seen her share of poorly organized charts of accounts and the resulting issues this causes for owners. It is because of this that Amy spends so much time early in her relationships with clients to get the chart of account piece right. We worked with Amy previously on setting up a chart of accounts for a real estate company using QuickBooks desktop and on how to properly set up escrow accounts.
We are going to cover five things in this blog:
- The importance of Setting up a Chart of Accounts
- Enabling the account settings
- Prepping to import a Chart of Accounts
- Importing the file
- Customization
A Few Important Notes:
- You can also access this same content in the companion video on YouTube.
- Access the sample chart of accounts for a real estate company at the bottom of the blog.
Importance of Setting up a Chart of Accounts
Setting up a chart of accounts is the first step in setting up an accounting system. A well-planned chart of accounts and accurately recorded transactions help an owner more clearly steer their business. The chart of accounts function is to provide structure for both recording and reporting of business transactions. The reports are then able to be shared with both lenders and accountants.
Enabling Account Settings
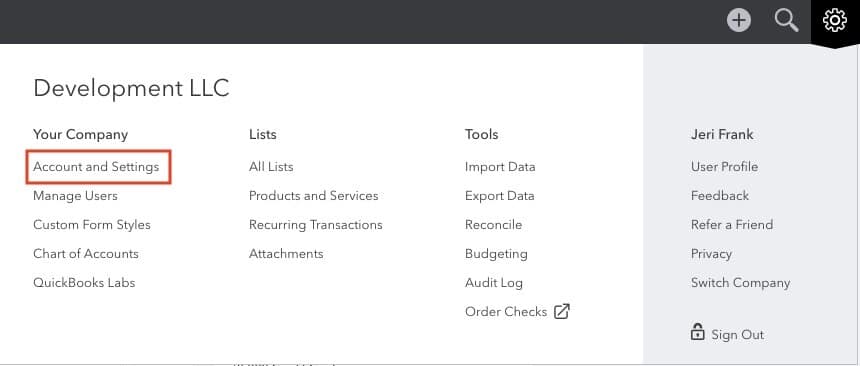
Prior to importing the template file, there are a few steps we need to take to get started. We will begin by enabling Account Settings. Go to the right-hand corner of your QuickBooks Online screen and click the gear icon and then Account and Settings.
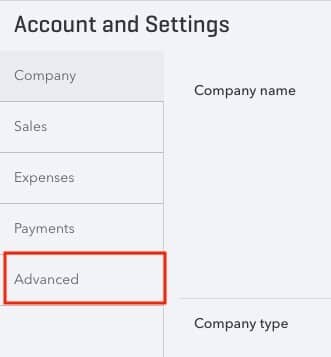
Once you are in Account and Settings, select Advanced.
Next click on Enable account numbers by selecting the pencil on the far right-hand side of the screen.

From here, click the box that says Enable account numbers and then click Save and exit.

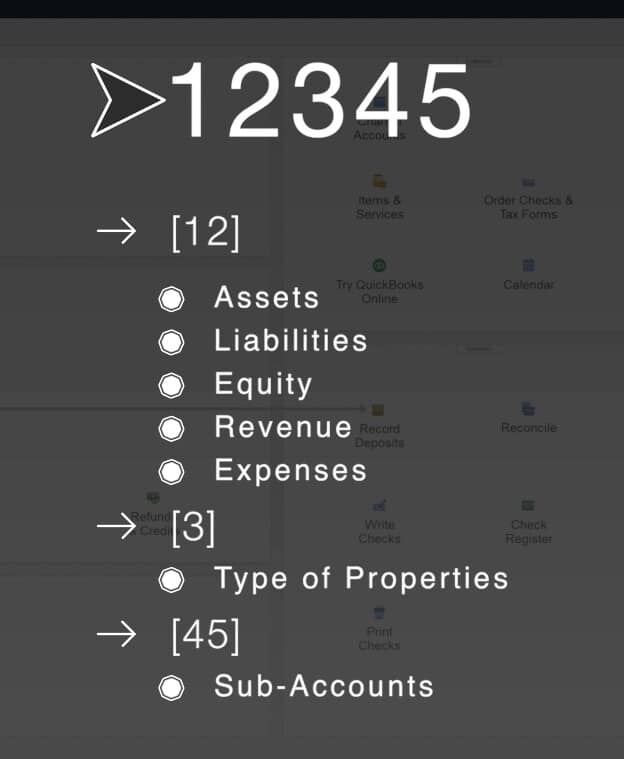
The purpose of establishing account numbers is to help organize how you want your chart of accounts to appear. The first two digits are used to identify if the account type: asset, liability, equity, revenue, or expense account. The third digit might be used to distinguish property types. For instance, you might number your retail and office differently. The fourth and fifth digits distinguish sub-accounts.
Prepping to Import a Chart of Accounts
Before we begin importing our sample chart of accounts for a real estate company, we need to clean out the chart of accounts that QuickBooks Online provides. On the right-hand menu look for Accounting.

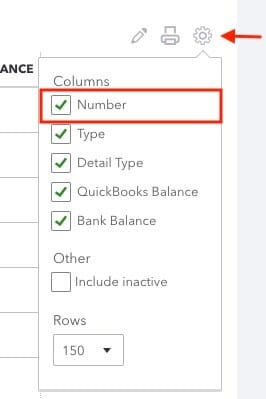
If the numbering is not showing, go to the right-hand side of the chart of accounts, click on the small gear button, select Number to show in the columns.
Next, delete all the unnecessary accounts. There are five accounts you will not be able to delete because QuickBooks Online will not allow it because they are default accounts for importing transactions. The five accounts you will not be able to delete are:
- Uncategorized Asset
- Retained Earnings
- Sales
- Uncategorized Income
- Uncategorized Expenses
Delete all the other accounts to eliminate duplicate accounts when you import the sample chart of accounts.
To delete an account, go to the right-hand side of the chart of accounts in the action column, select the account you want to delete, select View register, then click Delete.
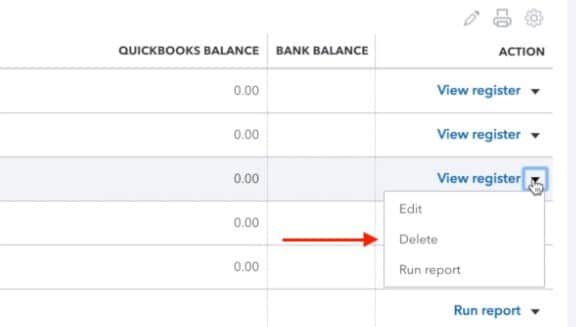
Once you select delete, a box will pop up that asks you if you are sure you want to delete the account. Select Yes.

If you select an account that you cannot delete, QuickBooks Online will give you the following warning/error that says something like this:

It is a bit of a slow process to delete all these accounts, but it is best practice to eliminate all the duplicates prior to importing the file. Let’s begin the import process.
Importing the Chart of Accounts
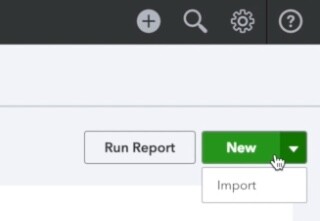
You can access the Sample Chart of Accounts for a real estate company at the bottom of the blog and download that to your desktop or wherever you prefer to save it. Next, go the right-hand side of the chart of accounts, click on New and then Import.
At this point, QuickBooks Online will walk you through a simple 3-step process to import the file. Begin clicking on Browse and locating the Excel Sample Real Estate Chart of Accounts file you placed on your desktop or where ever you placed the file. QuickBooks Online will take either a CSV or Excel file format. QuickBooks Online cannot currently accept an IIF file format. The IIF file format is used strictly for QuickBooks desktop version. If you are taking a chart of accounts format from an existing desktop chart of accounts and importing it into QuickBooks Online, you must convert it to a CSV or Excel file format before importing.

Then, select Next in the bottom right-hand corner of your screen. This will take you to step 2 in the importing process. At this step, QuickBooks will ask you to map your fields.

Our sample chart of accounts for a real estate company file was already mapped to the QuickBooks fields so you can simply click Next in the bottom right-hand corner and move onto the 3rd step. If you are importing from elsewhere, you will need to align your fields with each of the QuickBooks Online fields.
Time to Import
Once everything imports, you will receive a message that the accounts are ready to import. With our sample chart of accounts, there are 52 accounts that are ready to be imported. At this juncture, you can decide if there are accounts you do not want to import. Simply deselect the account or accounts you do not want to import. You can remove these accounts later as well. There are just fewer steps to the transactions if you remove/change the accounts now. Once you are ready, select Import on the bottom right-hand corner of your screen.

After you click Import, you will be prompted alerting you to any duplicate accounts that will look like this:
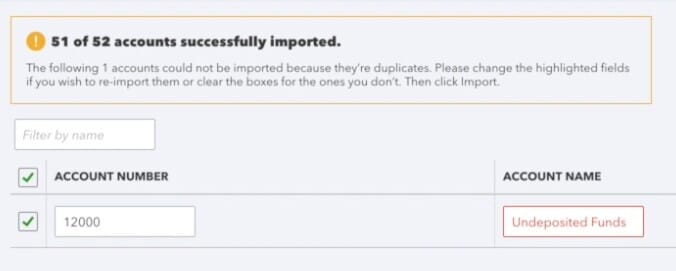
In this case, there was one duplicate account called Undeposited Funds. At this point, you have the option to change the Account Name to something else and then import. We are going to close out of this menu since we are not going to change anything. To do that, click the X in the upper right-hand corner of the screen.

There is one final question that QuickBooks Online will ask during this process and that is, “Do you want to leave without saving?” You will click yes.

That is it. You have imported your sample real estate chart of accounts.
Customize the Import
There is always some clean up to do after you import your chart of accounts. Specifically:
- Edit some accounts that are missing account numbers (these were the accounts that QuickBooks Online would not allow us to delete)
- Establish sub-accounts for certain expenses
- Add additional accounts
- Setting up sub-accounts for any fixed assets
- Setting up sub-accounts for escrow
Editing Accounts with Missing Account Numbers
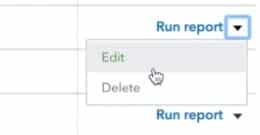
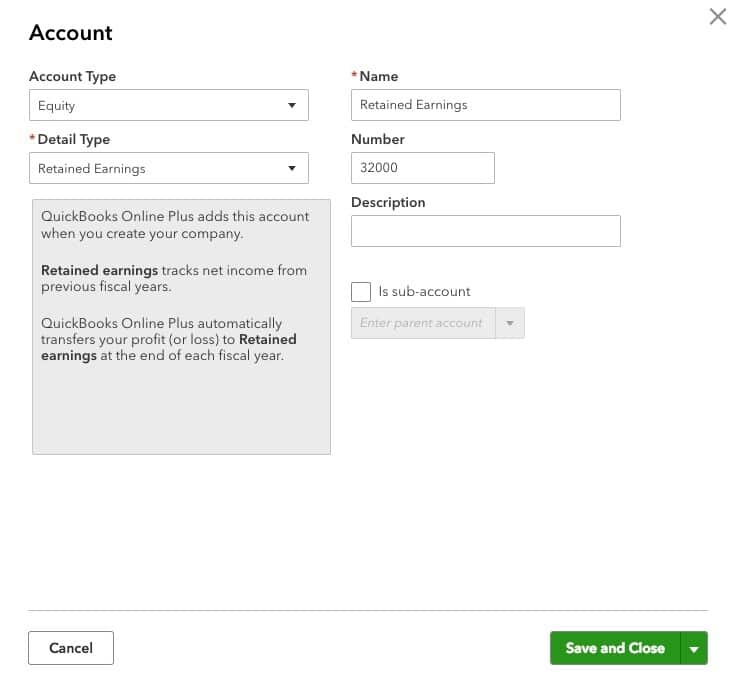
As you may recall there were 5 accounts that we were unable to delete. These do not have account numbers. For the accounts that did not have an account number, we will add the account number. To do that, Edit the account.
In this case, we are editing Retained Earnings and giving it an account number of 32000. Then select Save and Close.
Unclassified transactions appear in the Uncategorized Asset account, Uncategorized Income, and Undeposited Fund accounts after import. If you have something in those accounts, go in and edit the transaction anyway and put it in its correct account. Services income will eventually be deleted once your income accounts are properly set up for your business. It is a personal choice if you want to add numbers to these accounts. We prefer to keep them unnumbered as any balance will be more noticeable to us.
Establishing Sub-Accounts for Expenses
QuickBooks Online does not allow for importing of sub-accounts. In our sample chart of accounts for a real estate company file, professional fees should have 3 sub-accounts:
- Legal Fees
- Accounting Fees
- Consulting Fees
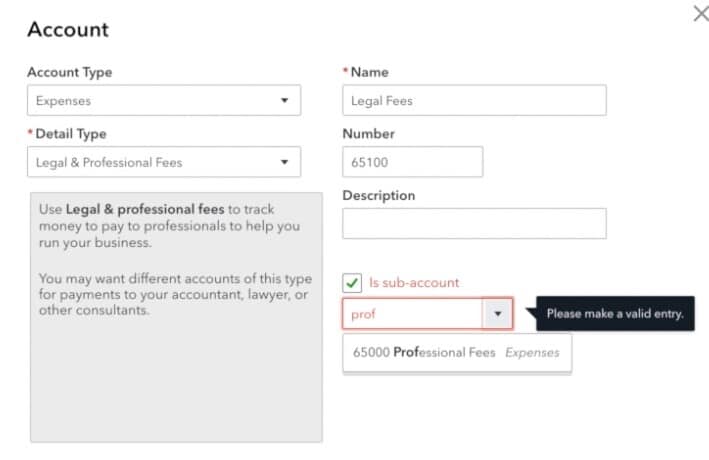
Creating sub-accounts gives you the opportunity to see certain expense types totaled in your reports. Sub-accounts also show up indented on the chart of accounts.
In this sample, Legal Fees should be a part of Professional Fees as a sub-category. Edit the account Legal Fees and check the box for sub-account and select Professional Fees and then select Save and Close. Complete the same actions for Accounting Fees and Consulting Fees or any other accounts you prefer to be sub-accounts.
Add additional Accounts
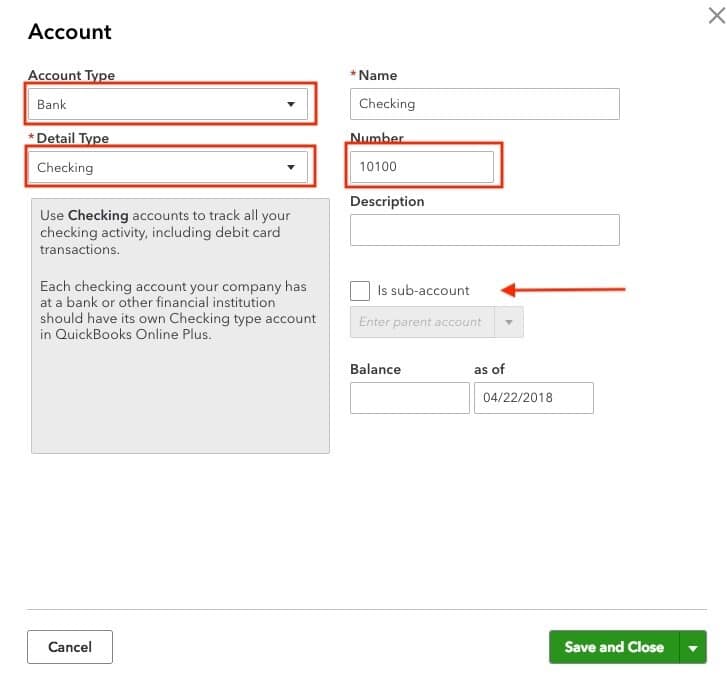
Make QuickBooks Online work for your real estate business. The sample chart of accounts for a real estate company is a starting spot. You may have additional accounts you want to include. For example, you may have multiple bank accounts. To add a new account, click New in the top right-hand corner of your screen.

A new Account box will pop up. Select Bank from Account Type and select Checking from Detail Type. Then add the Number. If you want to make it a sub-account of another account, you make that selection now. Once you are done, click Save and Close.
Setting up Fixed-Assets
It is good to set up your fixed assets by property which means setting them up as sub-accounts. This structure provides you better clarity for managing your business and helps later on if you decide you want to sell a property. The fixed asset accounts include:
- Dwelling
- Land
- Property Improvements
The account type will be Fixed Assets for each of these. Select the correct Detail Type for each account, Name the property, give it a Number, then select the appropriate account it will be a sub-account for. The click Save and Close. We name our properties by the street address, but find a method that works for you. Keep the numbering for Property A consistent across all the fixed asset sub-categories. We will use the “10” for each of these fixed asset types.
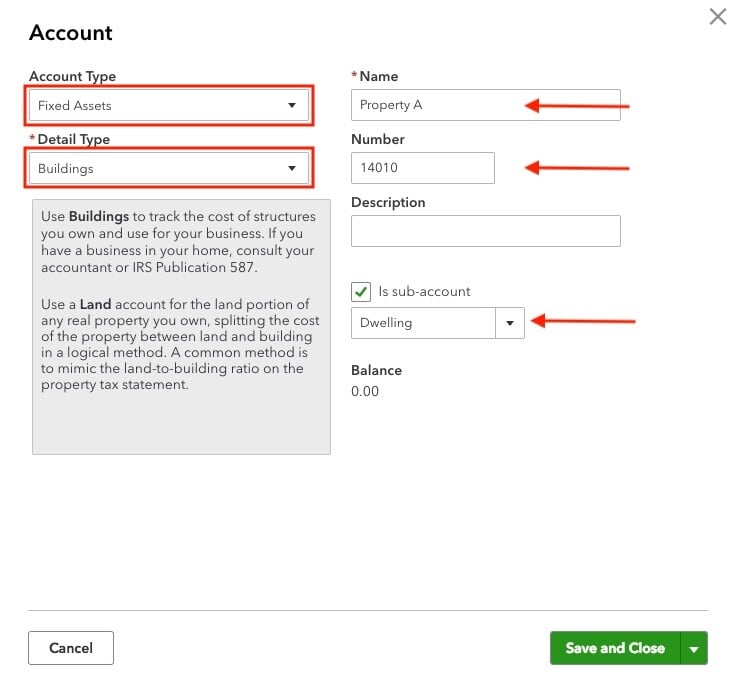
Use the following detail types for each of your fixed assets:
- For Dwelling, use detail type Buildings
- And for Land, use detail type Land
- Next, for Property Improvements, use detail type Buildings
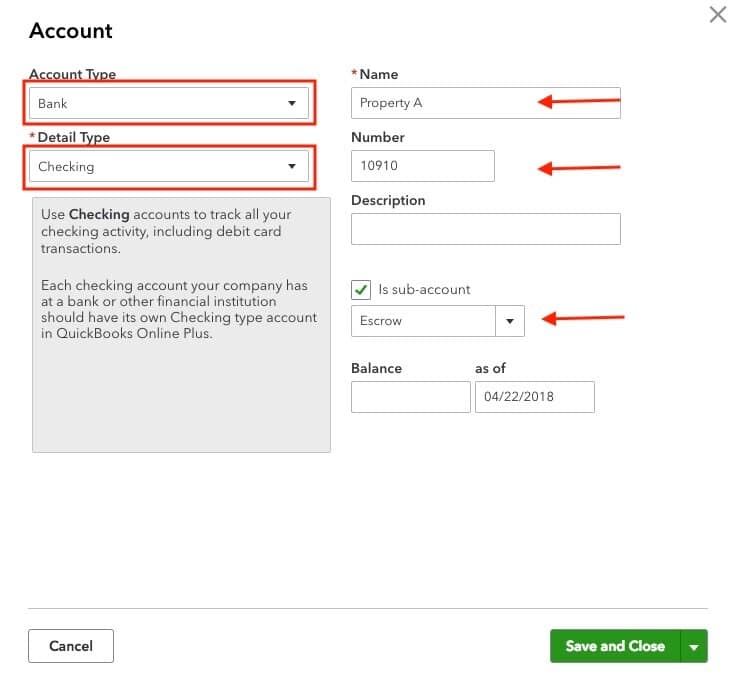
Setting up Escrow
We covered escrow accounts in detail in a previous blog. Check there for what an escrow account is all about. For now, though, set up your escrow the Account Type as Bank, the Detail Type as Checking, put in the Name of the property, the Number of the property (ending in 10 again) and select Escrow for sub-account. Then click Save and Close.
Final Words on Setting up a Chart of Accounts for a Real Estate Company
Thank you for sticking with us through the process of setting up a chart of accounts for a real estate company using QuickBooks Online. Don’t be afraid to customize your chart of accounts for your business. Make the reports work for you. You do that by the accounts you create in your chart of accounts.
And, remember, QuickBooks Online is very forgivable. If over time, you find you need to see your income or expenses differently, change it. It may require some work. But if that works helps you better manage your business, it is time well spent.
Download a copy of the free Excel Sample Chart of Accounts for a Real Estate Company file: Updated Sample Real Estate Chart of Accounts List.