What a Lease Represents in STRATAFOLIO
Managing a lease in STRATAFOLIO means working from a single, centralized source of truth. The Lease record serves as the foundation for billing, operating expenses, occupancy tracking, alerts, compliance, and reporting across your portfolio.
A Lease connects:
- A Tenant
- A Unit
- An Asset and Entity
- Lease Rates and escalations
- Operating Expenses
- Invoicing and accounting integration
- Documents and compliance items
Managing the Lease correctly ensures:
- Accurate rent invoicing
- Proper CAM tracking
- Correct occupancy reporting
- Reliable financial reporting
- Clean historical records
This article explains how to manage Lease updates, extensions, escalations, files, alerts, and special situations such as assignments and sub-leases.
A centralized lease database for commercial real estate gives landlords and asset managers one reliable place to store, track, and manage every lease detail: documents, key dates, tenant contacts, compliance items, and critical notes without digging through email threads or scattered spreadsheets. By keeping everything organized and searchable in a single system, you can reduce missed deadlines, improve team coordination, and respond faster to tenant needs while maintaining cleaner records across your entire portfolio.
Where to Find and Open a Lease
- From the left-side navigation, go to Operations
- Select Leases. The Leases table displays all leases, including current, future, and expired leases.
- Click the Information “i” button next to the lease
- This opens the Lease Detail View or the Lease Abstract View
Expired leases:
- Will not show under Building or Unit views if a newer lease exists
- Will not appear on the Rent Roll if expired
If the lease you need does not yet exist in STRATAFOLIO, you will first need to create a new lease record before you can manage its details.
How to Add a New Lease
In STRATAFOLIO, adding a lease creates the relationship between a tenant, a unit, and the financial terms of the agreement. The lease record becomes the central location where STRATAFOLIO tracks rent schedules, operating expenses, key dates, alerts, documents, and accounting connections.
When you create a lease, you define how the tenant occupies space within your property and how that occupancy affects billing, reporting, and portfolio visibility.
One of the most important parts of creating a lease is assigning the correct unit. Units represent the physical space being leased, and assigning them properly allows STRATAFOLIO to:
- Track occupancy and vacancy across your buildings
- Generate an accurate Rent Roll
- Connect the lease to the correct asset and building
- Calculate operating expense allocations
- Ensure invoices are tied to the correct location
Without assigning a unit to a lease, STRATAFOLIO cannot accurately represent how space is being used within your portfolio.
When setting up a lease, you will also define key lease details, including the lease term, rent schedule, escalation structure, and operating expense responsibilities. These details allow STRATAFOLIO to automate invoicing, send alerts for upcoming events, and maintain a complete history of the tenant relationship.
For a complete step-by-step walkthrough on creating a lease and assigning units, see:
How to Add a Lease and Assign a Unit in STRATAFOLIO
Once a lease has been created and the correct unit is assigned, you can begin managing the lease details, including extensions, rent escalations, operating expenses, and documentation.
How to Input a Lease Extension/Amendment Into STRATAFOLIO
When a lease extension or amendment is executed, you should update the existing Lease record instead of creating a new lease. This preserves historical accuracy.
Only create a new lease if:
- Lease terms drastically change
- A completely new tenant agreement begins
- A lease is assumed under substantially different terms
Keeping track of expiration dates and lease escalations in STRATAFOLIO is imperative for maintaining an up-to-date portfolio. The lease already entered has the security deposit, the lease options to renew, and copies of the original lease. There is no need to start over and re-enter all of that. Here are the steps to extending a lease.
- If the Lease Expiration has passed or the type of lease has changed, change the Lease Status
- Extend the Lease Expiration Date
- Add Lease Rate Escalations
- Extend or add the Operational Expense/OpEx period
- Add the Lease to the Files tab
Instead of inputting a new lease, extend the current lease for historical purposes. The only reason why we would suggest expiring the old lease and adding a new lease is if the lease terms drastically changed or if a tenant is acquiring someone else’s lease.
Changing the Lease Status
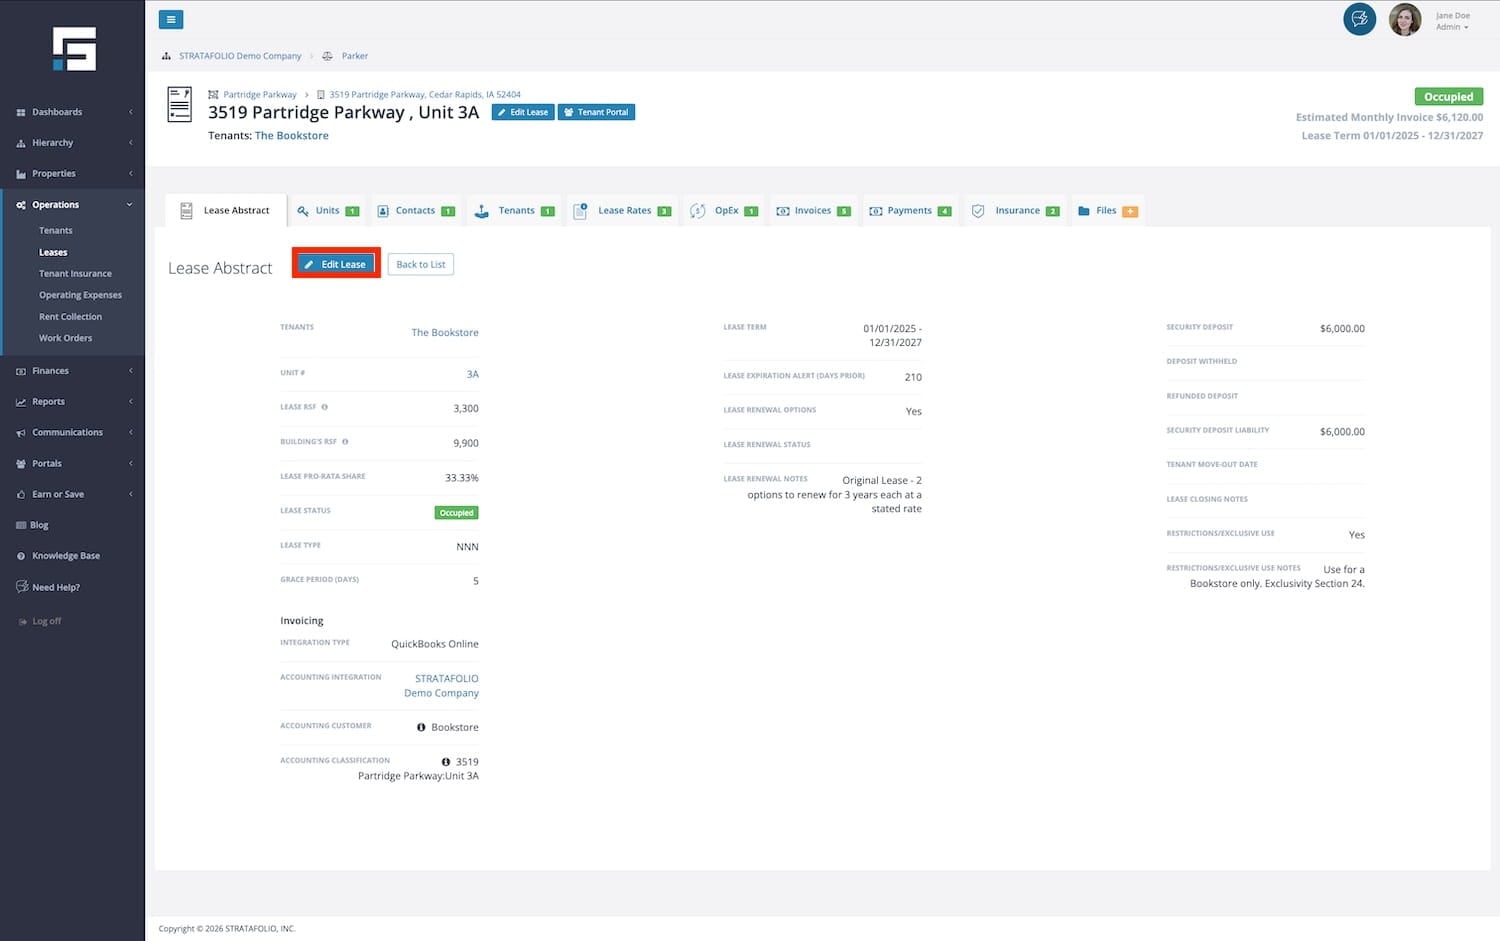
When the expiration date passes, STRATAFOLIO automatically marks a lease as Expired. Locate the lease by going to Operations from the left-side navigation menu > Leases> i icon beside the lease
NOTE: The Leases table will display all leases, current, future, and expired, entered into STRATAFOLIO. Expired leases will not show under the Building or Unit views if a newer lease has been entered. They will also not show on the Rent Roll if they have expired.
After you have chosen the proper lease, under the Lease Detail View select the Edit Lease button.
Select the appropriate status from the Lease Status drop-down.
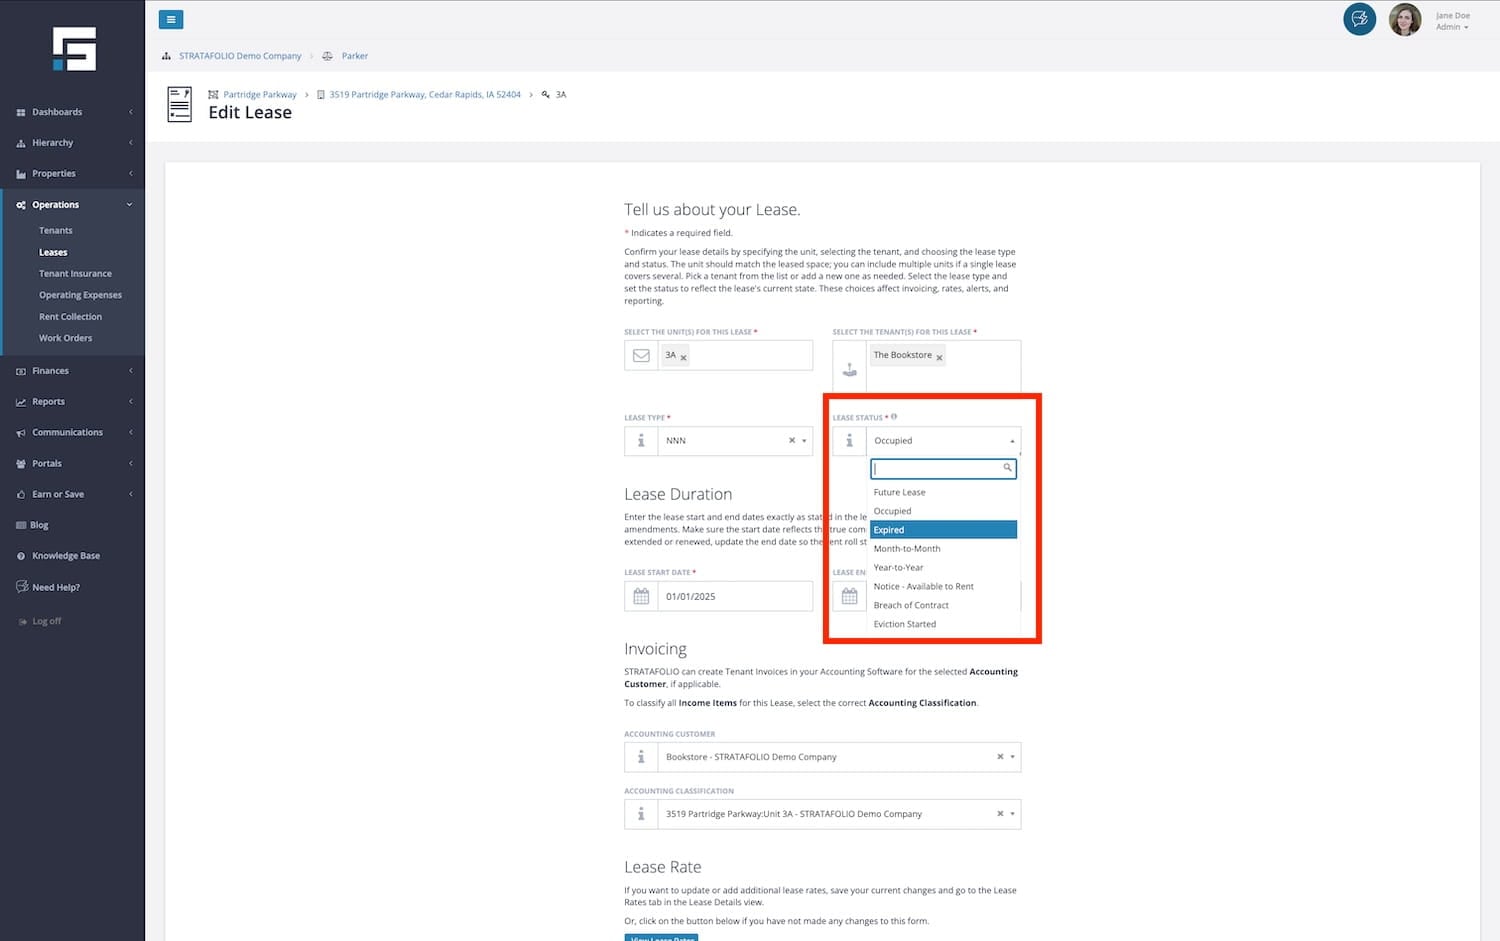
Change End Date
Modify the Lease End Date to the new end date on the amendment or extension.
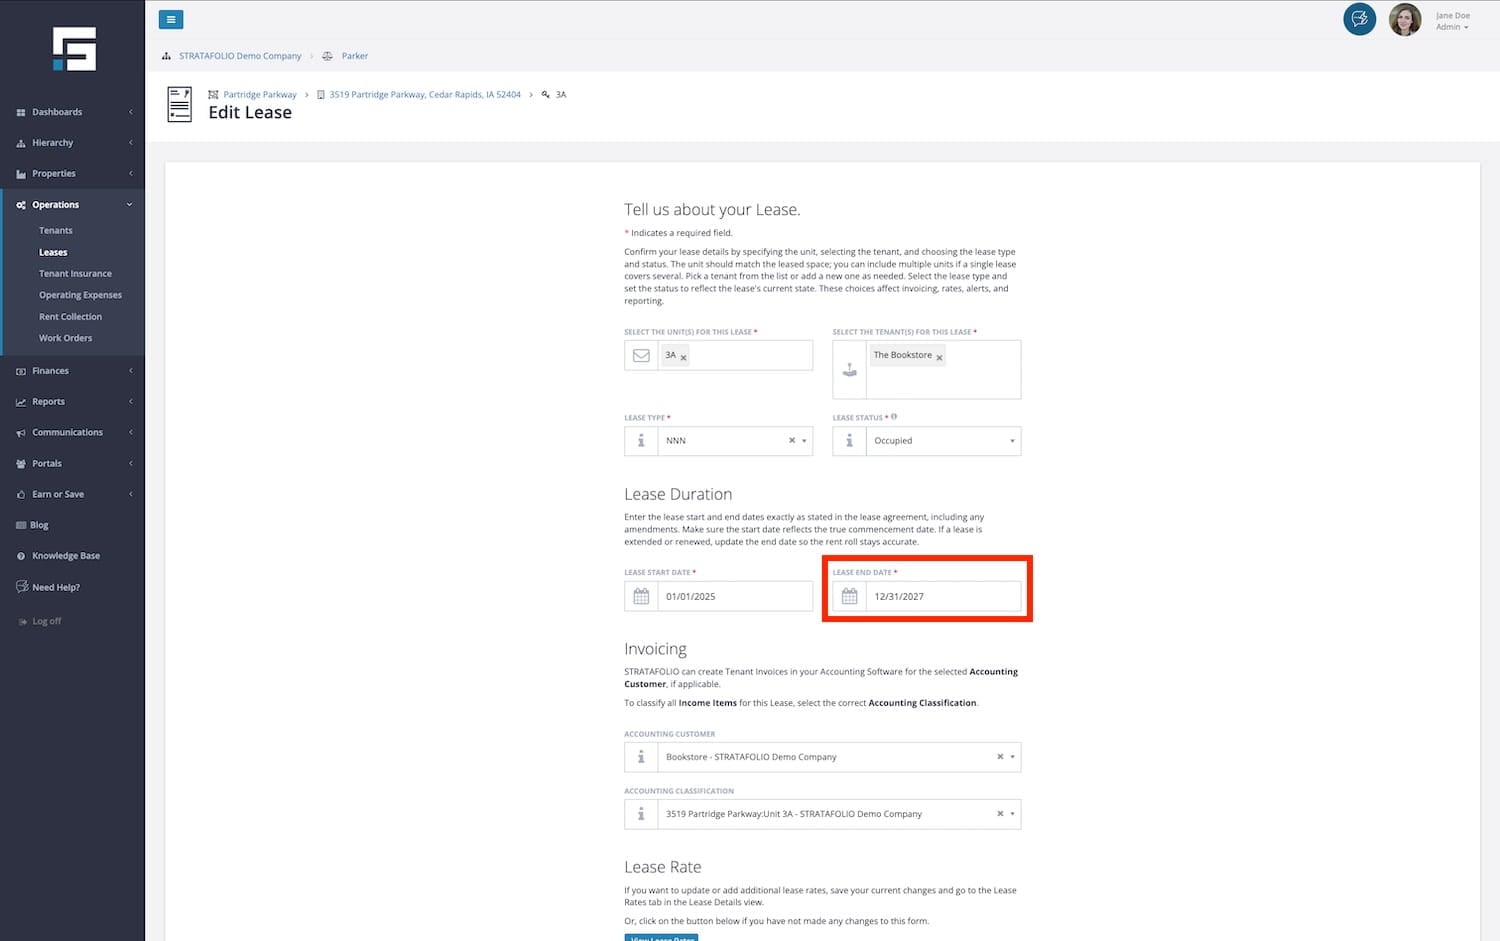
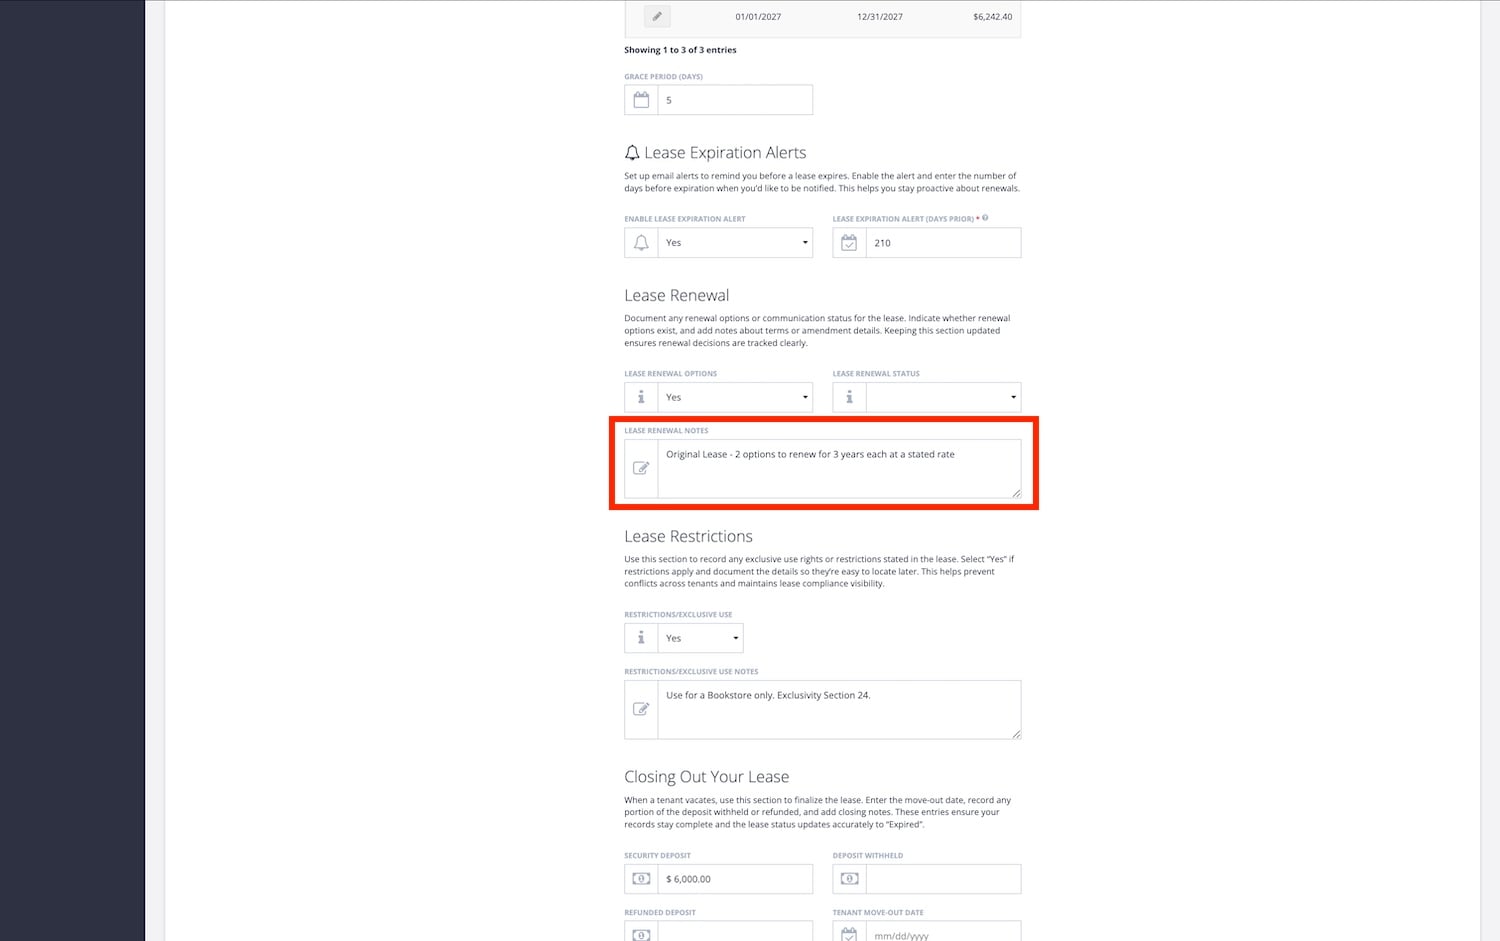
If the tenant has executed an option, update the Lease Renewal options on the Edit a Lease form with (option # executed) so it is clear how many options remain. Then choose Save.
Add Lease Rate Escalations
Now that the lease end date is extended, the Lease Rates can be modified. Note that the Lease Term or End Date must be extended to enter the new escalations. You cannot add Lease Rates past the end of the Lease Term.
While you are in the Lease Detail View, navigate to the Lease Rates tab, then select Add a Lease Rate.
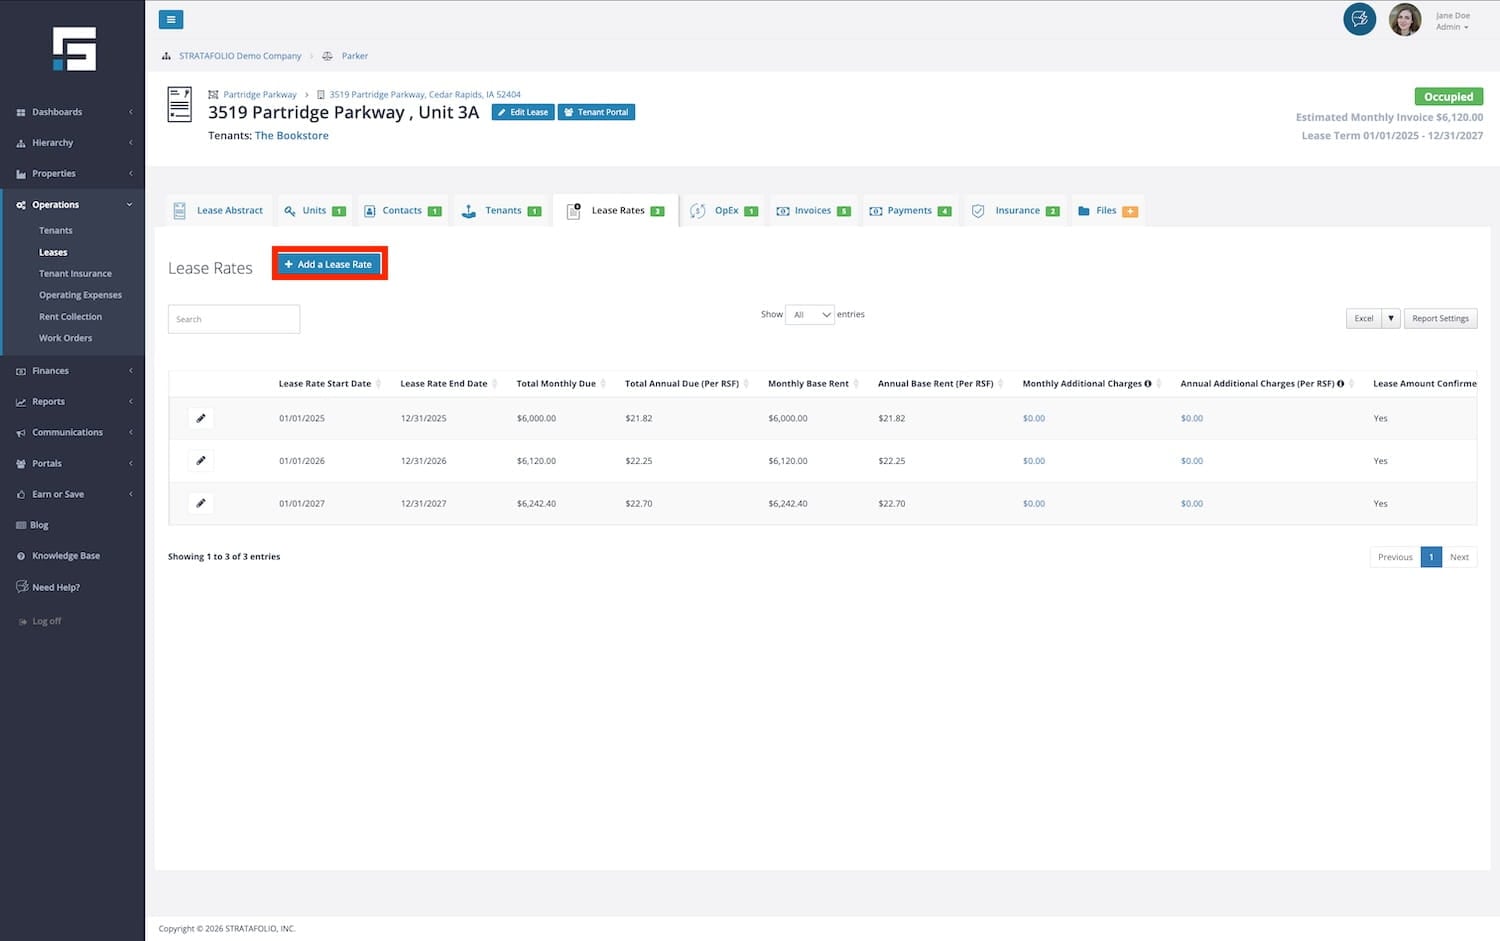
STRATAFOLIO will automatically calculate the dates for the next year and populate them. Modify dates as needed.
Enter the new Lease rate amount, type, and whether the lease rate is confirmed or not.
If unchecked or not confirmed:
- STRATAFOLIO sends an alert 30 days before escalation
- This is common for CPI-based increases or unclear escalations
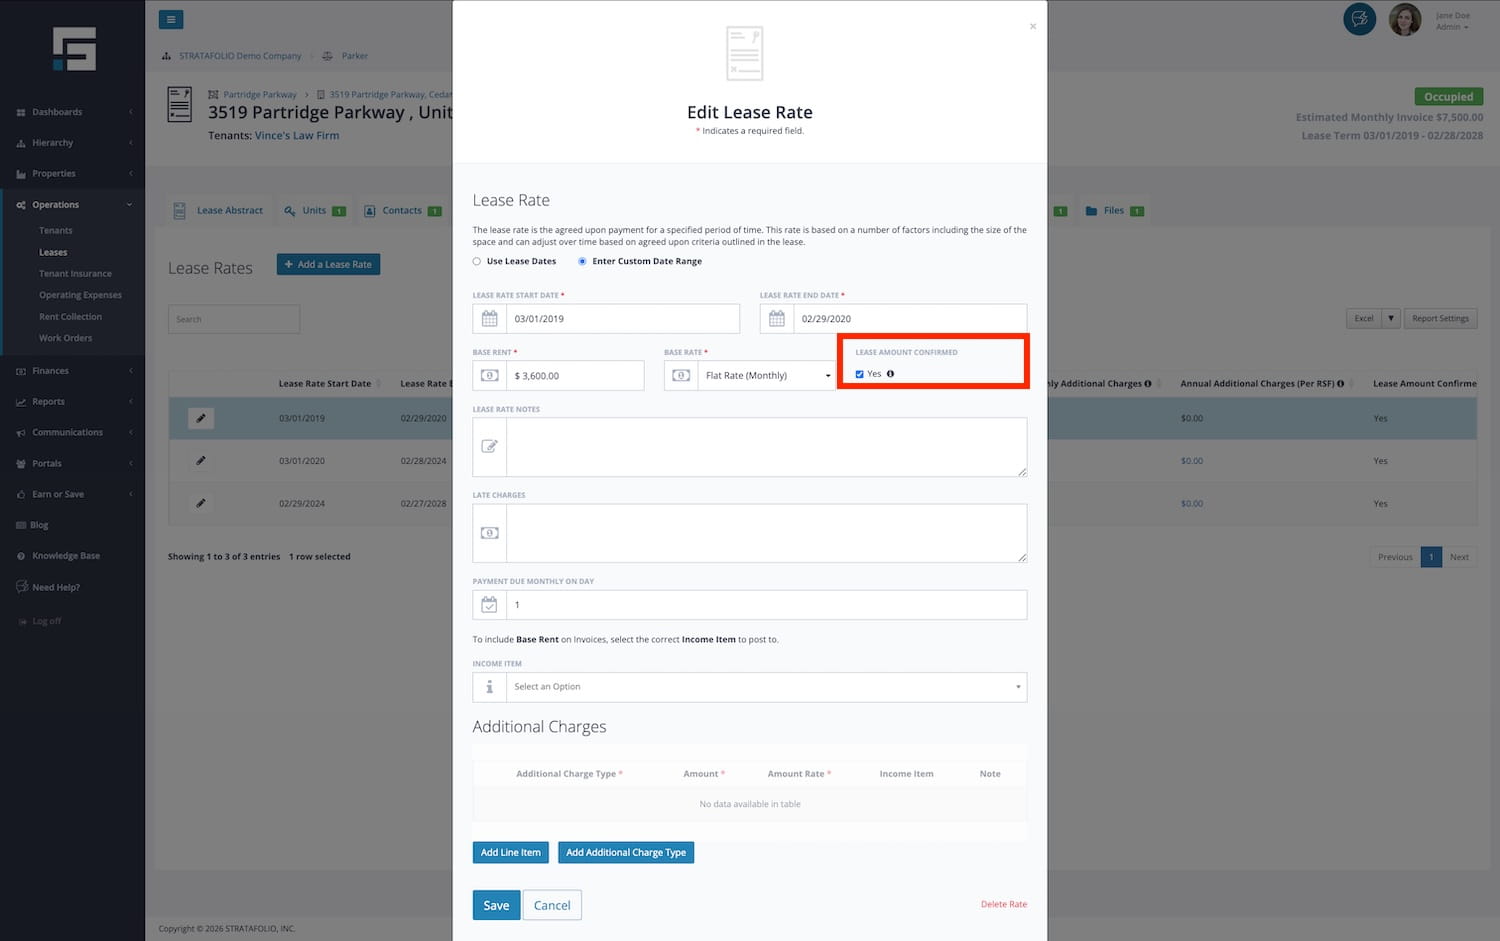
To resolve an Unconfirmed Lease Rate Alert:
- Open the Lease from the alert email
- Navigate to the Lease Rates tab
- Click the pencil icon to edit the rate
- Update the amount if needed
- Check the Confirmed box
- Save
The alert ensures you verify rent increases before invoicing.
In the Lease Rate Notes, STRATAFOLIO’s Onboarding team enters the document where the lease rate is located. Please use the note field for whatever notes you need for this specific lease rate period. The Late Fees and Due Date should pull through from previous rates. The Income Item should also pull through, but be sure it is the correct Income Item you would like to use for invoicing.
Select Save or select the Add Another checkbox to continue adding escalations.
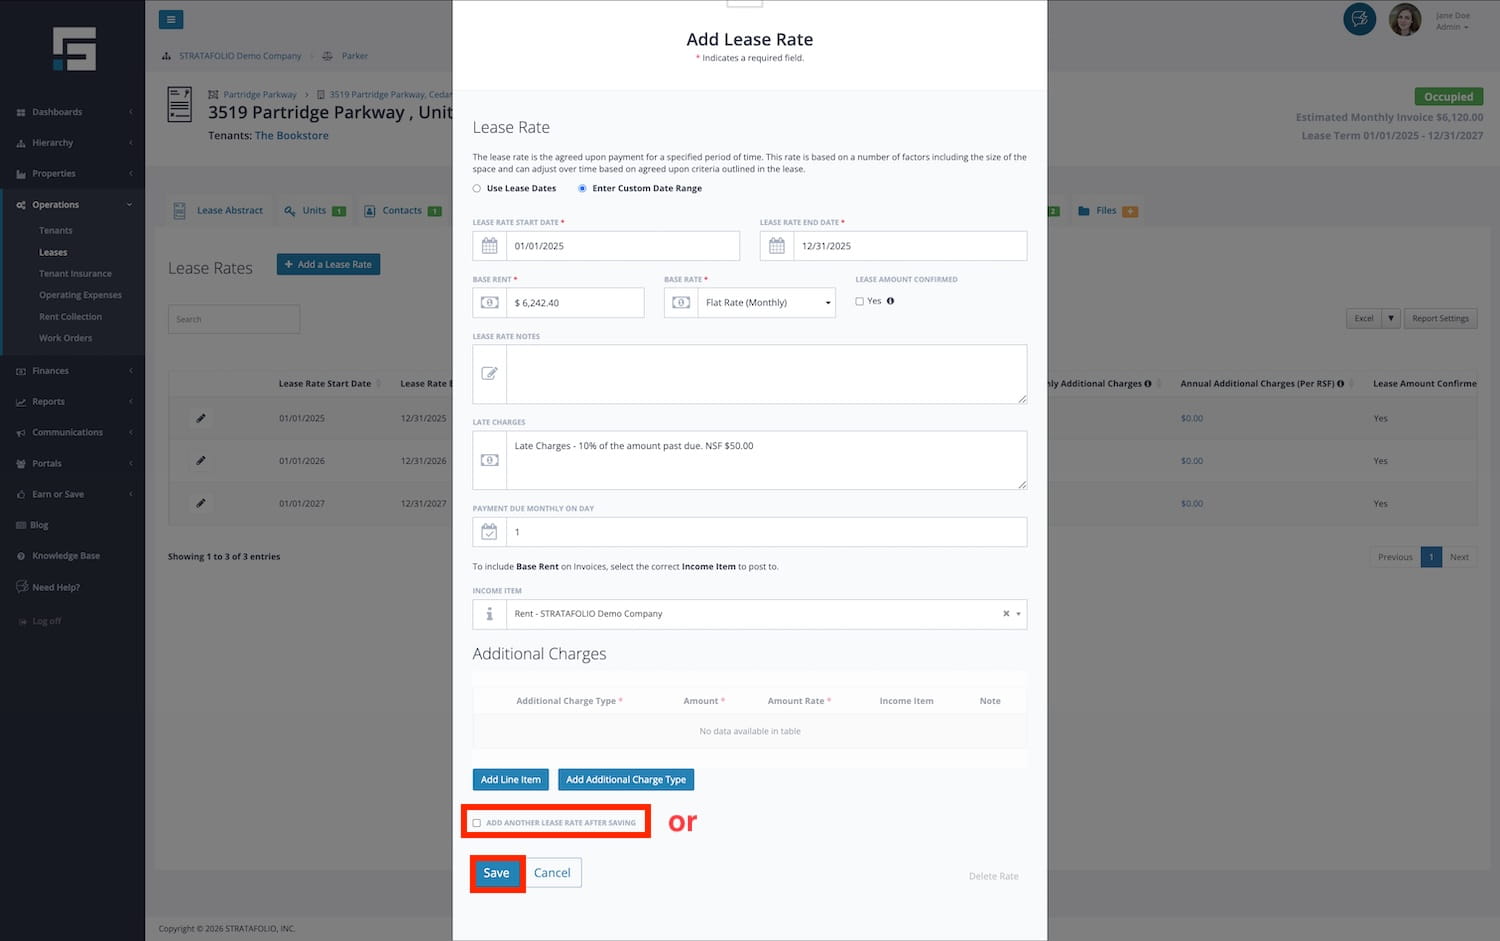
NOTE: These dates must be within the dates entered for the Lease Term. The Lease Rate end date cannot be set before the lease’s start date or after the lease’s end date.
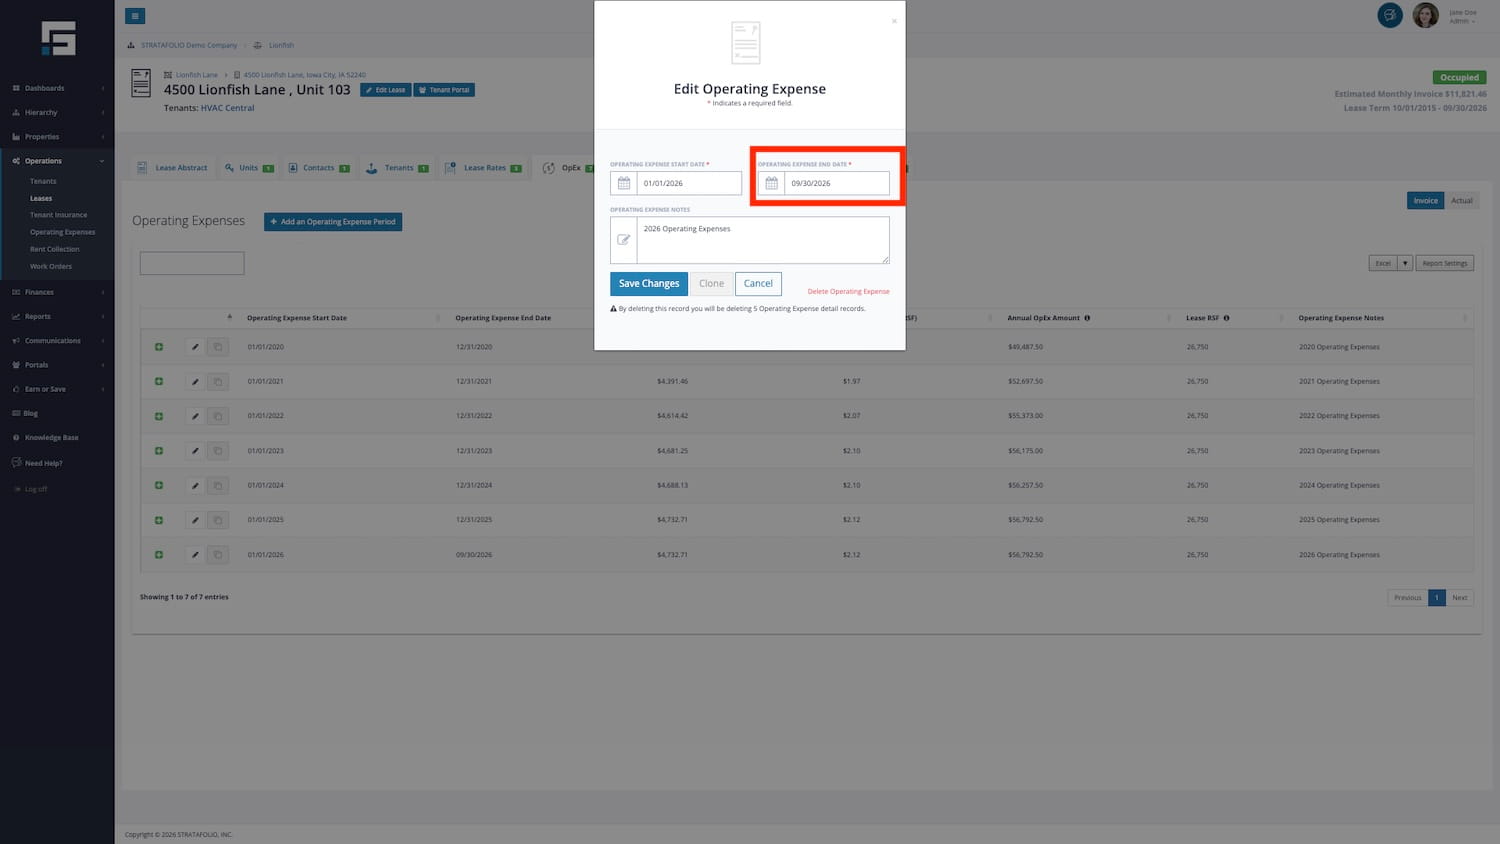
Extend Operational Expenses/OpEx Period
Navigate to the OpEx tab and select the pencil button next to the appropriate year. Extend the period expiration. You can only extend this period until the end of the Lease Term.
NOTE: STRATAFOLIO Onboarding recommends utilizing a new Operating Expense period each year. At the end of this year, you can utilize our cloning feature to copy over the same sub-categories you have used. Find directions for that feature at How to Clone Operating Expenses or CAM in STRATAFOLIO. After cloning, you can update the invoice amounts for the next year as needed.
Add Lease to Files
While in the Lease detail view, select the Files tab. Select the button to add a file. Upload up to 10 files at a time by dragging and dropping or selecting the button to browse and find the file.
Choose the file type and write a description if needed. You can choose whether the tenant can access this file if they have an active tenant portal.
Now that you have updated the lease with the new expiration date, new escalations, new operating expenses, and new files, it’s important to use the current lease to maintain complete historical data on each tenant. This will save you from re-entering data that has already been entered. To ensure that the escalations are correct, run the Rent Roll.
Compliance and Documentation
Managing a lease involves more than tracking financial terms and lease dates. It also requires maintaining accurate documentation and ensuring tenants remain compliant with the requirements outlined in the lease agreement.
Within STRATAFOLIO, the lease record provides a centralized place to store important lease-related documents and monitor compliance items such as Certificates of Insurance. Keeping these records organized within the lease allows property managers and asset managers to quickly access documentation, verify compliance, and maintain a clear audit trail for each tenant.
The following sections explain how STRATAFOLIO helps you manage lease documentation and compliance requirements.
How to Add or Upload Files Related to the Lease
Keeping track of important paperwork such as leases, loans, certificates of insurance, and countless other files requires a savvy filing system for the commercial real estate property manager. Because our focus at STRATAFOLIO is to offer solutions to streamline and simplify the management for commercial real estate owners, our software offers the option to add and store files in a secure, organized location.
A Few Things to Note When It Comes to Lease Files
All the file types cannot exceed 30 MB in size.
The accepted file types are:
- Image files (jpg, jpeg, bmp, and gif)
- Other files (doc, docx, pages, ppt, pptx, key, rtf, txt, csv, xls, xls, numbers, pdf)
- Video file (mp4 and mov)
- Compressed files (zip)
Where to View and Upload or Add Lease Files
To begin uploading files related to a specific lease, navigate to the Operations from the left-side navigation menu, then select Leases. This view shows all the leases in your organization, including current and past leases. Click on the ” Information Button “i” beside a lease, and this will open the Lease Abstract or Detail View of the lease you would like to view.
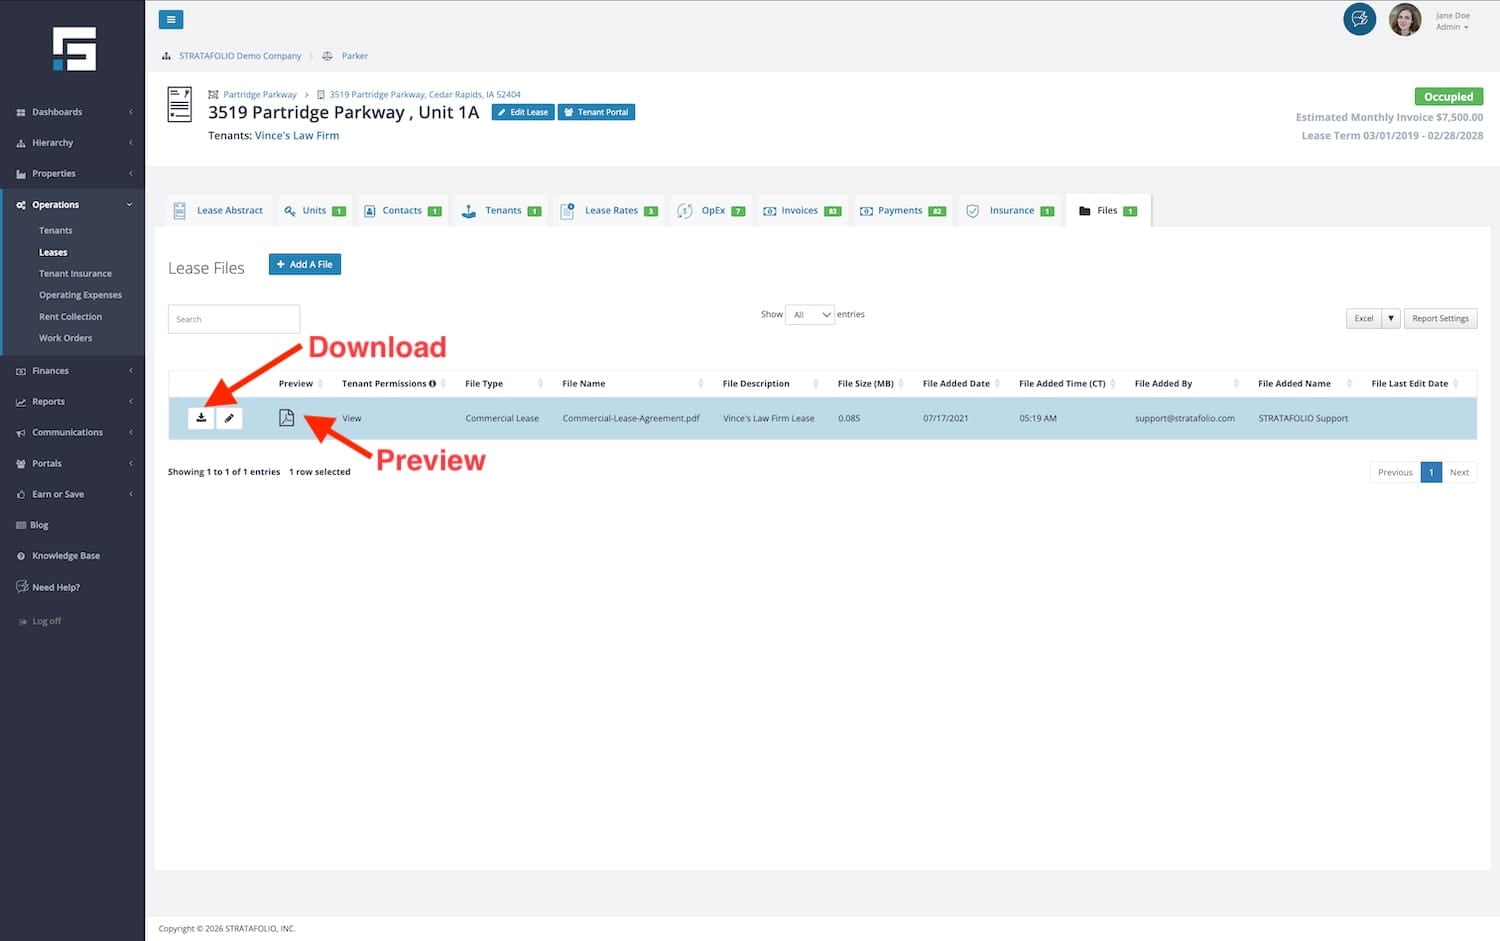
Once on the Lease Details page, select the Files tab.
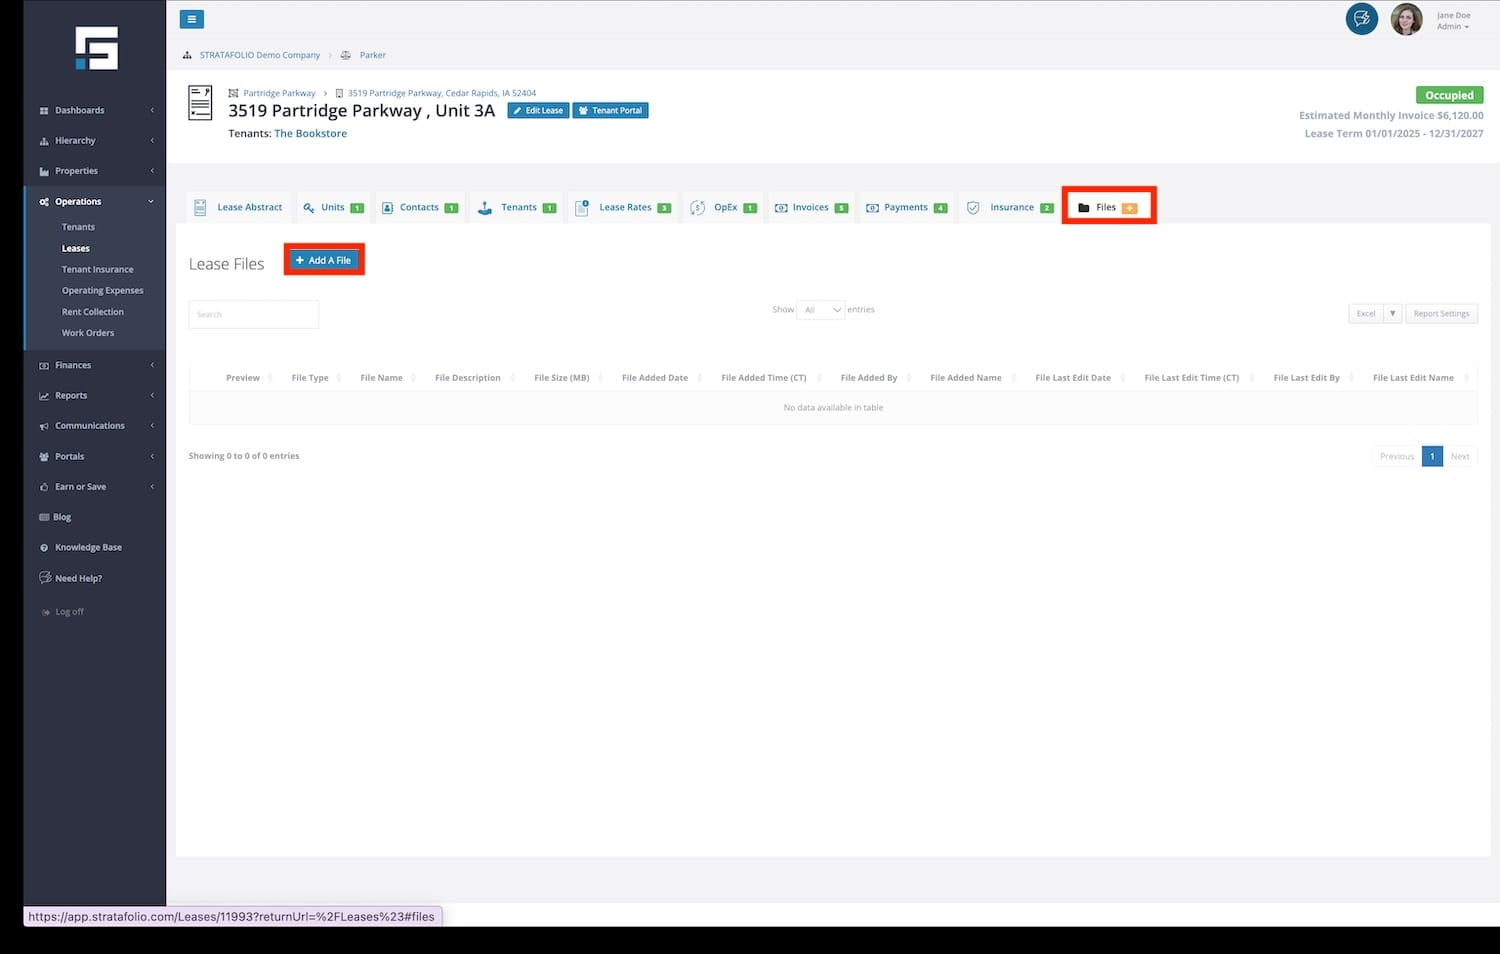
From the Files tab, you can:
- Add or upload a File
- Edit a File
- Allow a Tenant to Access a File
- Download & View a File
- Delete a File
1. Upload or Add a File
To upload or add a file, from the Filestab click the blue Add a File button; a form will appear. Here on this form, you have the following options:
- Gray Drag & Drop Rectangle – Drag or drop up to 10 files at a time into the gray rectangle, or click on the rectangle to browse for the file on your computer.
- Upload Description – You can add a description to the file in this field if needed.
- Tenant Permissions – This allows you to select the level of access you grant to the tenant in the Tenant Portal.
- File Upload Restrictions – Hover your mouse pointer over the “i” to see the limitation details on the types of files that can be uploaded. In general, files may be no more than 30MB and should be standard file types such as .jpg, .pdf, .docx, .xls, etc.
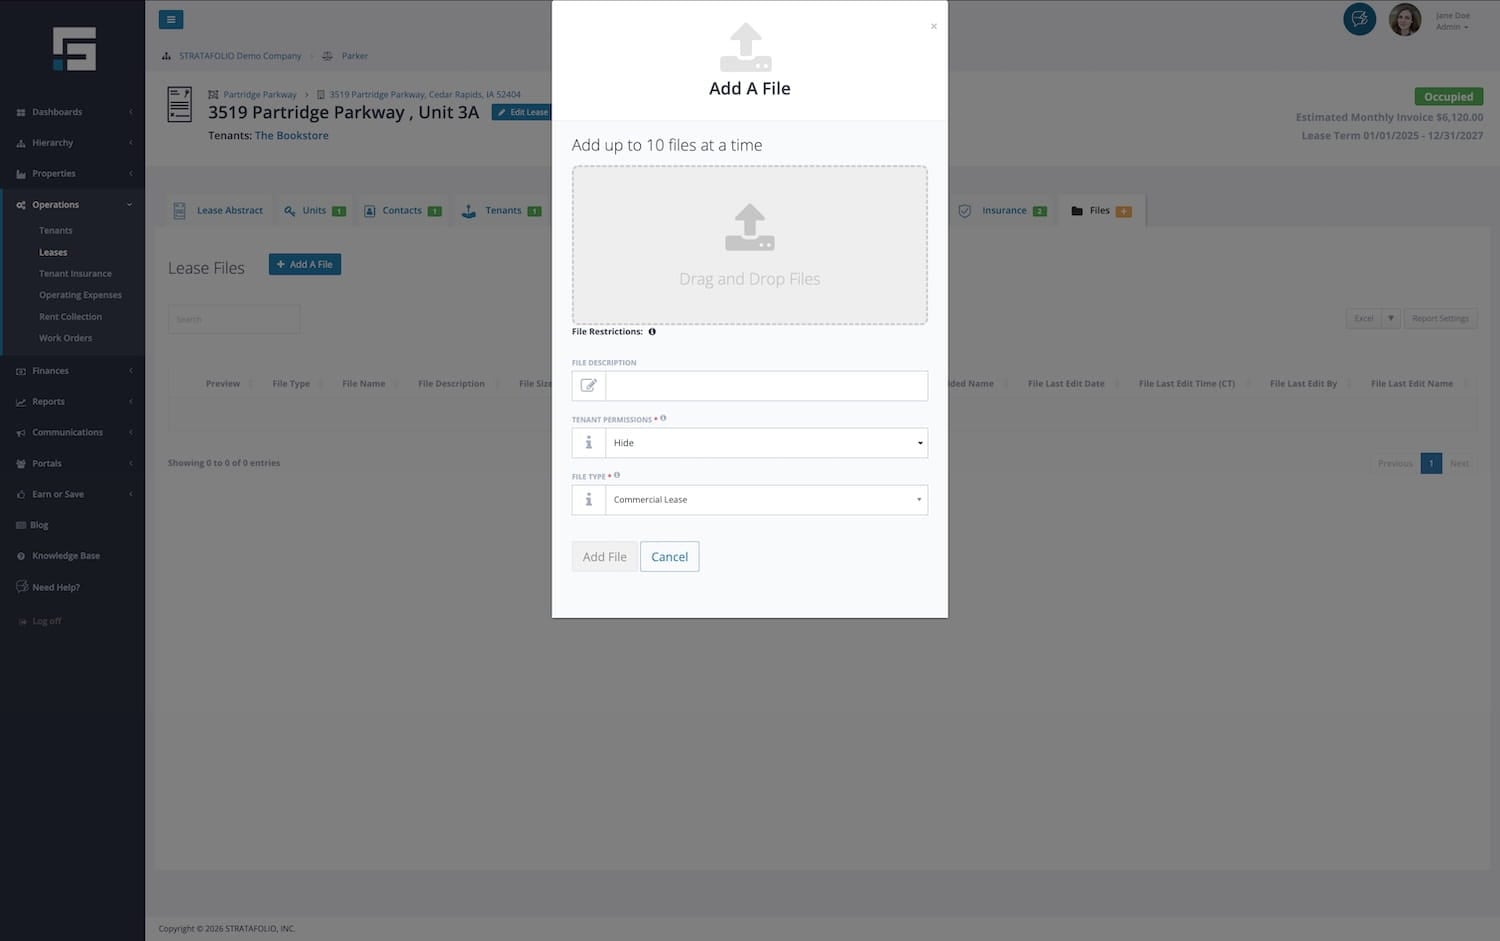
After you have selected the file(s) to upload, click Add File at the bottom of the form and wait for the page to refresh. The file(s) you uploaded will appear at the bottom of the file list.
By default, all files are initially set to Hide access and cannot be viewed by the Tenant in the Tenant Portal. You can update each file with View, Edit, or Delete access if you choose. If you do not change the file access, it will remain hidden from the tenant’s view. Access levels and how to download & view files are discussed below.
2. Edit a File
To edit the file description, click the pencil button next to the file to open the Edit File Information form. In this form, you can edit the file description, delete the file, and select the Tenant Access Level/Permissions for the file.
3. Allow a Tenant to Access a File
Tenant access permissions can be edited by clicking the pencil icon next to the file you want to edit. Once you click the Edit button, the Edit File Information form will appear, and you can select Tenant Permissions from a dropdown list.
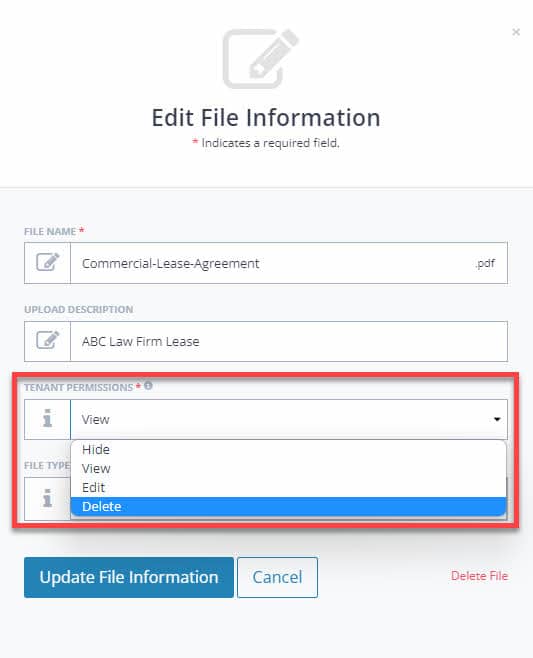
File Access Permissions
There are four file permission levels for files in STRATAFOLIO. Detailed information for each level is below. For more information on file uploads and what the tenant view is like in the Tenant Portal, read our knowledge base article on the Tenant Portal.
- View: View access allows a tenant to download and view the file only. The tenant cannot edit the file description or delete the file.
- Edit: Edit access allows a tenant to download and view the file and edit the file description. However, the tenant cannot delete the file.
- Delete: Delete access allows a tenant to download and view the file, edit the file description, and delete the file.
- Hide: If the landlord has selected to hide access to a file, the tenant will not see the file in their list in the Files tab of the Tenant Portal.
NOTE: The landlord can change the access level for files that the tenant uploads after they are saved by the tenant. A tenant cannot change the file access permissions. Access permissions can only be changed by a STRATAFOLIO User.
- Landlord File Upload: When a landlord or the landlord’s agent initially uploads a file to STRATAFOLIO, it will have Hide access and will not be visible to the tenant in the Tenant Portal.
- Tenant File Upload: When a tenant initially uploads a file to STRATAFOLIO, the tenant will have full access to view, edit & delete the file until the landlord changes the permissions.
4. Download & View a File
To view a file, click on the Download Button next to the file. This will download the file to your computer, where you can open and view it. You can also select the Preview button, and it will open up in another window.
5. Delete a File
To delete a file, open the Edit File Information form by clicking the Edit button next to the file.
Click Delete File in the lower right corner. Before the file is permanently removed, you will be asked to confirm that you want to delete it.
NOTE: Only a user with Administrator Rights can delete a file from STRATAFOLIO.
Managing Certificates of Insurance (COIs)
Many commercial leases require tenants to maintain specific insurance coverage throughout the lease term. As part of managing a lease, it is important to track each tenant’s Certificate of Insurance (COI) to confirm that required coverage remains active and compliant with the lease agreement.
Within STRATAFOLIO, COIs are connected directly to the lease and tenant records. Tracking these documents allows you to monitor insurance expiration dates, verify required coverage, and maintain documentation related to tenant compliance. Keeping COIs up to date helps reduce risk, ensures lease requirements are met, and provides a clear record of insurance documentation over time.
As you manage a lease, you may periodically review or update COIs when policies renew, change, or expire. STRATAFOLIO makes it easier to stay ahead of these updates by organizing insurance records alongside other lease documentation.
For step-by-step instructions on how to add, track, and manage Certificates of Insurance in STRATAFOLIO, see:
How to Add, Track, and Manage Tenant COIs
Unconfirmed Lease Rate Alerts and What They Mean
When entering Lease Rates, you may have noticed a small checkbox after the amount column. If you did not check it when entering the Lease Rate, that may be the reason why. If you leave this unchecked, you will get these alerts 30 days before the lease escalates.
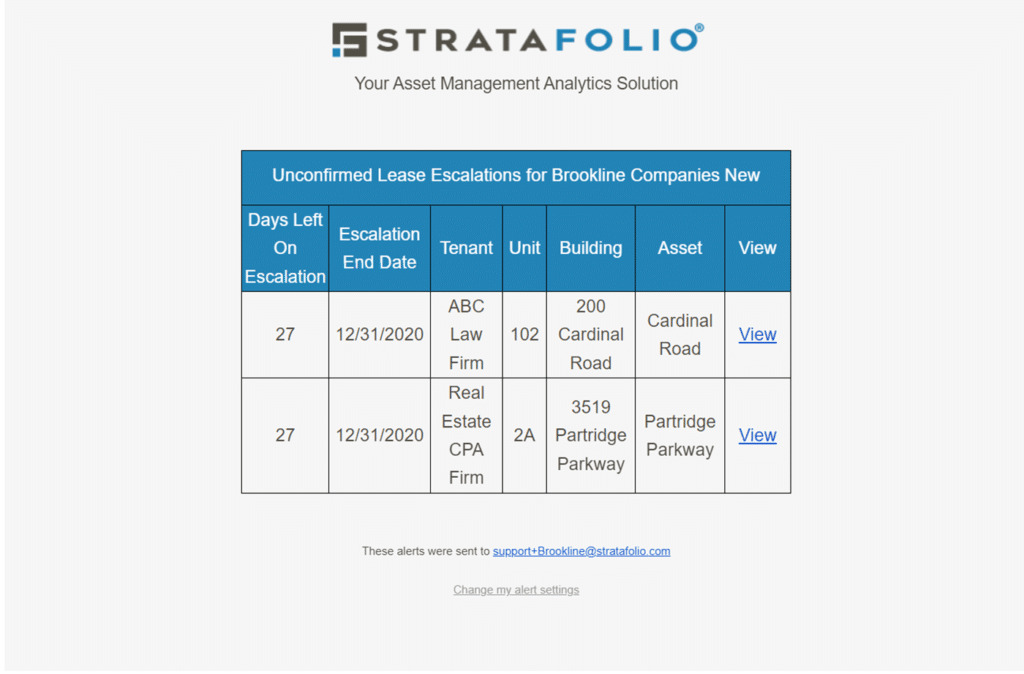
One reason this box is not checked by the Onboarding team is that the leases escalate at an unknown rate, i.e., the Consumer Price Index (CPI). When entering these lease rates, the future is unknown, but STRATAFOLIO still needs to alert you to the possibility of an escalation. It is important to show on the Rent Roll that the lease will escalate even if the amount is unknown until it happens. When this box is unchecked, STRATAFOLIO will send an alert indicating an Unconfirmed Lease Rate.
In the emailed alert, select the View link to go directly to the Lease in question. Look in the Lease Rates tab for the escalating Lease Rate. Select the pencil icon to edit the Rate.
If the Base Rent amount needs to be modified based on a different CPI rate, update it. Then choose the Lease Amount Confirmed Box and Save.
There are other reasons that the Onboarding team will leave the Confirmed Lease Rate box unchecked. Including unclear rate terms in the lease, such as “Annual increase of no less than 2%.” The team will enter a 2% escalation, but the amount may be different when the time comes. The alert is to help you verify that you are charging the correct amount and that you are notifying the tenant of the new amount 30 days in advance.
How to Respond to a Missing OpEx Period Alert
STRATAFOLIO sends you a Missing OpEx Period alert by email when a lease does not yet have its next Operating Expense period set up. This alert helps you stay ahead of your billing so operating expenses continue without a gap when the current period ends. Adding the next period on time keeps your invoicing accurate and your Rent Roll complete.
You do not need to search for the affected lease on your own. The alert links you directly to the leases that need attention.
How to Find the Lease With the Missing OpEx Period
- Open the Missing OpEx Period alert in your email.
- Click the Operating Expense link inside the alert.
- STRATAFOLIO opens the Operating Expenses index page. The OPEX STATUS dropdown filter is already set to Missing Next OpEx Period, so the table shows only the leases that need a new period.
- Click the OpEx End Date column header to sort the end dates. Click once to sort in ascending order, and click again to sort in descending order.
- Use the sorted list to locate the lease with the missing OpEx period, then open that lease to add the next period.
How to Handle Sub-Leases and Lease Assignments
When a tenant assigns or transfers a lease to another entity, such as in the case of an assumption or sub-lease, STRATAFOLIO provides two options to correctly manage the change.
You can either modify the existing lease to reflect the new tenant or close out the old lease and create a new one, depending on the lease terms.
Option When Handling Sub-Leases and Lease Assignments: Modify the Existing Lease
If the lease terms remain unchanged and the new tenant is simply assuming the existing lease, follow these steps:
- Add the New Tenant and Contact
- Navigate to Contacts and add a new Contact for the incoming tenant.
- Navigate to Tenants and add a new Tenant record.
- Edit the Existing Lease
- Search for the lease in STRATAFOLIO and select Edit Lease.
- Replace the old tenant with the new tenant.
- Under Invoicing, update the Accounting Customer to the new customer record synced from QuickBooks.
- Document the Change
- In the Lease Closing Notes, explain the situation briefly (e.g., “Lease assumed by Burlington Coat Factory after Jo-Ann Fabric bankruptcy”).
- Upload the assignment or sub-lease documentation to the Files tab of the lease record.
This approach ensures that the lease continues seamlessly under the new tenant while maintaining the financial and historical integrity of the record.
Option When Handling Sub-Leases and Lease Assignments: Create a New Lease
If the terms of the lease are changing, or if your accounting process requires a clean start:
- Close the existing lease by marking it as Expired.
- Create a new lease for the new tenant. Refer to the article How to Add a Lease and Assign a Unit.
This method provides a clear delineation between the two tenant agreements for reporting and audit purposes.
Best Practices for Handling Sub-Leases and Lease Assignments
- Always include supporting documentation (e.g., bankruptcy filings, assumption agreements) in the Files tab.
- Double-check the QuickBooks Accounting Customer link to ensure proper synchronization.
- Note any relevant financial or legal transitions in the Lease Notes to maintain a complete audit trail.
Why Can’t I Delete Leases or Units?
There may be times when you try to delete a lease in STRATAFOLIO and find that the system will not allow it. One common reason this happens is that ACH transactions have been processed for the tenant on that lease.
Why You Cannot Delete the Lease
STRATAFOLIO keeps a permanent record of every ACH transaction tied to a tenant. This protects the financial history of your portfolio, supports accurate accounting, and ensures that processed payments cannot be erased. Because of this, if any ACH transactions have ever been run for the tenant on a lease, that lease cannot be deleted from STRATAFOLIO. The lease must remain in the system to preserve the connection to the payment history.
Why You Cannot Delete the Unit
Units in STRATAFOLIO are connected to leases. If a lease cannot be deleted because of ACH transaction history, then the unit attached to that lease also cannot be deleted. This is because STRATAFOLIO does not allow you to delete a unit while a lease is still connected to it. As long as the lease stays in place to preserve the ACH record, the unit will stay in place too.