To connect your STRATAFOLIO account to your QuickBooks Online account (sometimes referred to as QuickBooks Software Online), follow our easy integration instructions. This connection is the foundation for seamless financial management across your portfolio, helping you cut down on manual data entry and keep everything aligned between systems.
Get Started by Logging In
To begin, log in to your STRATAFOLIO account and head to the left-hand navigation panel.
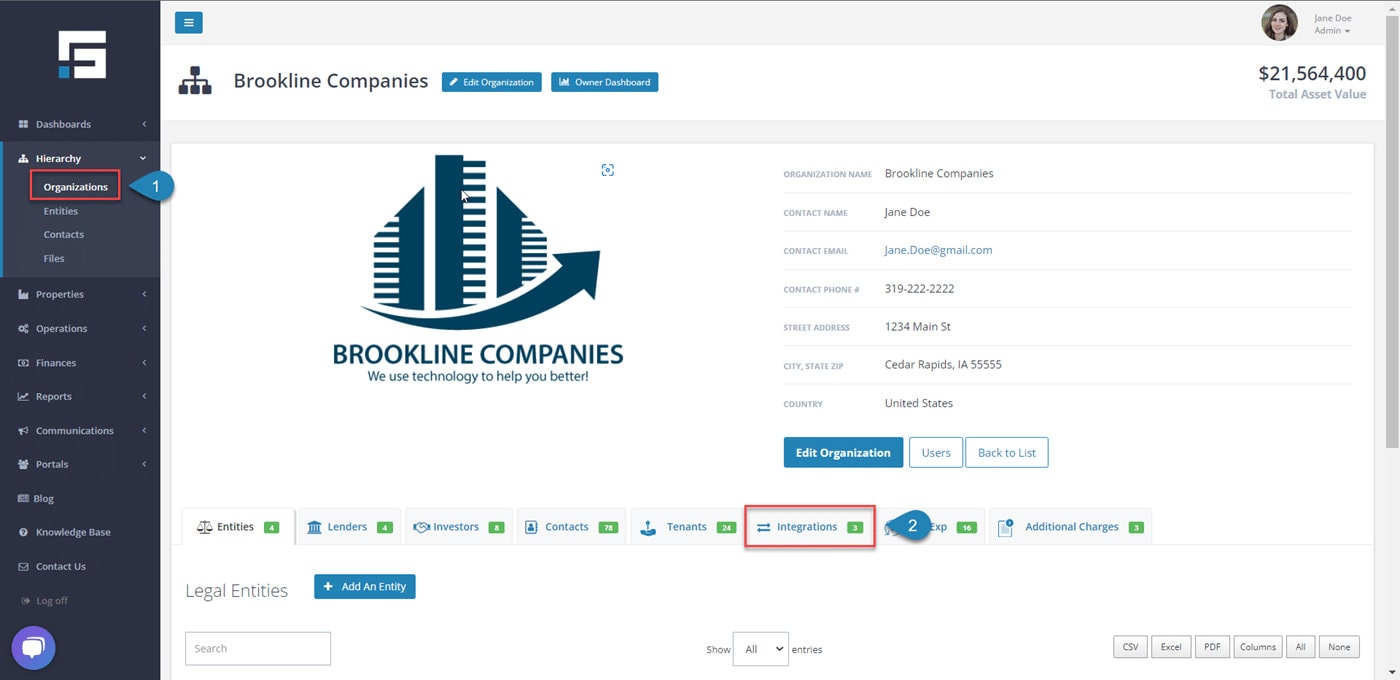
Navigate to Organizations from the left-side navigation menu, and then select Integrations. From the Integrations tab, select Add An Integration.

Choose QuickBooks Online
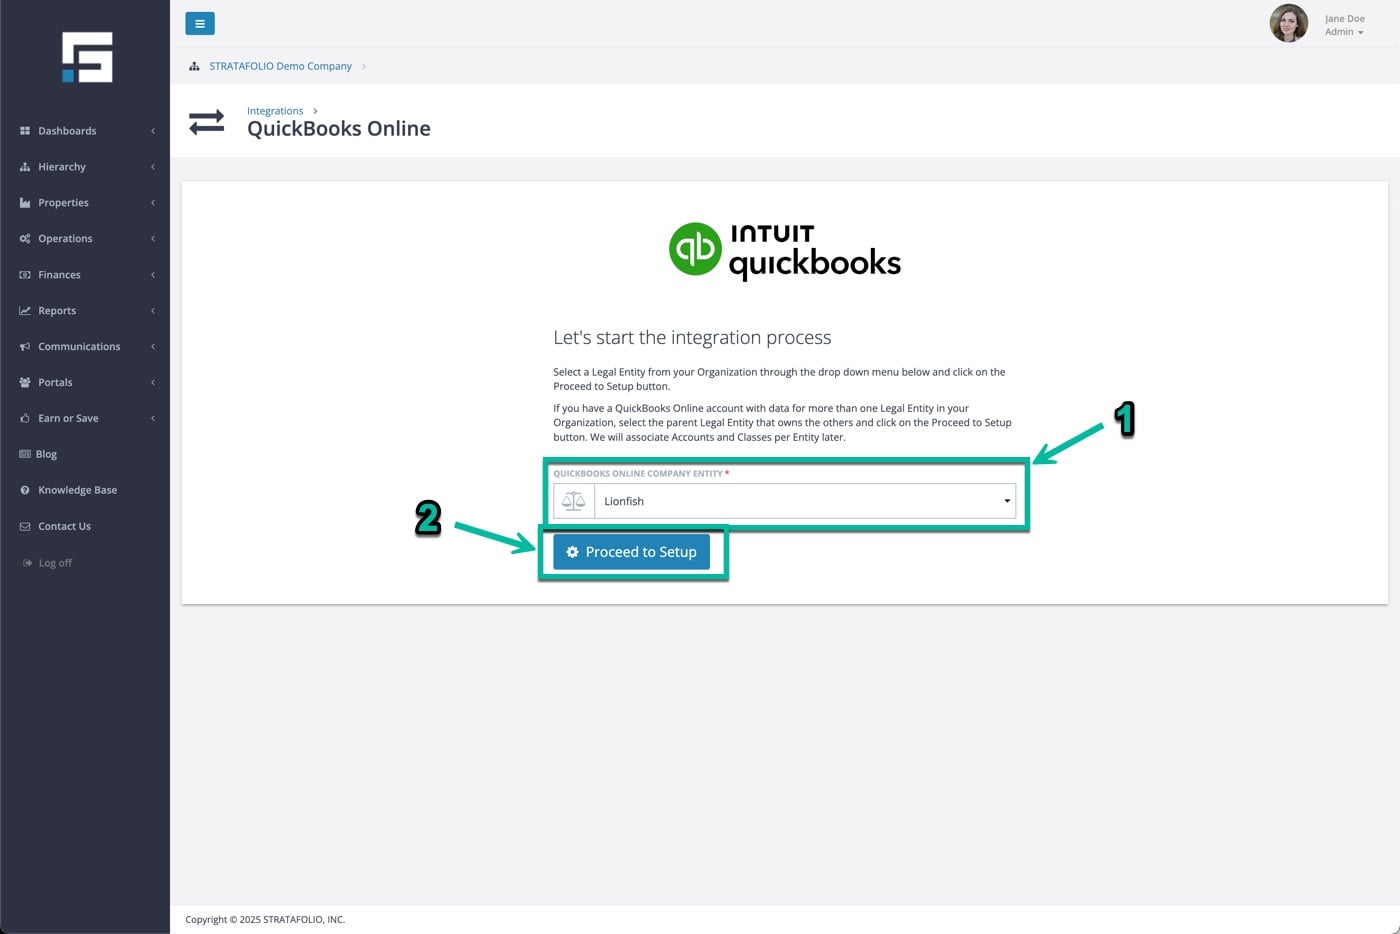
You will then see the integration options page. Select QuickBooks Online, and then choose Add Integration.
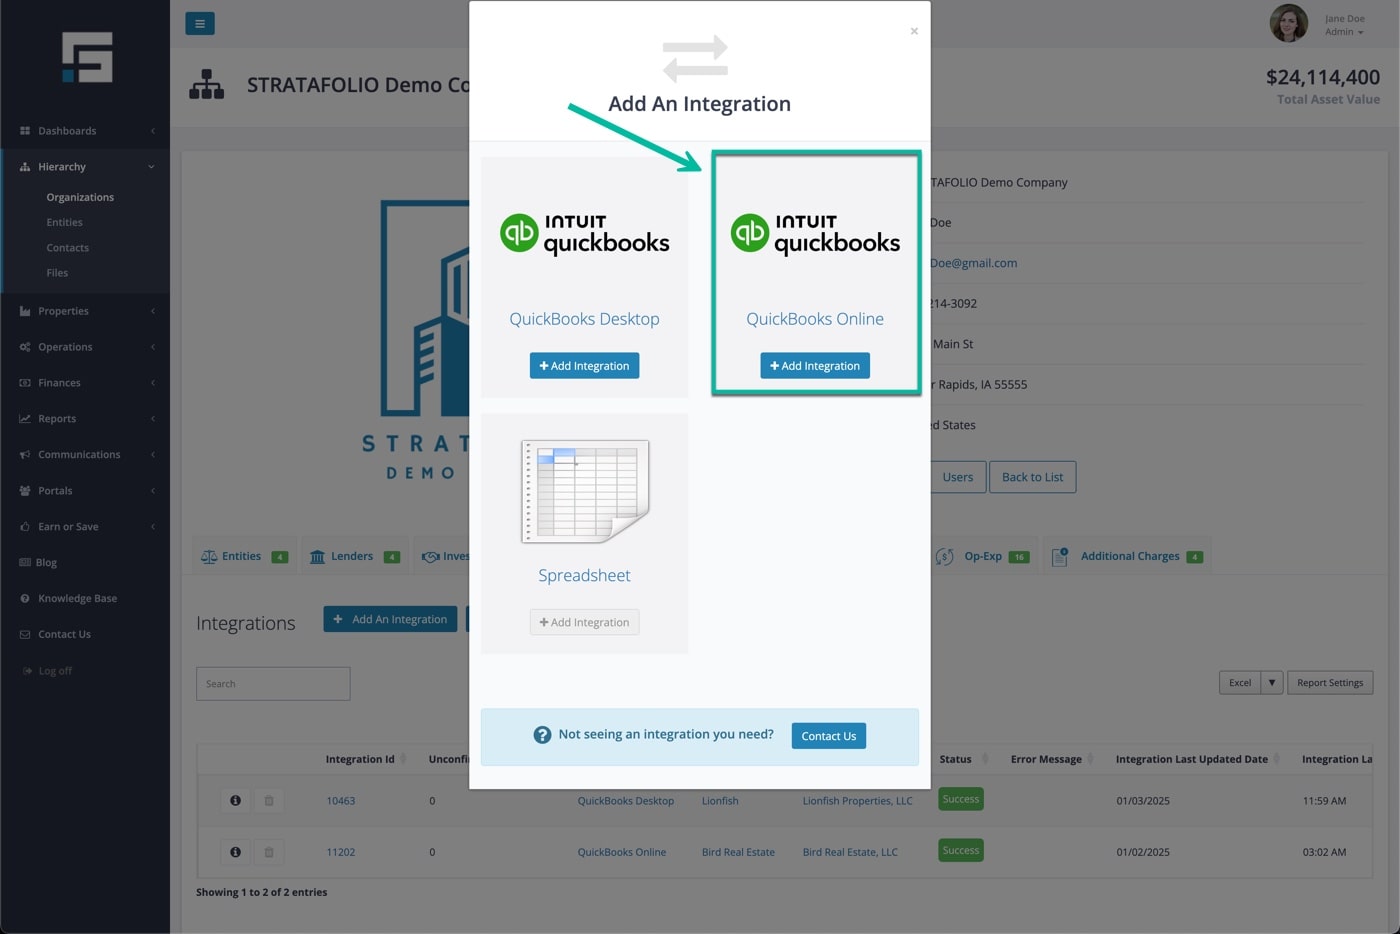
From the dropdown list, select the correct Entity in STRATAFOLIO that you want to integrate with QuickBooks Online. Please use caution during this step, as some accounts may have very similar names. Verifying you’ve selected the right entity will prevent unnecessary rework later. Once confirmed, choose Proceed to Setup.
Authorize the Connection
Next, you will start the integration process. When prompted, you will be redirected to the QuickBooks Online login page. This is where you authorize the connection between STRATAFOLIO and your QuickBooks account.
Follow the login prompts carefully, ensuring you connect to the correct QuickBooks Online account associated with the entity you selected in STRATAFOLIO. QuickBooks will ask you a few security authorization questions. Complete these prompts, and STRATAFOLIO will then finalize the integration.
Refresh and Review
Once you complete the setup, refresh your page in STRATAFOLIO. You should see the Accounts tab with a green number next to it, indicating that your connection is active. Depending on the size of your data, it may take several minutes for the system to import and sync everything. For organizations with many entities or a long history of financial data, expect the process to take a little longer the first time.
Why the Integration Matters
Connecting STRATAFOLIO with QuickBooks Online gives you a single source of truth for both operational and financial data. Instead of logging in and out of different QuickBooks accounts or manually updating spreadsheets, you can access the information you need directly in STRATAFOLIO.
The integration allows you to:
- Quickly view balances across all entities.
- Eliminate duplicate data entry.
- Ensure consistency between your books and your property operations.
- Simplify reconciliations at month-end.
- Save time by reducing the back-and-forth between systems.
By syncing your financial data into STRATAFOLIO, you give your team real-time visibility into the financial health of your portfolio.
Common Scenarios When Using QuickBooks Online
Here are some common situations where the QuickBooks Online integration proves especially useful:
- Managing multiple entities: You can connect each entity in STRATAFOLIO to its corresponding QuickBooks Online account without switching between systems.
- Auditing charges: Quickly confirm that all rent and NNN charges are being invoiced properly by cross-checking your books.
- Monitoring payments: See who has paid, who is past due, and where late fees may apply.
- Improving reporting: Build reports in STRATAFOLIO that automatically pull accurate financial data from QuickBooks.
Troubleshooting Tips for QuickBooks Online Integration
If you encounter any issues during the setup process, here are a few things to check before reaching out for help:
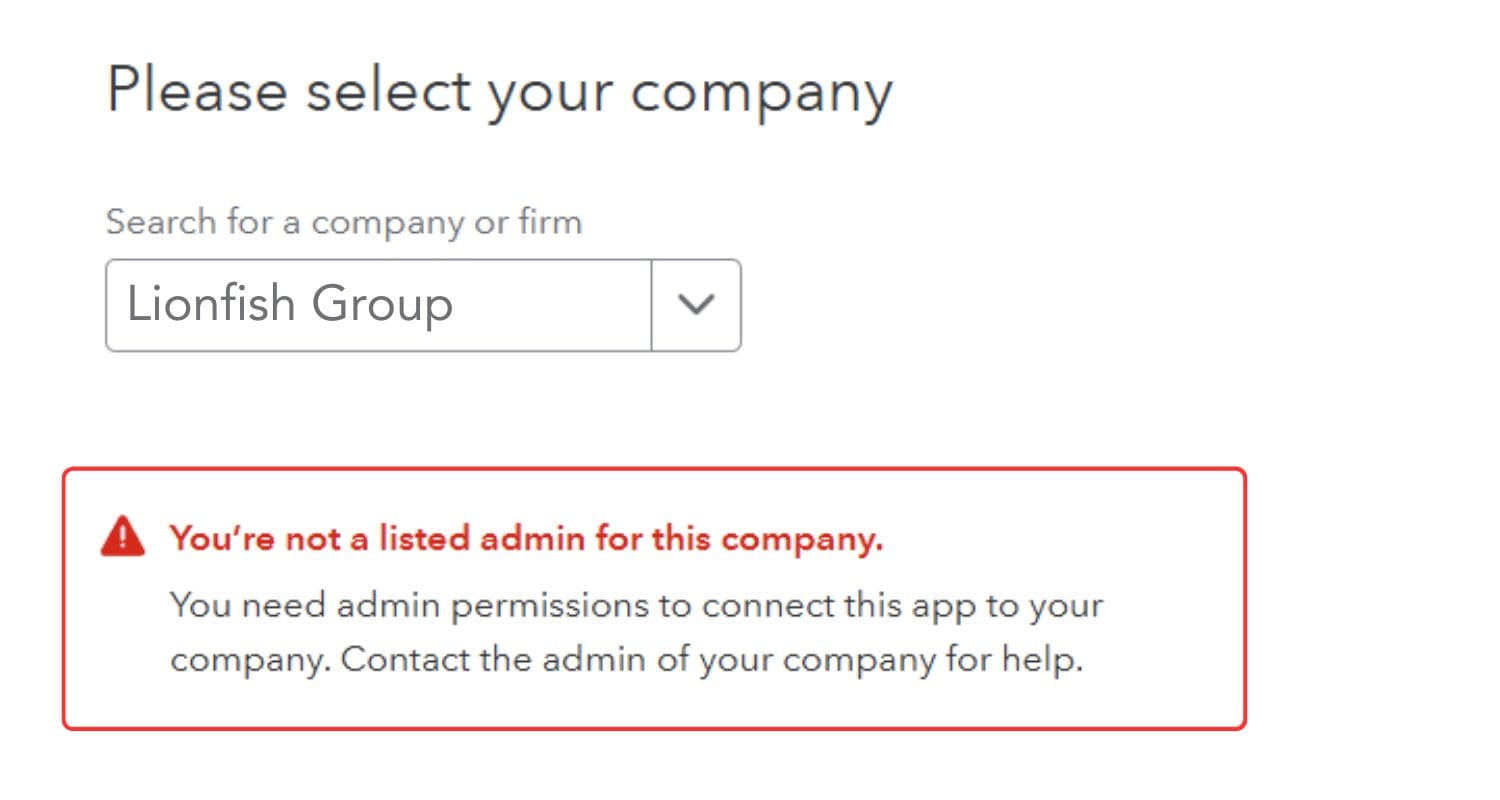
- To connect an Entity to QuickBooks Online, you need admin-level access in both STRATAFOLIO and QuickBooks Online. If you are not listed as an admin on the QuickBooks company you are trying to connect to, QuickBooks will not allow the connection, and you will need help from that company’s admin before you can continue. You will see a warning telling you that you are not a listed admin for that company.
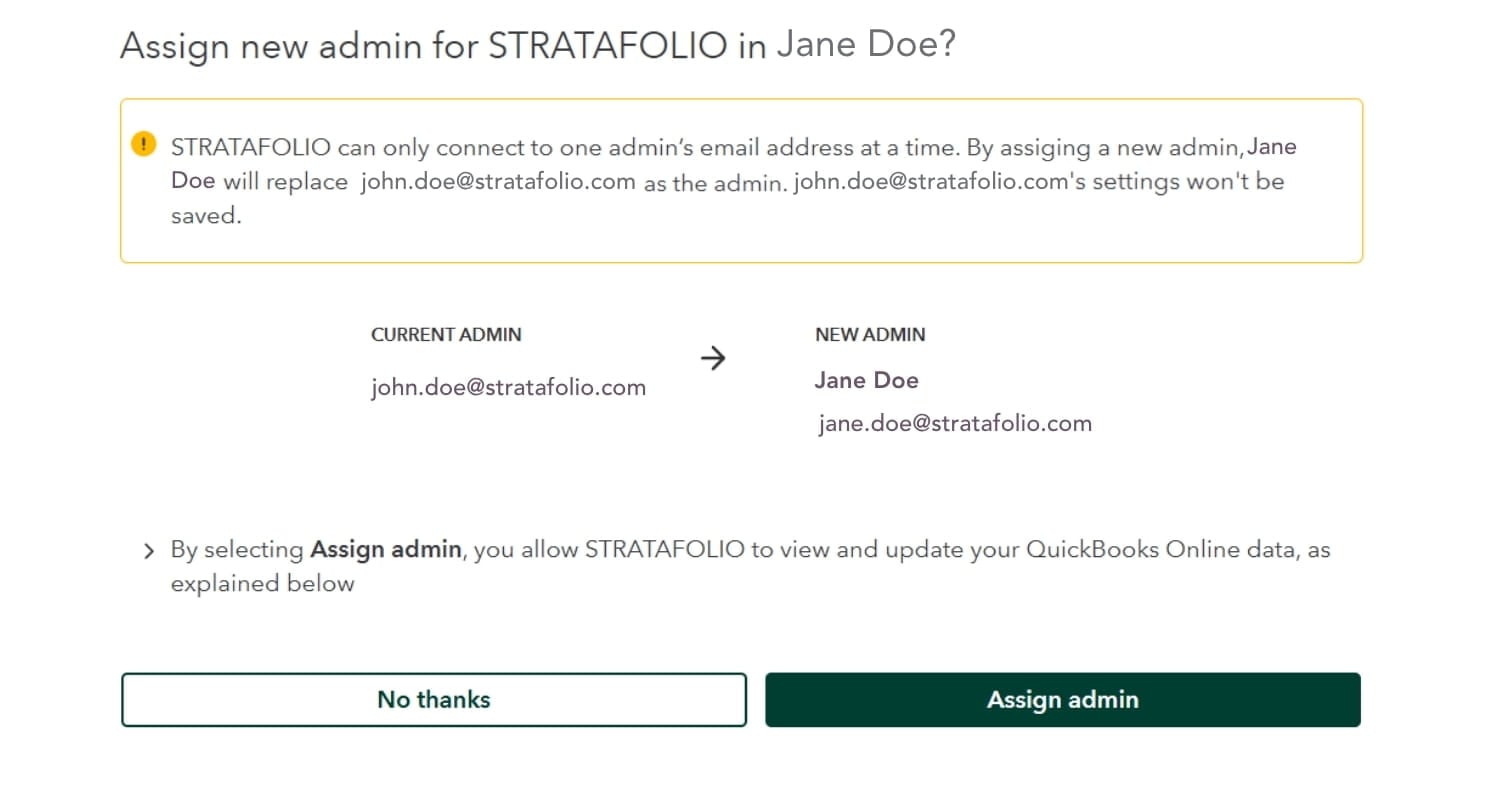
- If a different admin email is already connected and you try to connect, you will see a prompt asking whether you want to assign a new admin. If you choose to assign yourself as the new admin, you will replace the current admin, and the previous admin’s settings will not be saved. Before you assign a new admin, make sure your team agrees on who should be the connected admin. If you are not sure, choose No thanks and confirm with the current admin first so no settings are lost.
- Verify that you are logging into the correct QuickBooks Online account if you manage multiple accounts.
- Confirm that your QuickBooks Online subscription is active.
- Try refreshing your browser or clearing the cache if you don’t see the Accounts tab update right away.
If problems persist, STRATAFOLIO support is always available to help you with integration questions. For specific QuickBooks functionality, we recommend working with your accounting team.
Next Steps after Connecting QuickBooks Online
Once you’ve completed the connection, you’re ready to take advantage of other powerful features in STRATAFOLIO. For example, you can set up user permissions so your team has the right level of access to financial data. To learn how, check out our Knowledge Base article on giving access to a user in STRATAFOLIO.
How Can I Turn Off Custom Transaction Numbers in QuickBooks Online
STRATAFOLIO has the capability of pushing invoices into QuickBooks Online. When this happens, QuickBooks Online assigns the invoice a number and returns it to STRATAFOLIO. When the Custom Transaction Numbers setting is enabled, QuickBooks Online assumes the user wants to use their own custom invoice numbers and will not assign one. Every time an invoice is created, the user will go into QuickBooks Online and update it with a customer invoice number.
To utilize STRATAFOLIO to its full capabilities, including ACH, and save you a lot of time, invoice numeration needs to be used. This will allow QuickBooks Online to create the invoice numbers automatically for you and allow you to differentiate between invoices. This will need to be done in each QuickBooks Online account integrated with STRATAFOLIO.
How to Turn Off Custom Transaction Numbers
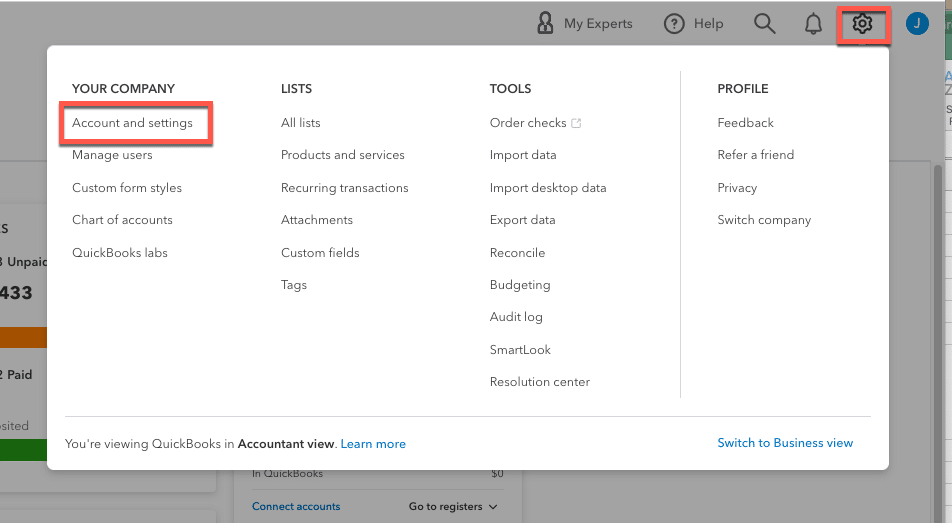
Select the gear icon at the top right of your screen, then select Account and Settings.
Select Sales, then toggle Custom Transaction Numbers off.
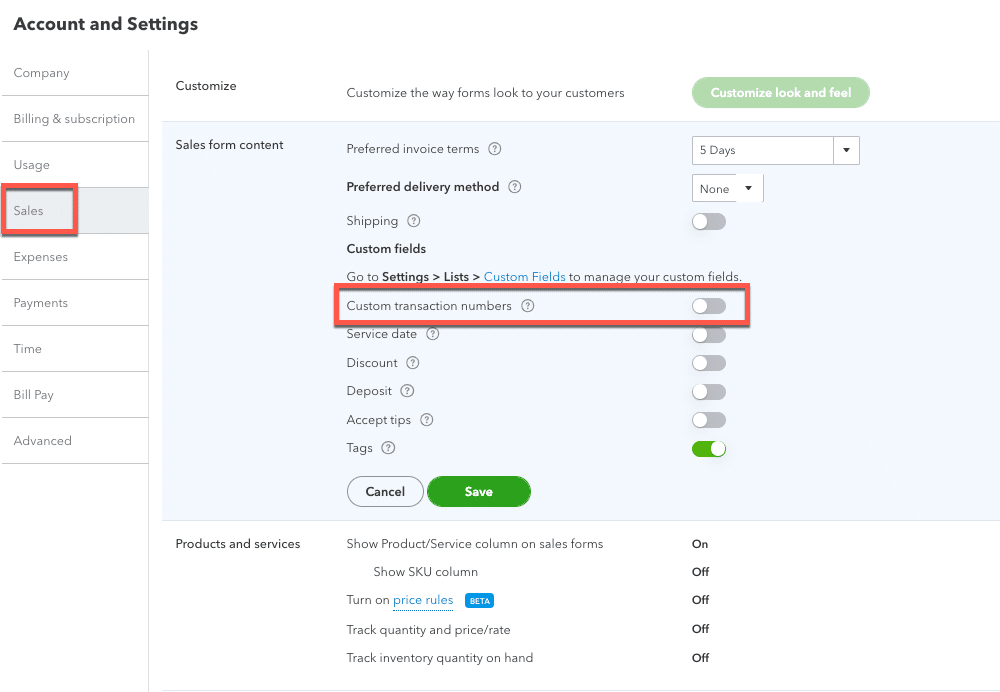
If you have created invoices before turning off this toggle, you will need to go back and manually update their invoice numbers in your QuickBooks Online accounts. The invoices in your STRATAFOLIO portfolio will be updated with the invoice numbers you added in QuickBooks Online.
Reconnect QuickBooks When the Sync Breaks
One or more of your QuickBooks Online accounts may stop syncing with STRATAFOLIO, and you see an error message. This can happen for a variety of reasons, such as your QuickBooks Online administrators changing, passwords changing, Intuit changing the integration certificates, or any number of other reasons. This does not happen often, but when it does, a simple reconnection of the account(s) is needed. In other words, you’ll need to reconnect QuickBooks sync with STRATAFOLIO to get everything running again.
Where to Find Integrations in STRATAFOLIO
STRATAFOLIO connects to QuickBooks to keep your financial data synced and up to date. All QuickBooks integration settings are managed at the Organization level, so they apply consistently across your hierarchy.
To find the QuickBooks integration settings, follow these steps:
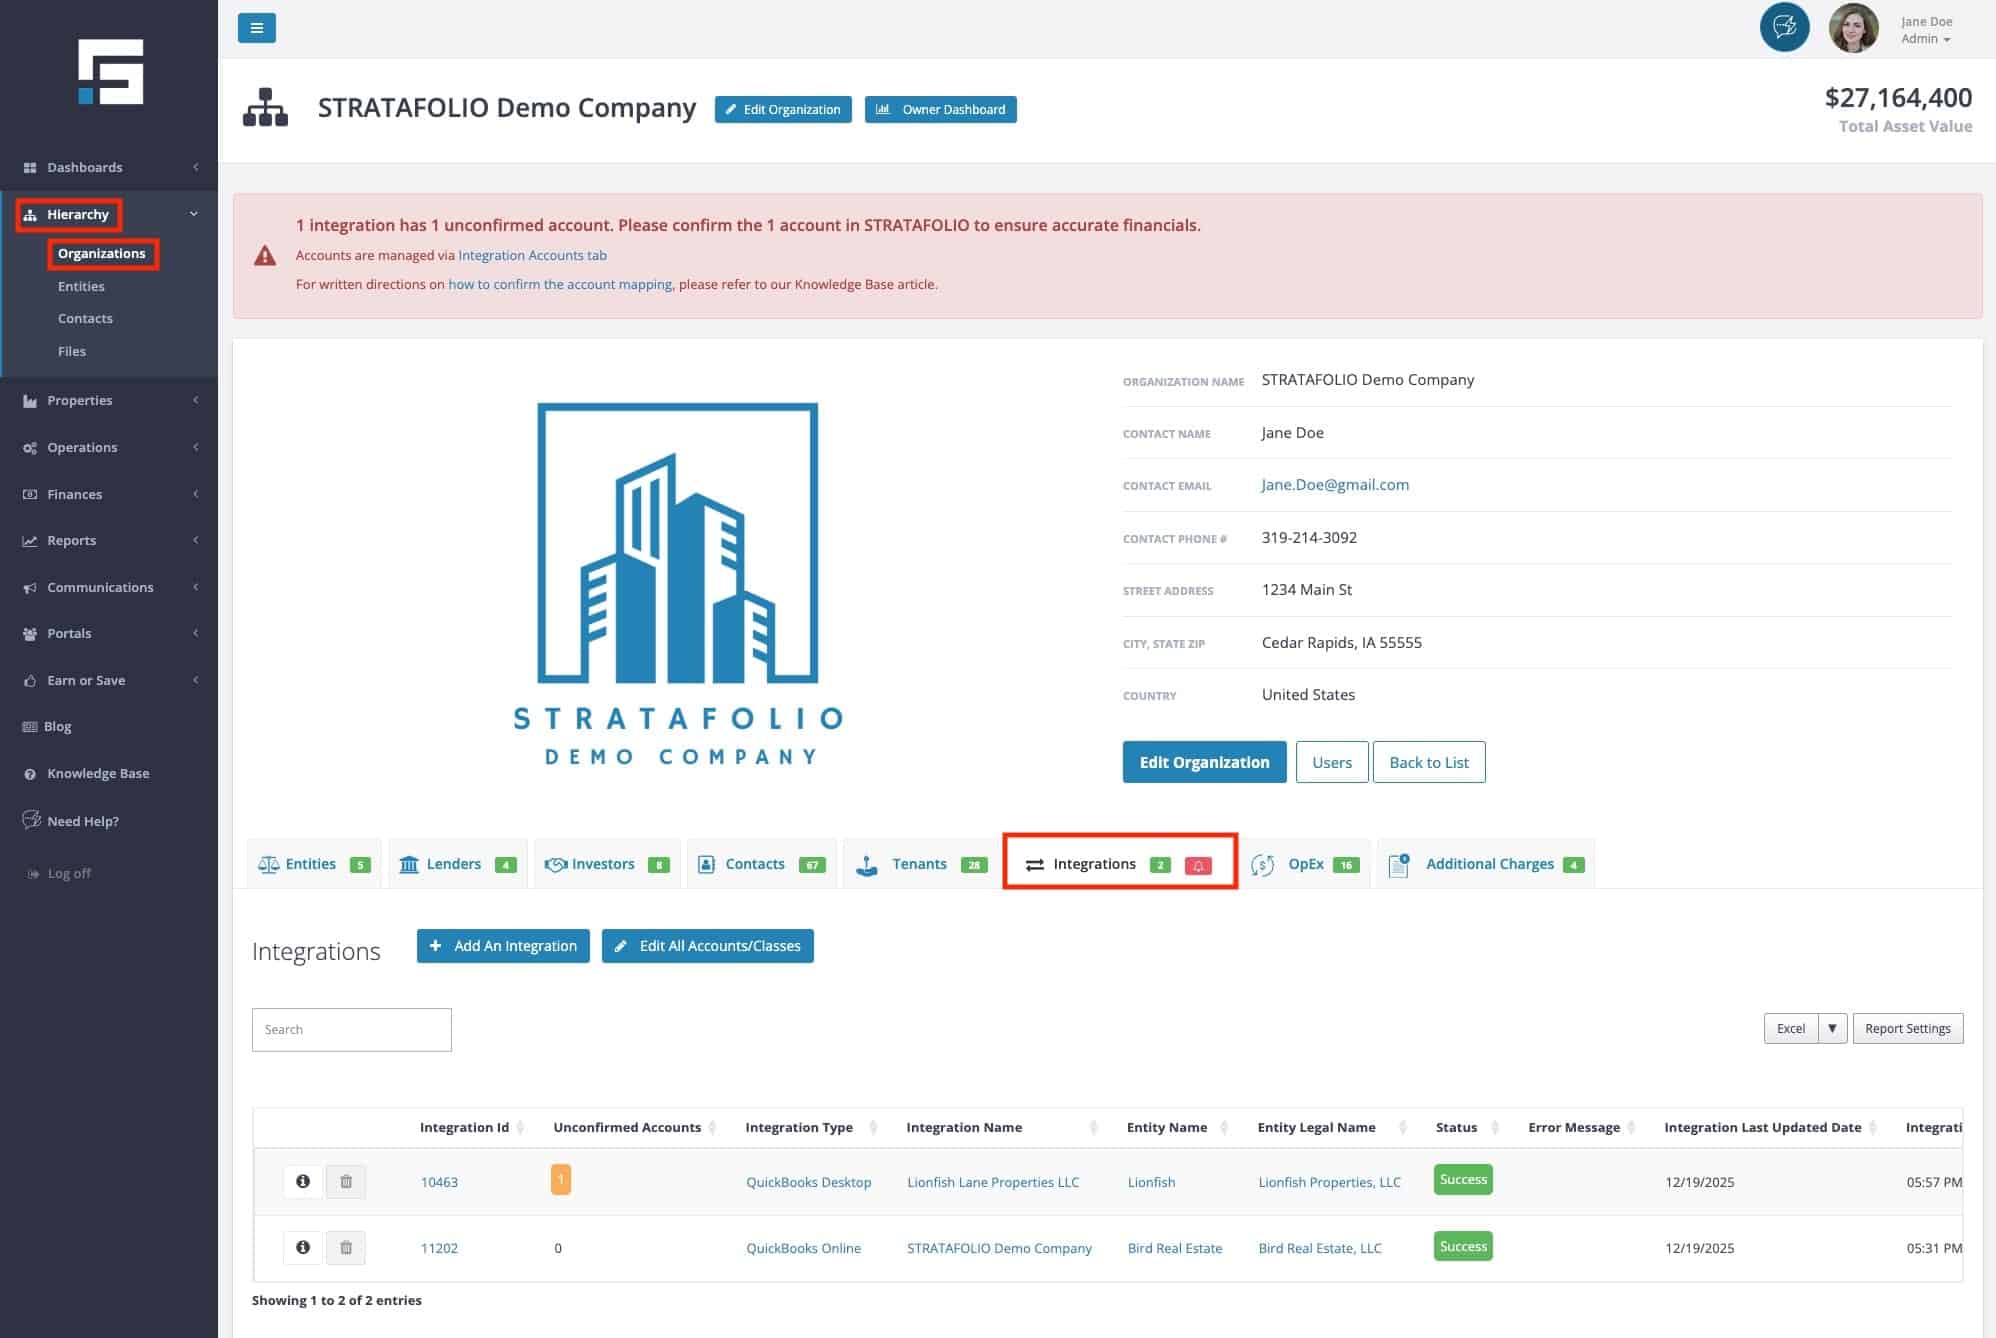
- From the left side navigation menu, select Hierarchy.
- In the Hierarchy dropdown, choose Organizations.
- Select the Organization you want to manage.
- Open the Integrations tab.
The Integrations tab is where you can view, manage, and monitor your QuickBooks connection. This is the central location for syncing financial data between QuickBooks and STRATAFOLIO, ensuring your accounting and reporting stay aligned across your entire portfolio.
How to Know If You Need to Reset the Integration
On the Integration tab in the main Organization record in STRATAFOLIO, you will see a red bell indicating that something needs attention. After selecting the tab, you will see if there is an issue with account mapping or the integration syncing. If you see a red alert for syncing issues, this indicates that you need to fix a QuickBooks sync break by resetting the integration. You can find the information on How To Map A New QuickBooks Account in STRATAFOLIO Knowledge Base article.
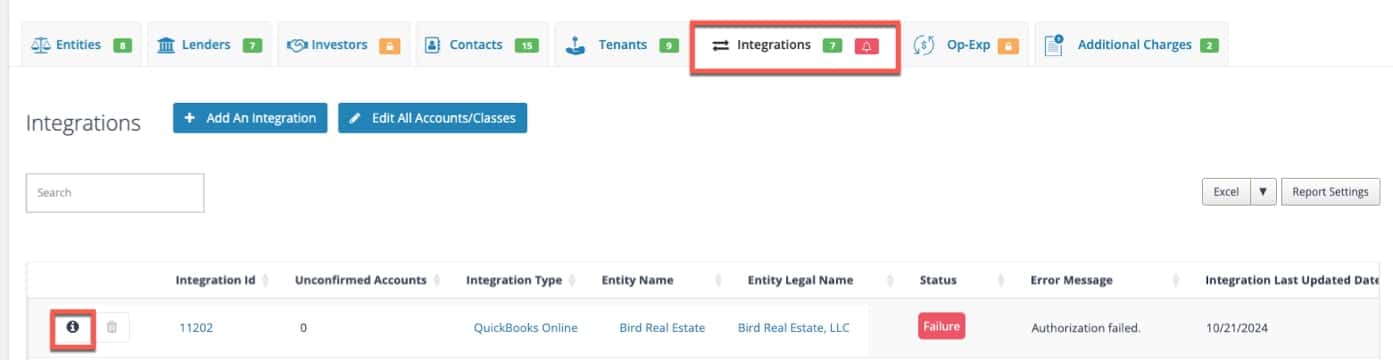
For syncing issues, you will see the red Failure in the Status column and more information in the Error Message column.
If there is a yellow button labeled “Outdated,” there is no need to do anything. This will happen if there has been no movement in your QuickBooks Online account for more than 72 hours. If you believe that you are receiving this message by mistake, please complete a transaction in QuickBooks Online to verify the integration. It should refresh in a few minutes. If it has been longer than an hour, please use the Contact Us button on the left-hand navigation bar for assistance.
How to Resync an Integration
These steps provide a workaround for a broken QuickBooks sync that reconnects your data and ensures STRATAFOLIO continues to pull in the most up-to-date information. Select the appropriate integration by clicking on the “i” for more information.
Inside the integration, select the Setup tab. This should show you the QuickBooks Online syncing error message if there is one. The most common errors are “Authorization has expired,” “Authorization denied,” “Unauthorized,” and “Authorization failed.”
Inside the Setup tab, there will be a green button labeled “Connect to QuickBooks.” Selecting this will open up your QuickBooks account in your browser.
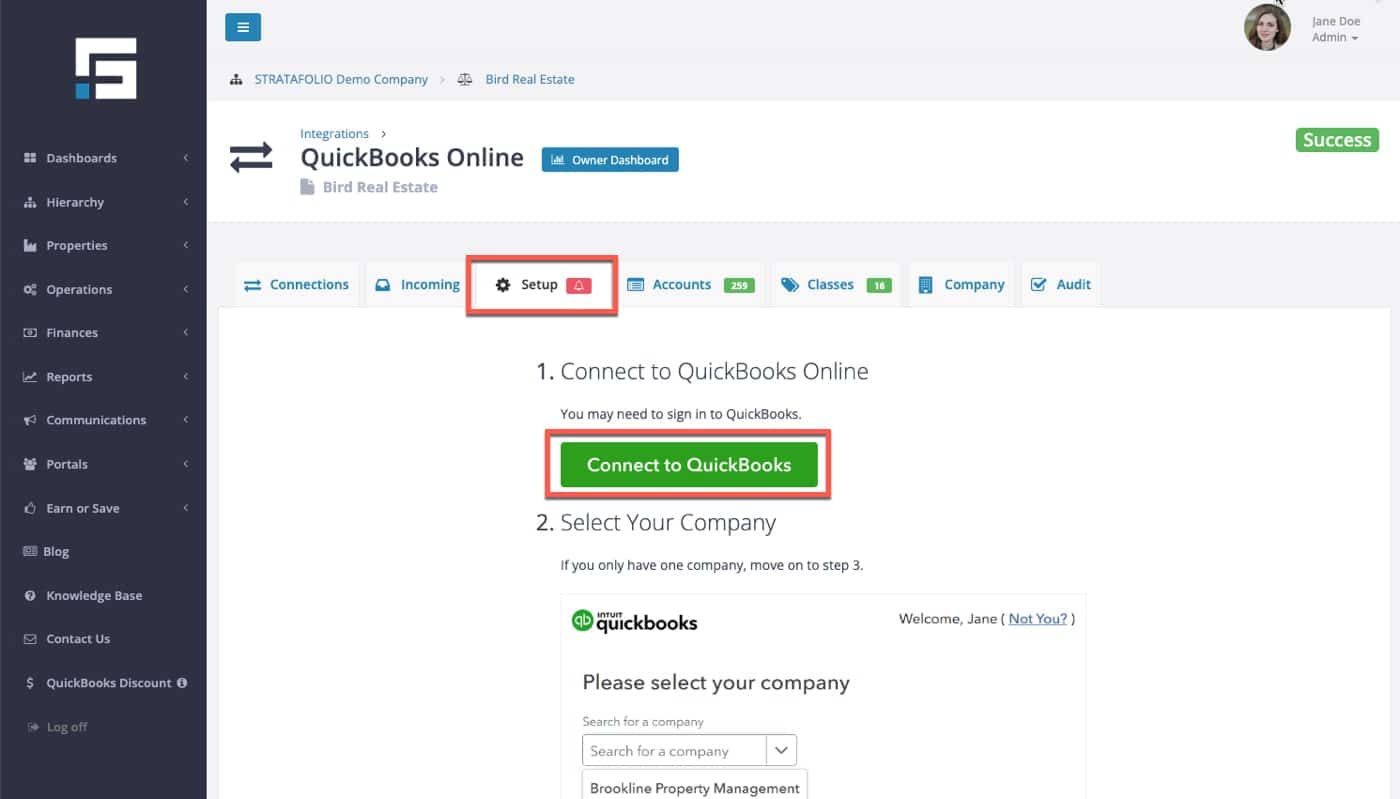
Select the proper QuickBooks Online account to reconnect. It is crucial to connect the same account previously linked to ensure correct mapping in STRATAFOLIO.
If any accounts have been added since the last successful sync, you may need to confirm them, such as general ledger accounts or classes. See our Knowledge Base articles for more information on how to map Accounts, Classes, and Loans in STRATAFOLIO.
Repeat this process for any integrations with red Failure as the status in the Integrations tab.
NOTE: If you have a QuickBooks Desktop account, you will need to follow the directions for Updating Web Connector for QuickBooks Desktop, as these instructions are very different.