QuickBooks is the most popular financial software platform worldwide.
It’s easy to use, inexpensive, and adaptable for nearly any business, including commercial real estate. These reasons have made it the software of choice for small to medium-sized real estate businesses. This article will demonstrate the best way to operate commercial real estate and QuickBooks together.
Commercial Real Estate and QuickBooks
Many real estate owners and their staff don’t enter the business with an accounting background, and they struggle to properly set up their QuickBooks files when they start their business. These early missteps can result in improper tracking of income or expenses, inability to secure loans, and damaged business reputations down the line. All of which can severely impact the profitability of a real estate business.
In this article, we will address:
- How to set up the company file
- Setting up/using a good Chart of Accounts
- The use of Classes
- How to set up Tenants
- How to set up Income Items
- The importance of Invoicing (even if your tenants should know)
- Linking Bank Accounts
- Recording Loans
We recommend the following steps for setting up your real estate company correctly from the beginning in QuickBooks. We will be providing the steps using QuickBooks Online to demonstrate, but you can follow similar steps with QuickBooks Desktop.
One Legal Entity per Company File
Each legal entity needs its own QuickBooks company file to prevent commingling of funds and resources and legally protect the owners. Each file will deal exclusively with the properties it owns, leases, or manages. In the United States, a legal entity may be a Sole Proprietorship, Limited Liability Company (LLC), Partnership, S Corporation, or C Corporation.
Setting up a QuickBooks company file for a real estate entity will depend on the legal entity’s form of business, number and type of owners, and its assets and liabilities. It is best to check with your accountant for confirmation if you need a separate QuickBooks file or combine them if it is not clear.
A Clean Chart of Accounts
With each entity, it’s essential to have a clean Chart of Accounts (COA). The Chart of Accounts lists all the types of financial information a business entity tracks. There are five basic types of financial information:
On the Entity’s Balance Sheet:
- Assets
- Liabilities
- Equity
On the Profit and Loss Statement (P&L):
- Revenues
- Expenses
You can follow along with our video and blog for best practices on setting up a Chart of Accounts.
Balance Sheet Accounts
Assets are the items from which a business enterprise derives economic benefits. Cash, securities, land, buildings, furniture, equipment, and accounts and notes receivable are all examples of assets. Liabilities reflect what the enterprise owes to other parties. Liabilities include accounts payable, notes payable, and mortgages.
Equity represents the ownership of the company. This section of a Chart of Accounts can vary depending on the form and ownership structure of the business entity. Each owner should have an investment and a draw account for sole proprietorships and partnerships. Corporations will have retained earnings accounts.
- Assets = Liabilities + Equity
Profit & Loss Accounts
Revenues are inflows of cash and economic benefits to the business entity. Expenses are outflows of cash and economic benefits from the business entity tracked within one business cycle (generally a year). Expenses include reimbursement accounts for Common Area Maintenance (CAM) charges and other overhead operating expenses.
On the other hand, balance sheet accounts are permanent, and their balances carry from business cycle to business cycle.
On the other hand, profit and loss accounts are closed out to the equity accounts at the end of each business cycle. At the end and beginning of each business cycle, a Profit and Loss Account balance will be zero. The business cycle is typically at the year-end at the time of tax filing. Please review with your accountant for the proper way to do this.
Using numbered accounts in your COA allows you to distinguish between similar accounts. A numbered accounting structure is beneficial when the management of accounting staffing changes over time.
In our article Setting up a Chart of Accounts for a Commercial Real Estate Company, we provide a template to help real estate companies create their Charts of Accounts in QuickBooks Online.
Use Classes for Additional Properties
Classes help sort financial transactions in one QuickBooks Online file among common criteria. For example, you could have an asset with multiple buildings. In that situation, you might want each building (or unit) to have its own class and/or subclasses if there is a need to break down the expenses. This additional separation helps when running a Profit and Loss Statement to see the revenue and expenses as a whole and more granularly.
Note: Only QuickBooks Plus and Advanced users can create classes. As an admin, you must first turn on class tracking in QuickBooks to begin.
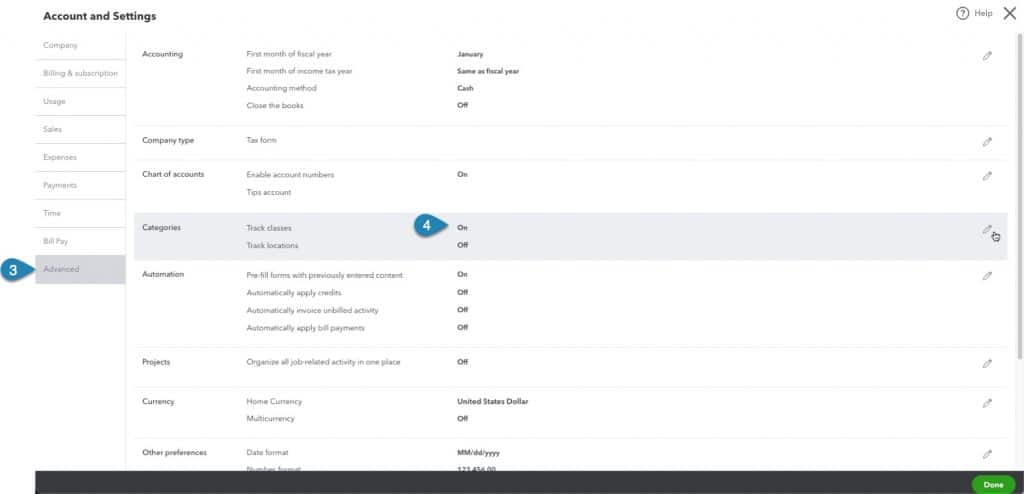
- Go to Settings gear icon.
- Select Account and Settings.
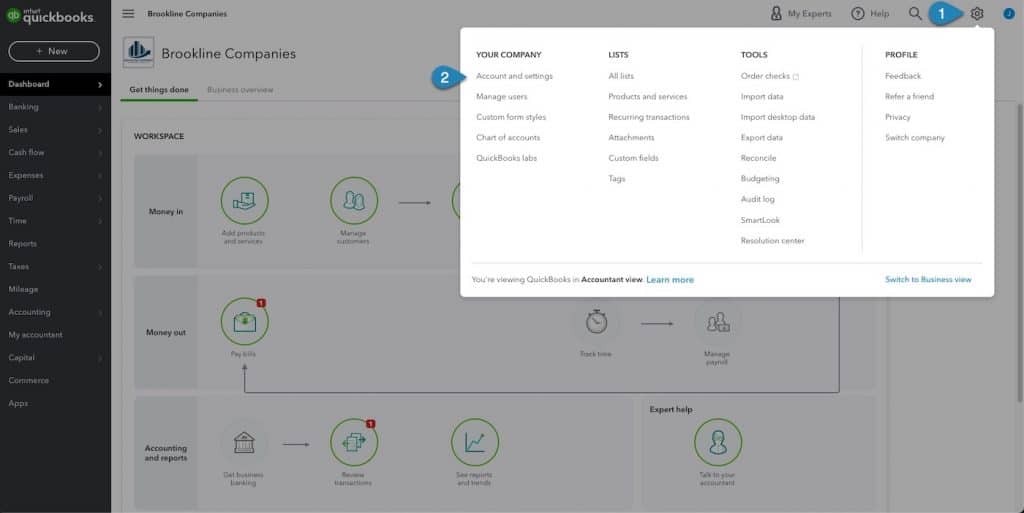
- Select Advanced.
- Turn on Track Classes.
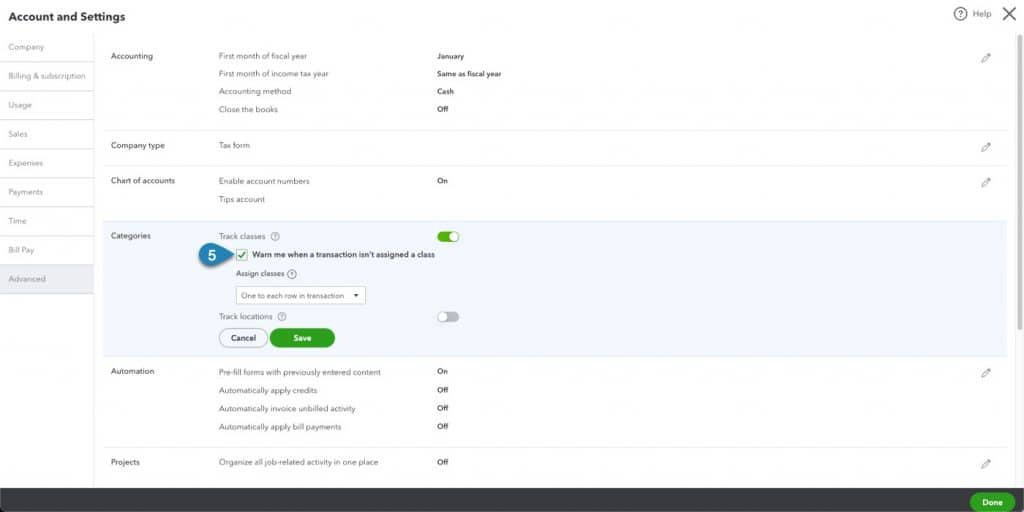
- Lastly, we recommend you select the option to warn when a transaction is not assigned a class and then save your selection.
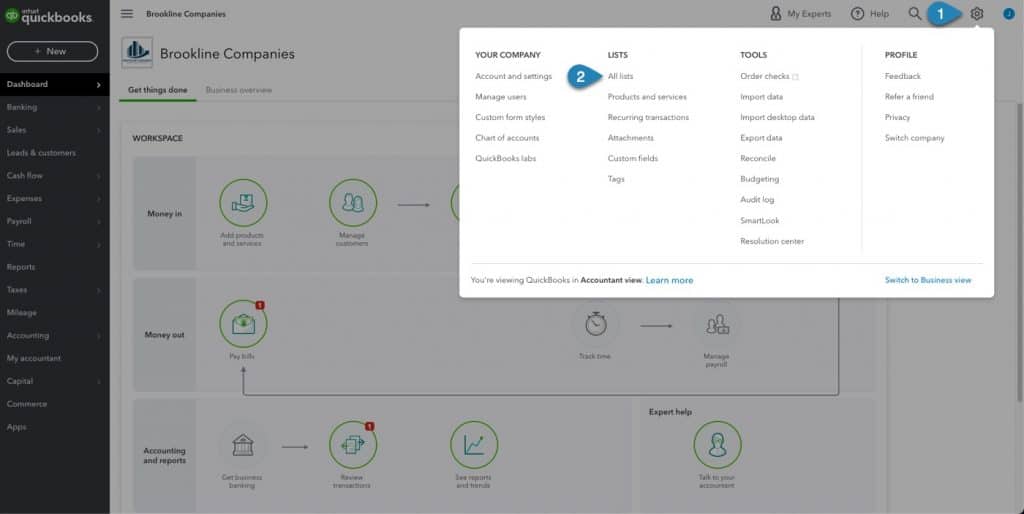
To use classes in QuickBooks Online, do the following:
- Go to the Settings gear icon.
- Select All Lists.
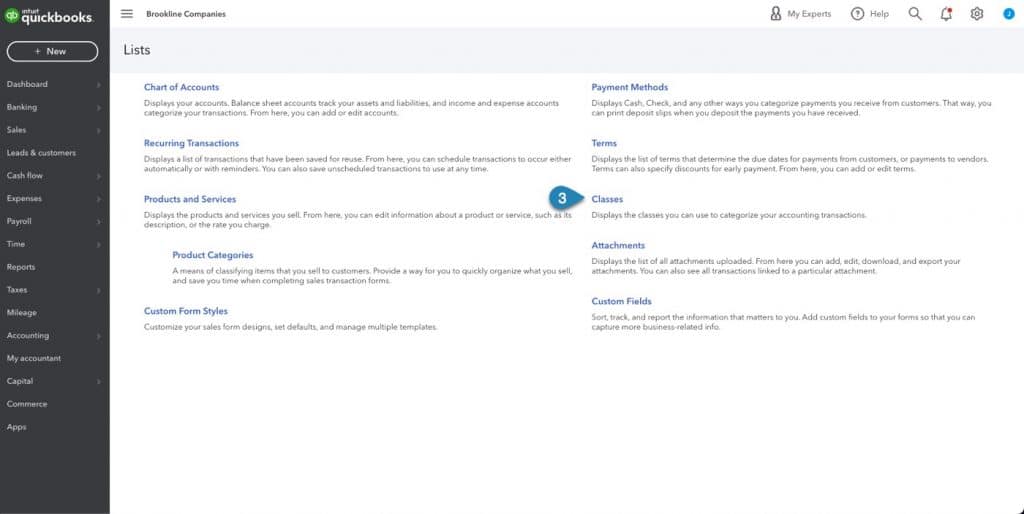
- Click on Classes. This listing contains a complete list of the classes you are using. Plus, it allows you to create new classes as well.
We recommend you keep separate balance sheet accounts for each asset. Additionally, use a different class for overhead and administrative to ensure every transaction has a class to post to.
Set up Tenants as Customers
Add each of your tenants in QuickBooks as customers. By setting your tenants as customers, you can easily create invoices.
- In the Your Books menu on the left side of the screen, click on Leads & Customers.
- Click on New customer.
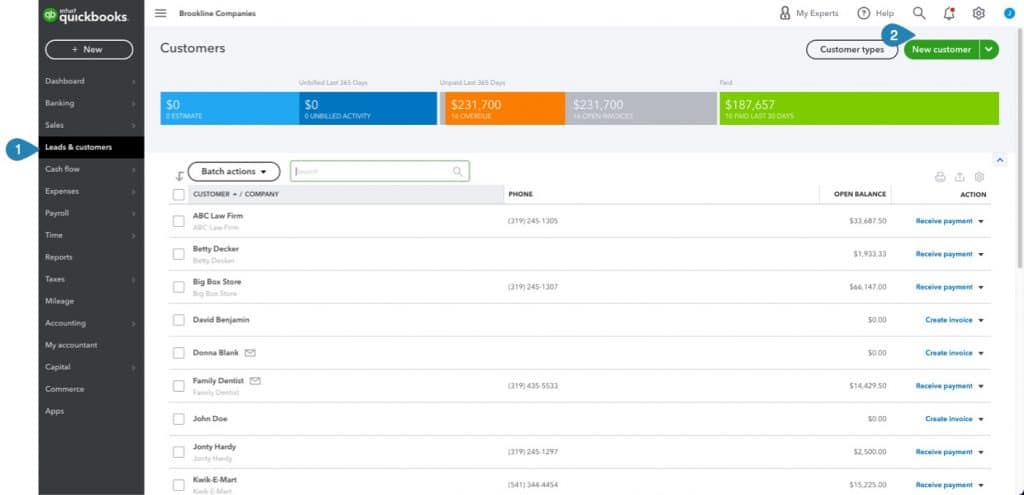
- Use the Customer types button to create types of customers for your business if you want to segment or distinguish one customer type from another.
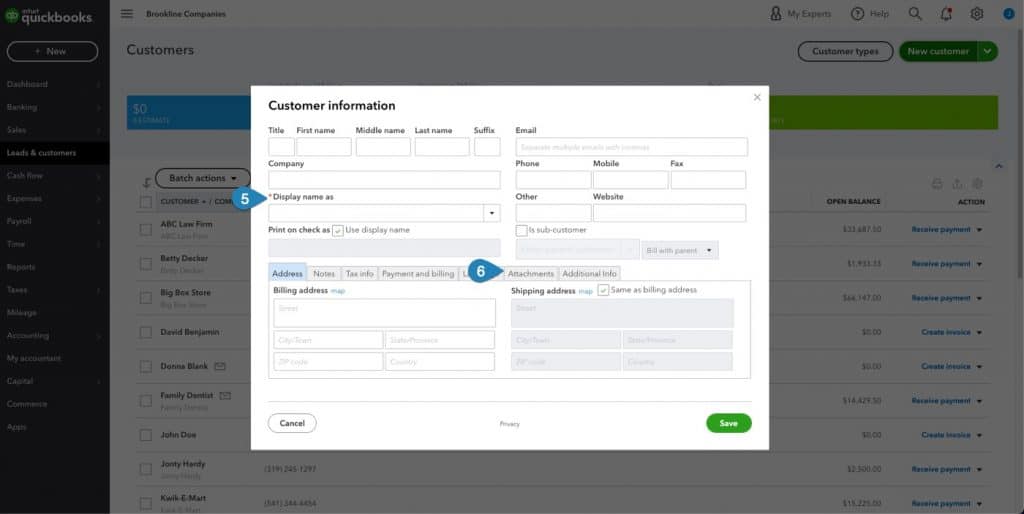
- Use the New Customer button to add tenants. The following screen will appear. Completely populate this form.
- Select the correct Display name as for your tenant to help facilitate matching deposits in the future or writing any checks.
- Attachments can be used for any documents you want to attach to the tenant/customer.
Setting Up Income Items
Next, set up income items. Income items include rental income and any other income items types invoiced to tenants. For a detailed process on setting up income items, please see the article How to Create an Income Item and Invoice in QuickBooks for Real Estate.
We recommend splitting out base rent and the additional rent associated with recovering taxes, insurance, and common area maintenance expenses for commercial leases.
Always Make Invoices
QuickBooks allows you to generate unique invoices for each month’s billing. With the income items created for rent, CAM charges, and any other income that you need to make an invoice for, it will be easy to keep track of who has been charged monthly. And, more importantly, that they have paid their rent. And not only have they paid, but they have paid the correct amount. To learn how STRATAFOLIO helps with ensuring you are invoicing for the most recent rent escalation and additional rent, check out the information on our Operations Management page.
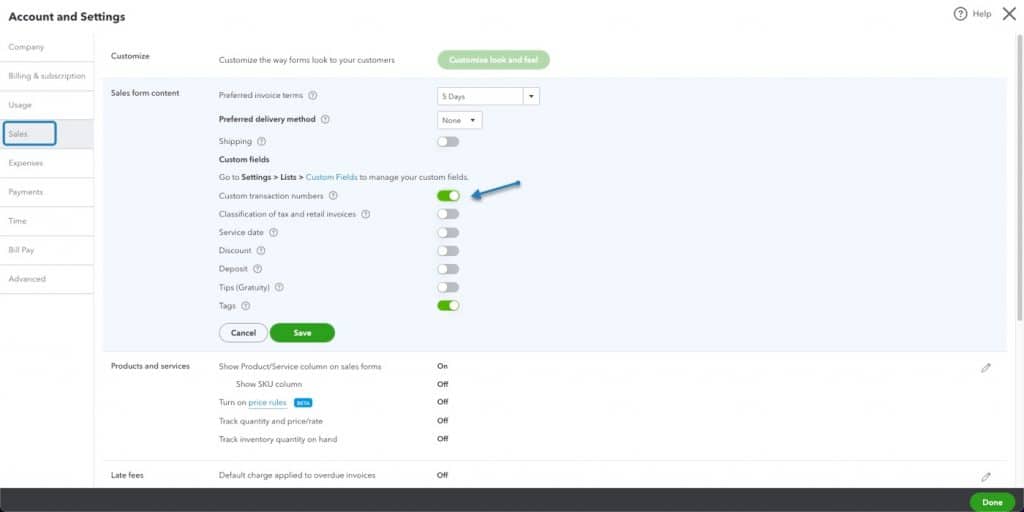
It is vital to have a uniquely numbered invoice for each invoice created.
To do this, verify that the custom transaction number setting in the account settings is turned off. This will allow QuickBooks to create a subsequently numbered invoice for your tenants with minimal effort.
If you use STRATAFOLIO, you can create all your invoices (with the most current base rent rate and other charges) for each of your QuickBooks company files at once, with just one click. Learn more about how you can unlock your full potential through automation.
Connecting Your Bank & Credit Card Accounts
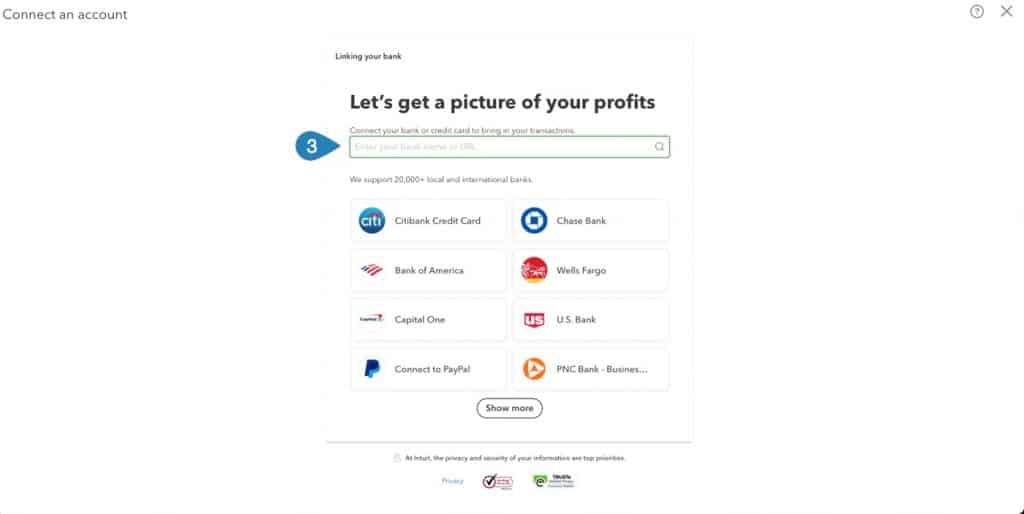
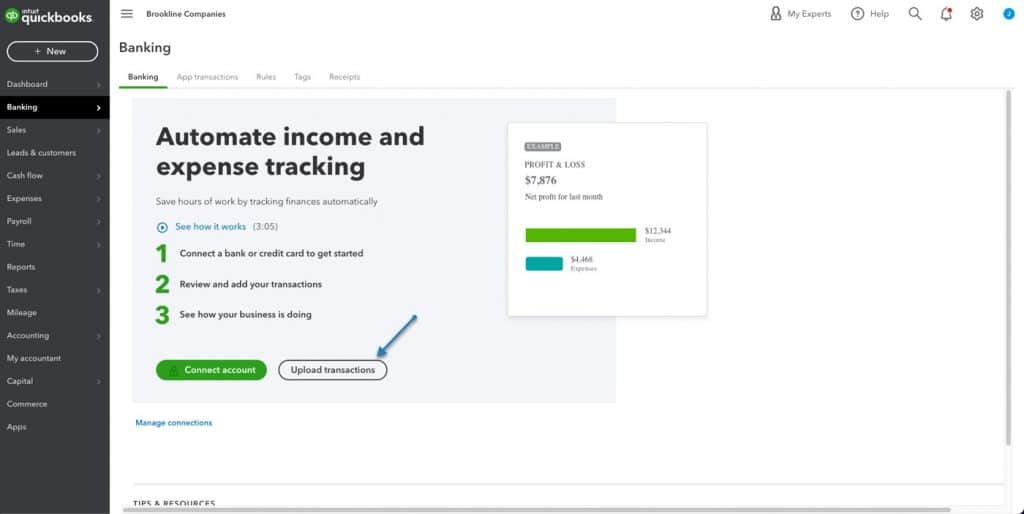
Online banking, or bank feeds, is a fantastic time-saving feature within QuickBooks Online. By linking your bank accounts to your QuickBooks account, your transactions are automatically downloaded and categorized for you. Then, as transactions come in, all you have to do is approve them.
- Click on the Banking.
- Select Connect account.
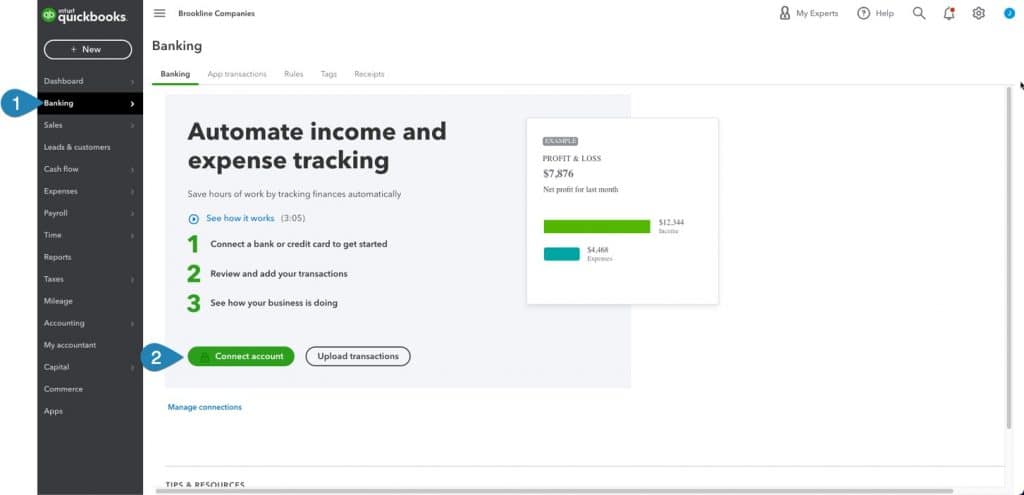
- Select the bank from the list, or type in your bank name or URL in the box to select your lending institution.
To bring in historical transactions, select Upload transactions and follow the steps. For more information on the process, check out this helpful video provided by QuickBooksHelp.
Recording Loans
Use the Chart of Accounts to add liability accounts for loans and mortgages. Each loan should have its own liability account and interest expense account (and escrow account if needed). As payments of principal and interest tend to be recurring, it is highly advisable to automate these transactions using transactions in the QuickBooks Accountant Menu shown below.
Every month (or on a regular schedule), you will need to update the principle and interest paid as the memorized transaction for the loan will not account for the slight changes each month on these accounts.
Conclusion
The many tools and modules of QuickBooks Online help commercial real estate companies organize, track and automate their business transactions. With QuickBooks Online, a commercial real estate company can determine its profitability, secure credit, and automate its cash flow using the best practices in this article.
Check out our product overview video for more information on how STRATAFOLIO integrates with QuickBooks (both Desktop and Onlne) to support vital property management activities.


