Overview
The QuickBooks chart of accounts mapping process ensures each account is properly aligned with STRATAFOLIO’s consolidated COA. When you add or edit an existing account in QuickBooks, STRATAFOLIO will see the updates the next time it syncs. Therefore, it’s good practice to verify that the sync has completed successfully to avoid discrepancies or errors in your account information. After the initial setup, STRATAFOLIO will automatically map the account based on its account type in STRATAFOLIO or in QuickBooks. You should verify that the account is properly within STRATAFOLIO’s consolidated Chart of Accounts (COA) to ensure it displays correctly on the Dashboard.
Where to Find the Chart of Accounts (COA) in the QuickBooks Integration Tab
This article will walk you through QuickBooks account mapping in STRATAFOLIO, so your Chart of Accounts stays accurate and up to date.
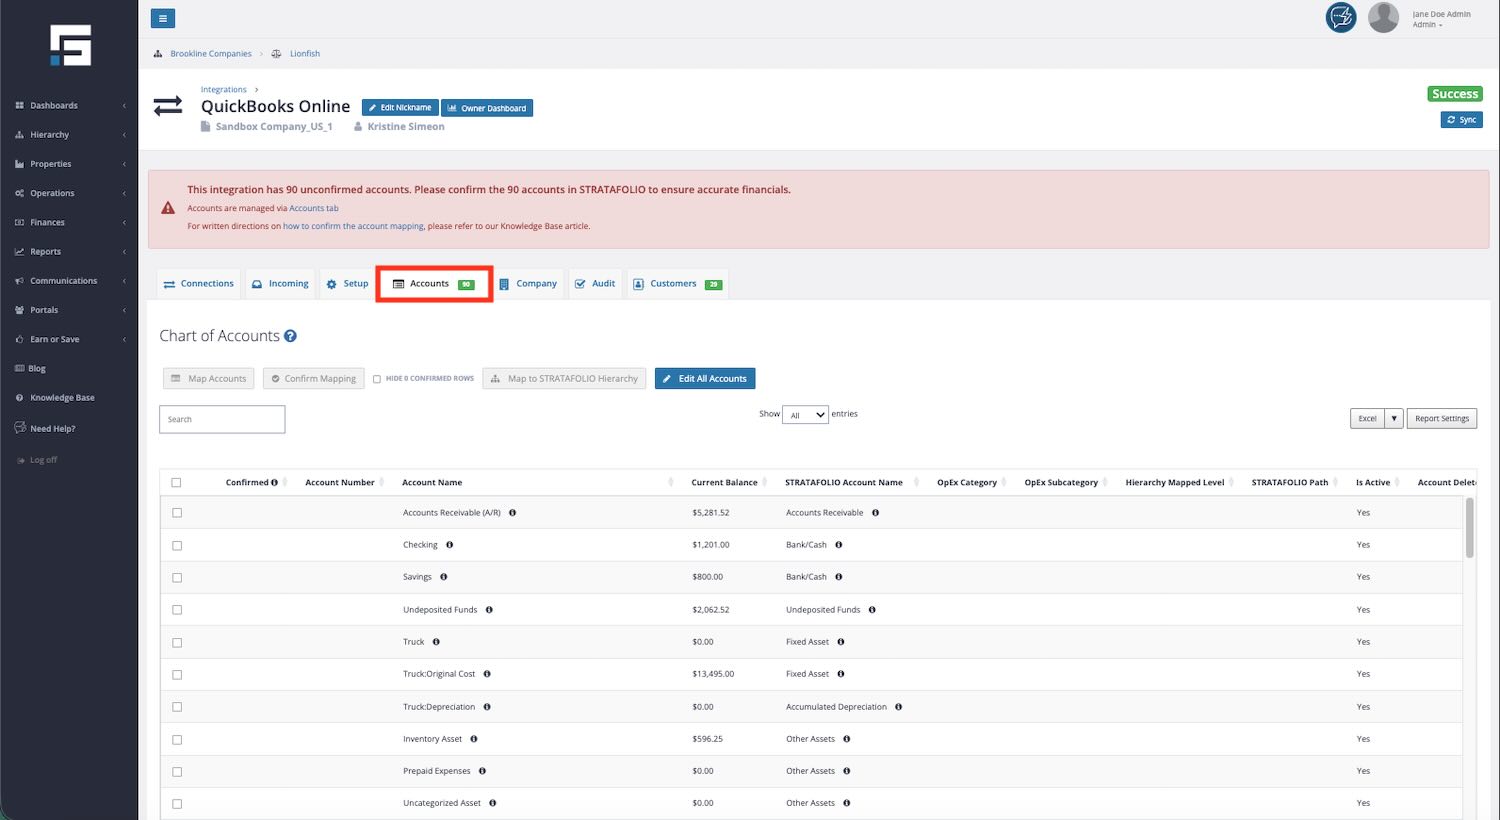
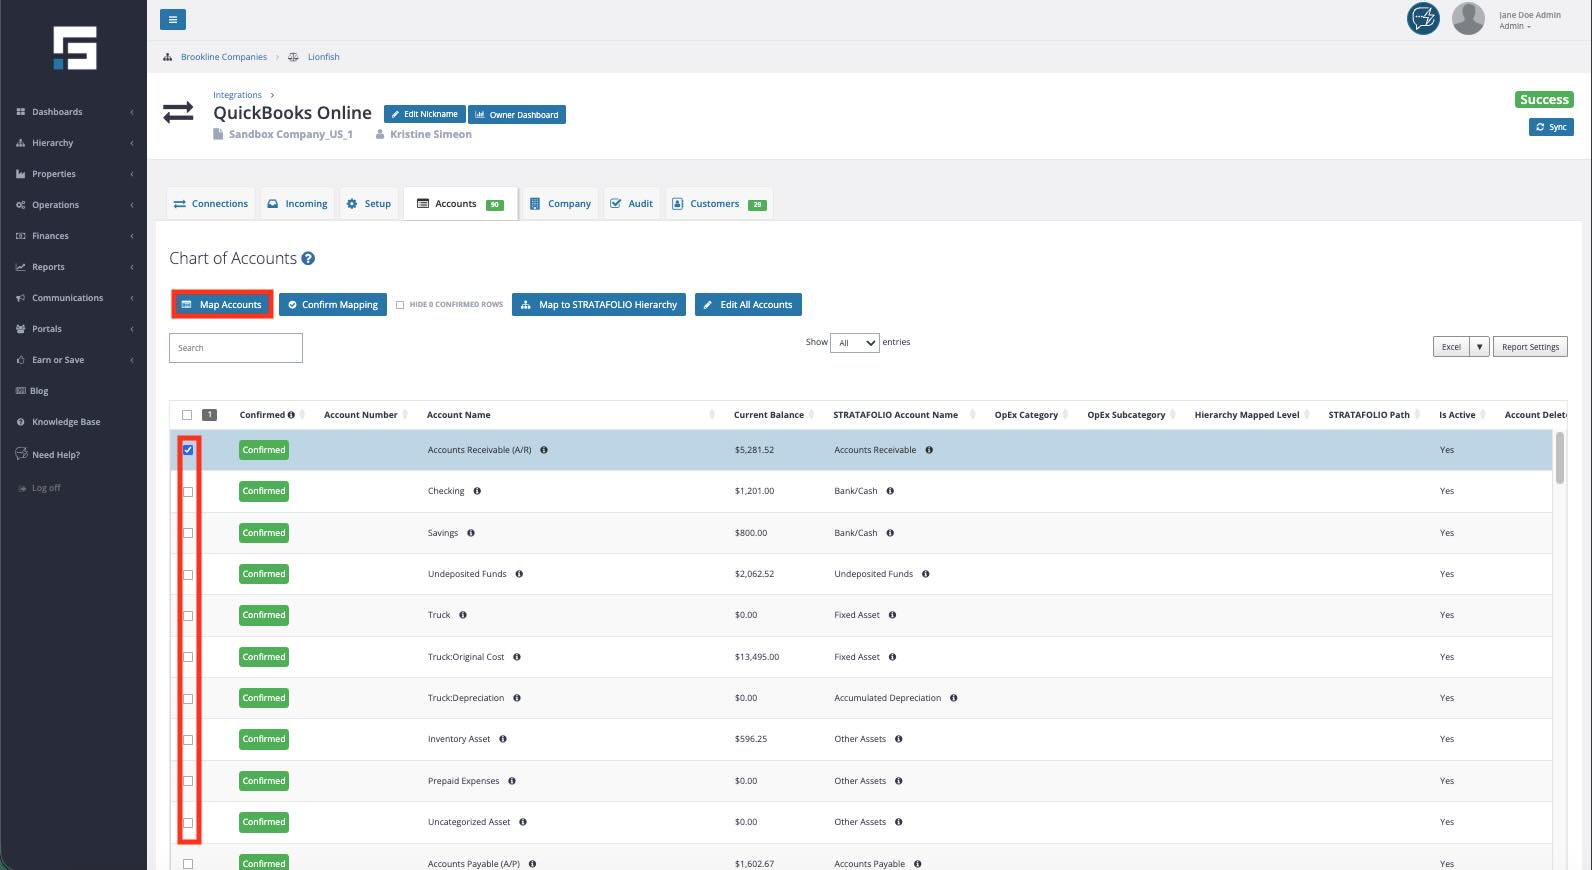
On the main Organization page, select the Integration tab. This tab will display a list of the QuickBooks accounts that have been connected. Select the “i” next to the Integration, which corresponds to the QuickBooks file with the new accounts.
To view the Chart of Accounts (COA) in QuickBooks, first navigate to the Accounts tab. This action will display all accounts, including those that have been deleted. In QuickBooks, the account name appears under the Account Name heading. Similarly, the Account Name column in STRATAFOLIO indicates where each account is currently mapped within STRATAFOLIO’s consolidated COA. Furthermore, it is important to note that STRATAFOLIO may occasionally need to adjust the account placement based on the various account types found in QuickBooks.
Accounts Confirming Feature in STRATAFOLIO
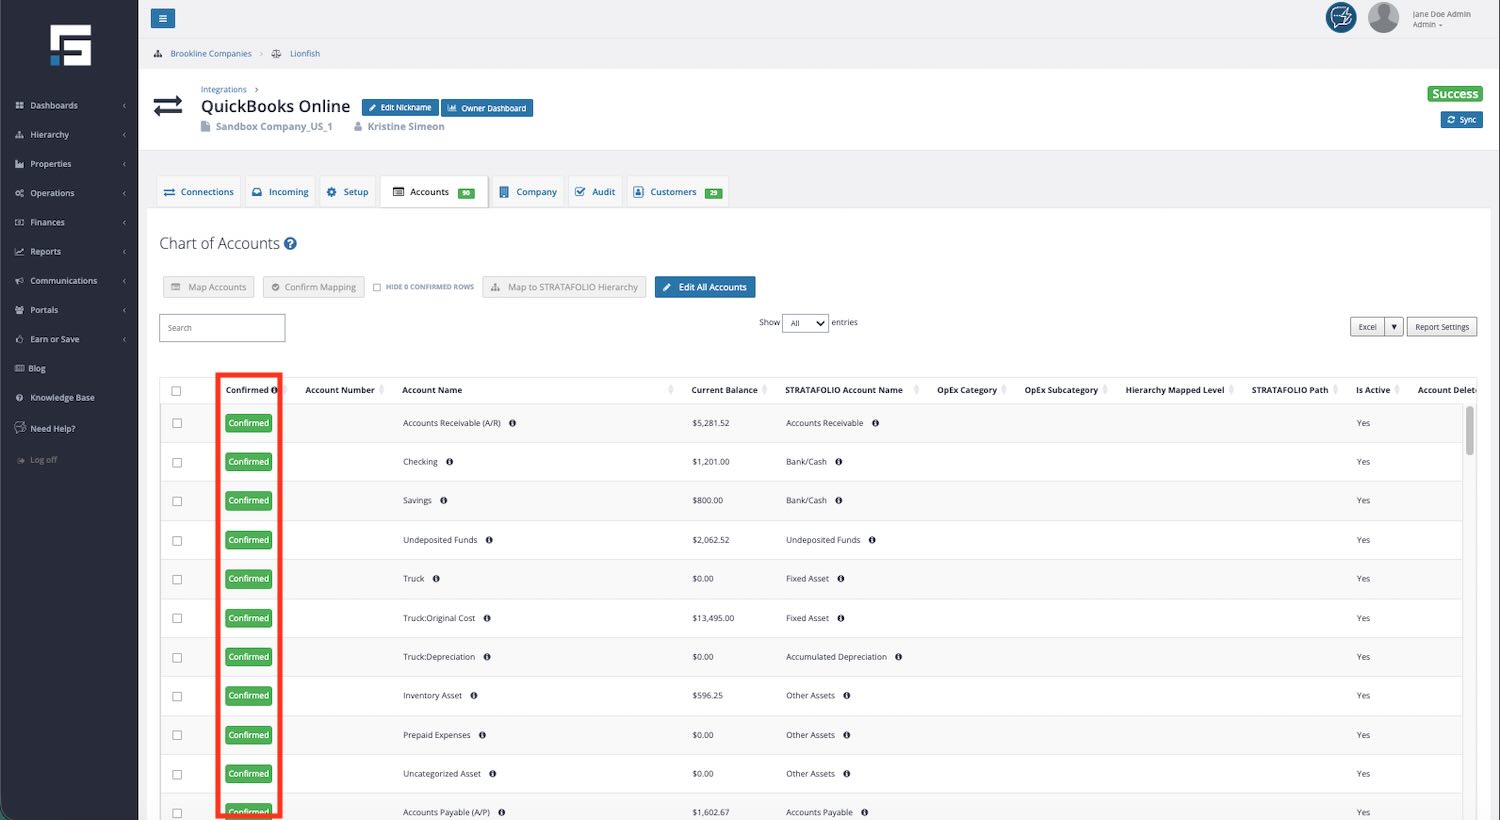
STRATAFOLIO uses the Confirm feature to distinguish verified accounts from those that are not. To ensure accuracy, check the box next to the line(s) if you are certain that the QuickBooks account correctly matches the STRATAFOLIO Account Name. Additionally, if you have any doubts, leave the box unchecked. After checking all the correct pathways, choose Confirm Mapping and then Save Changes.

After selecting the Save Changes button, the selected account(s) will display the green “confirmed” message. The account(s) will still show the checkbox marked; therefore, it is important to deselect those account(s) before confirming the next batch.
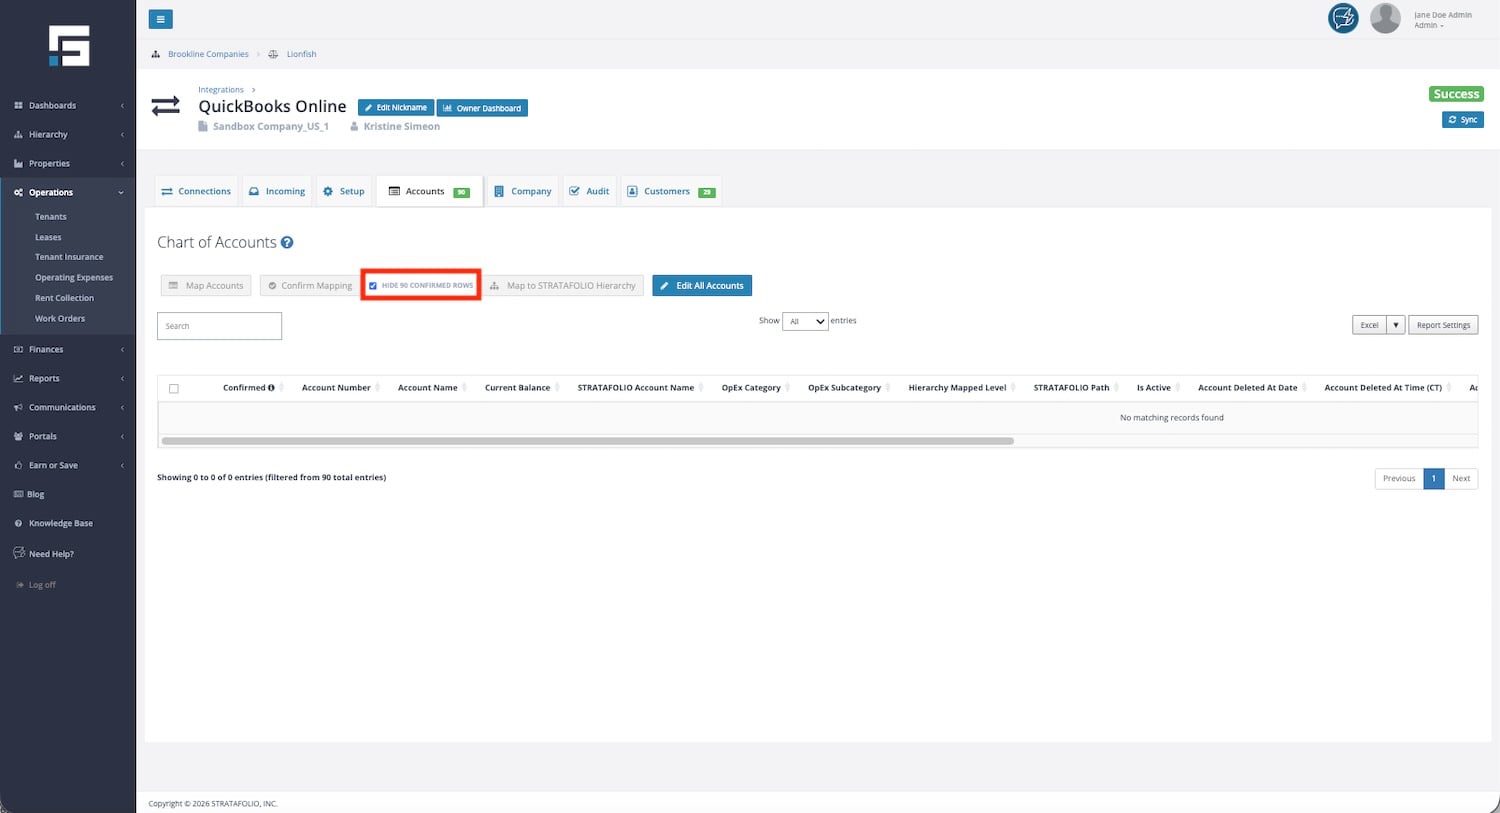
The Hide Confirmed Accounts feature enables the system to display only unconfirmed or unverified accounts. If you make significant changes to an account in QuickBooks, the system may, consequently, unconfirm it. As a result, you will no longer see the green “Confirmed” message displayed next to it. To show only unconfirmed accounts, select the Hide Confirmed Accounts button.
Updating the Mapping for an Account
Here’s how to map QuickBooks accounts correctly so they show up in STRATAFOLIO without errors.
Select the checkbox next to the Account Name that needs a new mapping or a change to the existing mapping. Next, select the Map Accounts button.
After selecting the Map Accounts button, a pop-up window will then appear. This window will guide you step by step in selecting the correct account. The accounts on the Dashboard have the same names and appear in the same order as in this list. Select the drop-down menu and choose the proper account to use.
After selecting the STRATAFOLIO account, select the Save & Confirm button.
After you have selected the Save & Confirm option, the system will display a green “confirmed” message next to the new account. This message indicates that the account has been successfully saved and confirmed. This means that STRATAFOLIO has mapped the account, and it is now ready for use. STRATAFOLIO will refresh the account listing.
NOTE: It is important to deselect the account(s) that were just mapped. If you do not properly deselect the accounts, STRATAFOLIO may remap them incorrectly, resulting in inaccurate account mapping. To avoid this issue, ensure all relevant accounts are deselected before proceeding.
HELPFUL HINT: To help organize and select the accounts that require mapping, use the search function and the filter on each column.
Sub-Accounts Mapping
With QuickBooks Online account mapping, you can connect sub-accounts directly to Assets, Buildings, or Units in STRATAFOLIO.
STRATAFOLIO typically uses the Classes feature to differentiate among multiple assets within a QuickBooks account. Users can create sub-accounts to manage their assets separately; this option also serves as an alternative to Classes. With sub-accounts, there is an additional step after mapping to connect the specific Asset, Building, or Unit in STRATAFOLIO to the correct sub-accounts. Below are the directions for the use of sub-accounts in QuickBooks and how to map them correctly in STRATAFOLIO.
Select the checkbox to map the accounts to a specific Asset, building, or Unit. Choose Map to STRATAFOLIO Hierarchy.
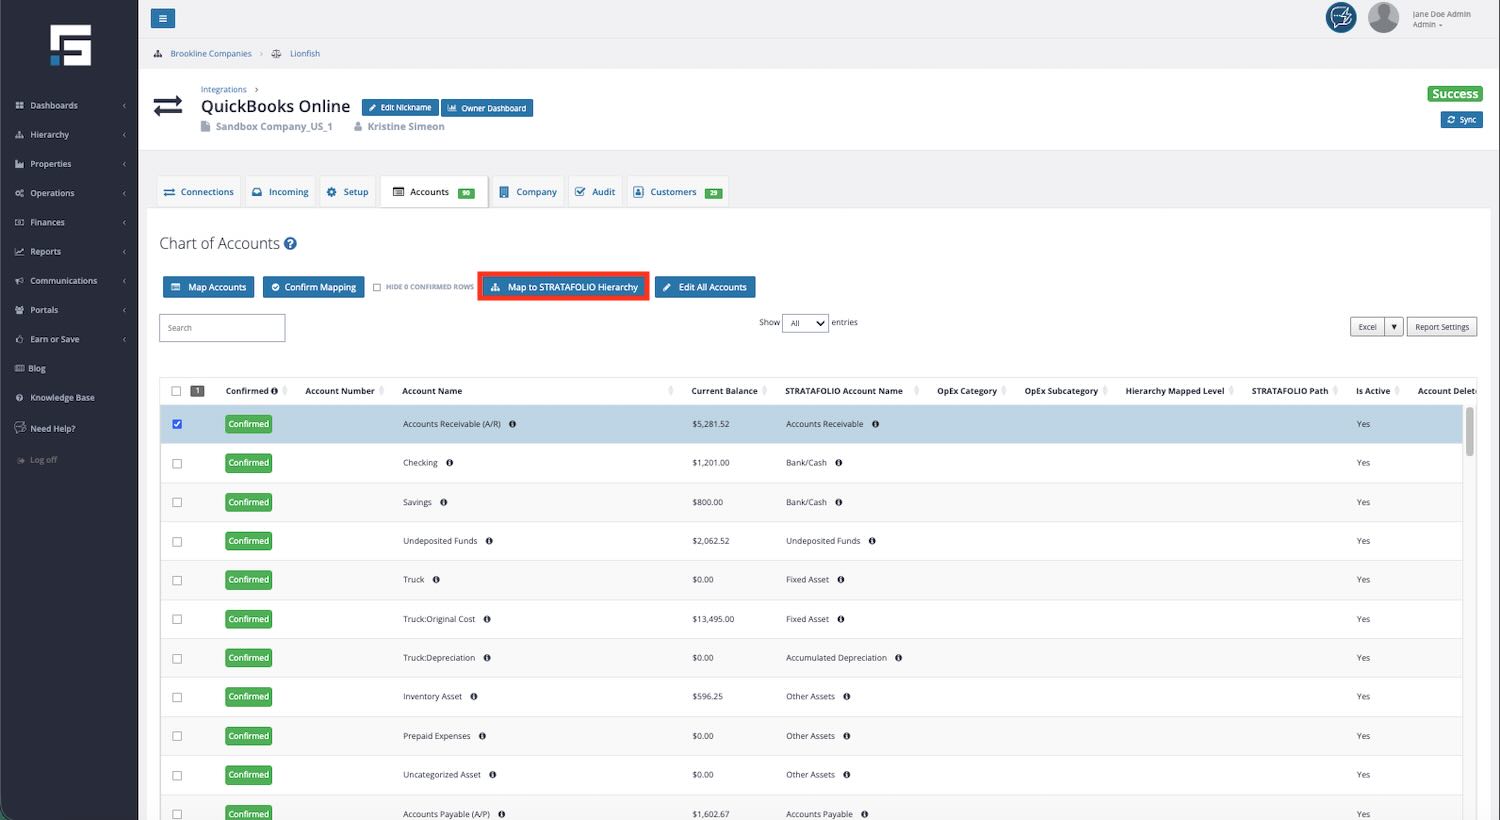
Based on the desired level of mapping, choose the Entity, Asset, Building, or Unit in STRATAFOLIO to which you need to map the sub-account. Select Save Changes.
STRATAFOLIO will map all transactions posted to this sub-account only to that specific Entity, Asset, Building, or Unit.
NOTE: For CAM/Reimbursable accounts, if no Hierarchy is selected and Classes are not used, the expenses will be allocated on a pro-rata basis across all of the Units associated with this Integration.
Furthermore, if you are currently implementing Classes in your QuickBooks, it would be extremely beneficial to review the article on Mapping Classes in STRATAFOLIO. This resource can provide valuable guidance on how to correctly map your Classes. As Loans are a little different, there is a Knowledge Base article on Mapping New Loans in STRATAFOLIO as well.
Handling Deleted Accounts and Ignored Accounts
When mapping QuickBooks accounts to STRATAFOLIO, you may see accounts that have been deleted or made inactive in QuickBooks. Because STRATAFOLIO syncs the full chart of accounts, these accounts may still appear in the mapping screen even if they are no longer actively used.
If an account has been deleted and you want STRATAFOLIO to completely disregard it, you can mark the account as Ignored.
How Ignoring an Account Works
Marking an account as Ignored tells STRATAFOLIO to treat that account as if it does not exist. Once ignored:
- The account will not appear in STRATAFOLIO reports
- Any balances or historical activity from that account will not be imported
- The account will be excluded from future data syncs
This is useful when accounts were created in QuickBooks but later deleted, merged, or replaced, and should no longer affect your STRATAFOLIO data.
How to Ignore a Deleted Account
- Navigate to Hierarchy from the left-side navigation menu, then select Organizations. Click the i icon beside the Organization record.
- Click on the Integrations tab. Select the i icon beside the integration to open the detailed view.
- Go to the Accounts tab.
- Locate the account that has been deleted or should not be used.
- Select the account and choose Map to STRATAFOLIO Hierarchy → Ignored.
- Click Save Changes.
You can verify that the account is ignored by checking the Ignored status on the right side of the mapping table.
Confirming Account Mapping
Ignoring an account and confirming a mapping are two different actions.
- Ignoring an account removes it from STRATAFOLIO entirely.
- Confirming mapping simply acknowledges that the account mapping is correct and clears the system notification that an account still needs review.
After adjusting mappings or ignoring accounts, you may still need to select Confirm Mapping to remove any outstanding mapping warnings.
Optional: Moving Accounts to “Unspecified”
If you prefer not to ignore an account completely, you can move it to Unspecified instead. This allows the account to remain visible while separating it from standard financial categories.
Best Practice for Ignoring Accounts
Use the Ignored option only for accounts that are truly deleted or should never appear in STRATAFOLIO. Ignoring active accounts may result in financial data being excluded from reports or dashboards.