Struggling with where to begin when adding a new lease or assigning a unit? Do you need a refresher? In this Knowledge Base Article, we provide step-by-step instructions for adding a lease in STRATAFOLIO.
The Add Lease and Edit Lease forms include built-in guidance throughout each section to help you complete your lease records accurately and with confidence. As you work through the form, you will find plain-language descriptions under each section explaining what the fields mean and how they affect your records, quick tips for completing fields correctly, and contextual examples to help you navigate more complex inputs. Info icons and inline notes appear throughout the form as a built-in reference so you always have the context you need without leaving the page.
TIP: Each section guidance of the form explains what is required, what is optional, and how your entries flow into invoicing, reporting, and your Rent Roll.
How to Enter or Add A New Lease
NOTE: All leases must be added to one or multiple units only. You can only add a Lease from the Units Index Page.
To add a new lease, follow the steps below:
- Log in to your account
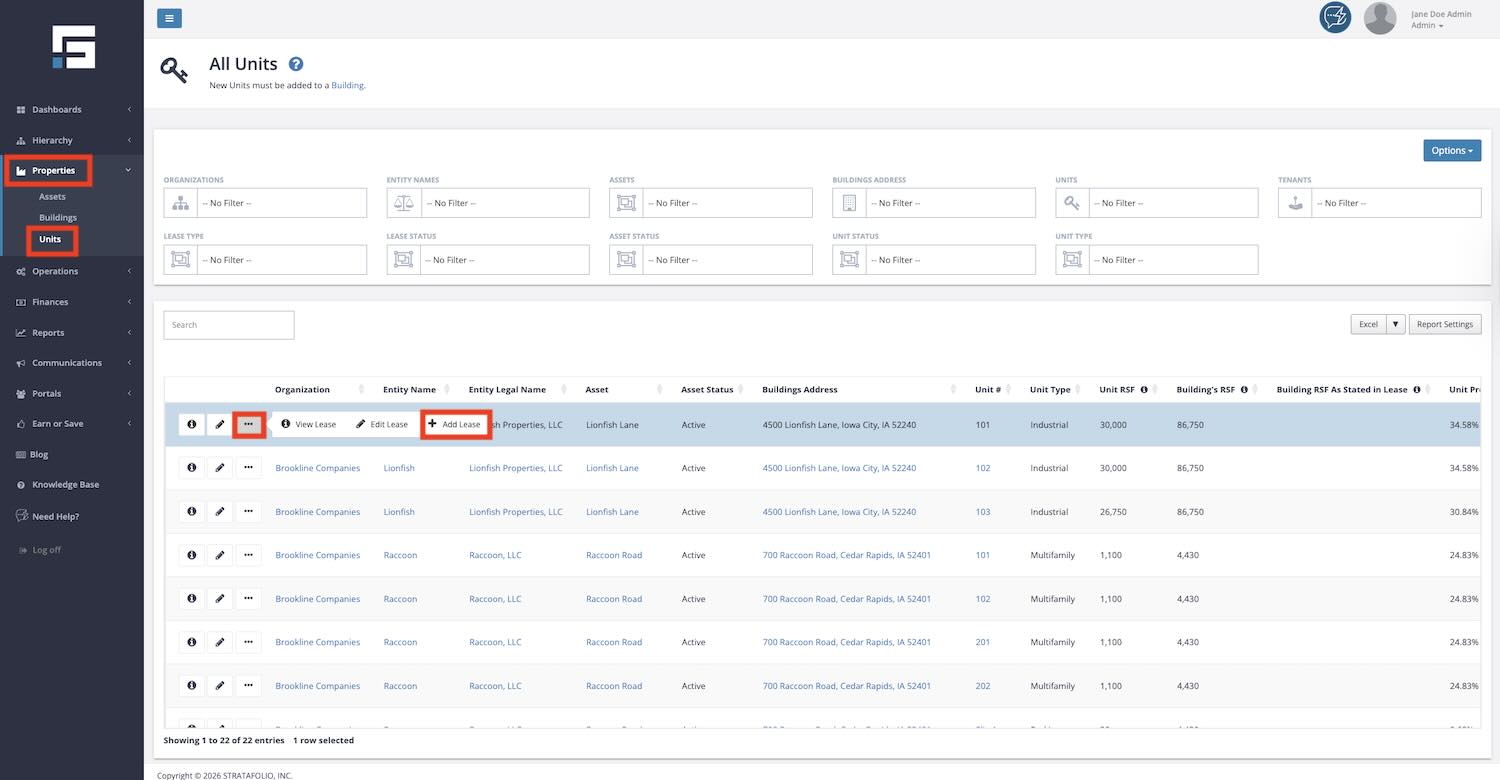
- Navigate to Properties on the left-side navigation menu and click on Units from the dropdown.
- From the Units index view, click on the ellipsis (…) button next to the Unit the lease will be added to.
- Click the + Add Lease button within the More Options pop-up.
TIP: If you have a large portfolio with many units, use the filters above the table to search for the entity, asset, building, or units you want to add this lease to. You can also use the search box to find the unit quickly if the unit has a unique name. This makes it easier to add a lease to a unit without scrolling through the full list.
This will take you to a page where you can enter information for the lease you are adding. Once there, you can review the lease and add the relevant information into STRATAFOLIO. Have the lease nearby, as you must reference it to add the information to this page.

This page is organized into eight sections, which are discussed in detail below.
Tell Us About Your Lease
UNIT(S) (required)
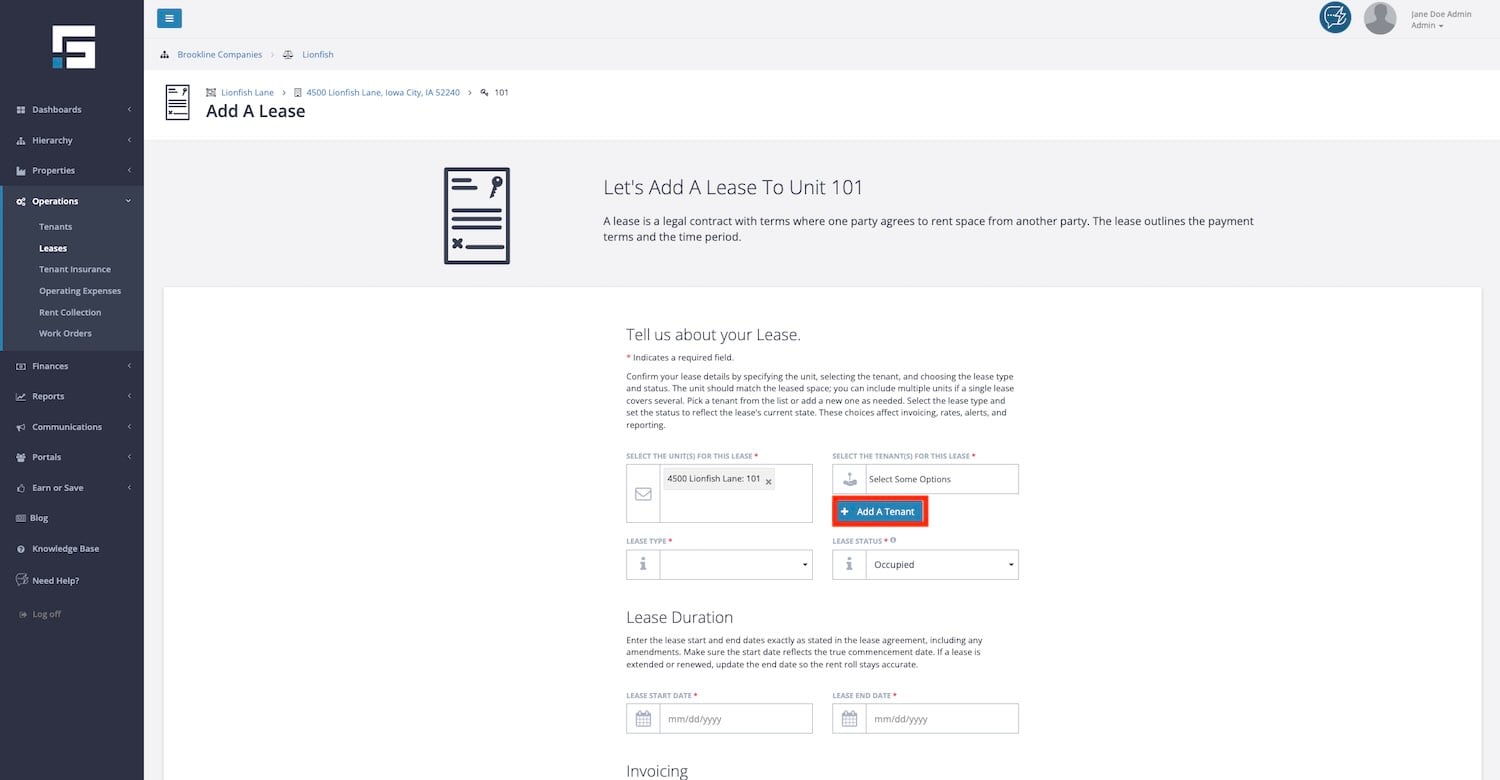
The unit you selected when you clicked Add Lease should appear in this block. Verify that this unit number matches the unit for the lease.
TIP: You can add an additional unit(s) in this block if the tenant is renting more than one unit. Sometimes it is useful to enter both units here if the tenant has a single lease for both units and the units are in the same building. If the tenant has separate leases, pays separate rates for each unit, or the units are in different buildings, it is usually better to enter them separately and not combine the units under one lease.
For more information on units, read more on How to Add a Unit.
TENANT(S) (required)
Tenant is a required field for a lease. This is typically the name of the company or person leasing the space from you. If you have already added the Tenant information to STRATAFOLIO, click inside the Tenant block, and a dropdown list of tenants will appear. Click on the tenant for whom the lease is.
To add a new tenant while on this page, click the blue Add A Tenant button.
If you need more directions, please see our article on how to Add Tenants & Contacts in STRATAFOLIO.
LEASE TYPE (required)
Select from the dropdown list of Lease Types, which include:
- NNN – Triple Net
Used primarily for commercial leases, triple net means that the tenant will reimburse/pay the landlord for the actual costs of:- Real Estate Taxes
- Insurance
- CAM (Common Area Maintenance)
- NN – Double Net
Also used primarily for commercial leases, double net means the tenant will reimburse the landlord for only two of the items listed above. These are typically Real Estate Taxes and Insurance. - N – Single Net
Also used primarily for commercial leases, single net means the tenant will reimburse/pay the landlord for one of the items listed above. This is typically only Real Estate Taxes.
NOTE: Triple, Double & Single Net leases usually invoice a set amount for CAM, Insurance, & Real Estate Taxes every month. This is then reconciled and true-upped with the invoiced amount and the actual costs at the end of each year.
- Gross – A Gross lease means the tenant pays one flat rental fee. Apartment rentals are a good example of a Gross lease. For commercial properties, a Gross lease will have the cost of CAM, Insurance, & Real Estate Taxes included in the one, flat rental fee.
- Modified Gross – When a lease is primarily gross, with periodic additional fees, Modified Gross can be used.
- Sublease
- Other
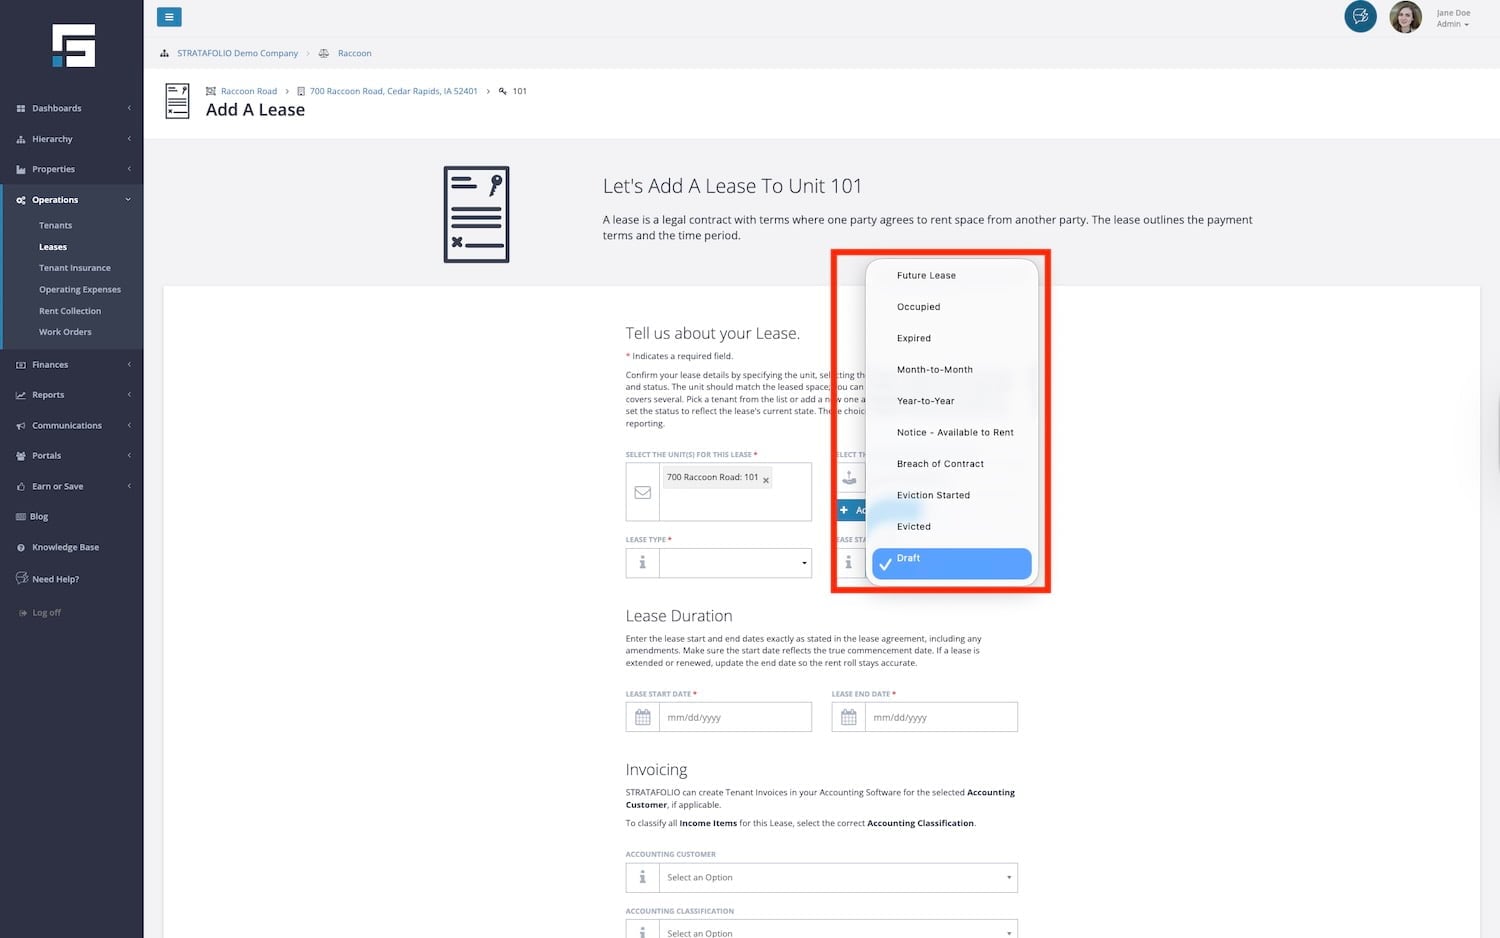
LEASE STATUS (required)
Select a Lease Status option from the dropdown menu for this field. It is important to keep these updated when there are changes to the lease. Lease Status is very important information for an accurate & complete Rent Roll.
The Lease Status options include:
- Future Lease – The lease will automatically update to Occupied at the date entered for the Lease Term when entering the lease ahead of time.
- Occupied – This is when the unit is occupied.
- Expired – If the lease is not updated before the end of the lease term, the lease status will automatically change to Expired.
- Month-to-Month – This is the best option if the lease is continued without a new lease being signed. This will include the tenant on the Rent Roll and continue at the same rate until a new rate has been entered.
- Year-to-Year – This will be the best option if the lease is renewed annually. This will include the tenant on the Rent Roll and continue at the same rate until a new rate has been entered.
- Notice – Available to Rent – This lease status is used when notice to vacate has been given, but the tenant still occupies the unit. It will remain on the Rent Roll until the end of the lease term.
- Breach of Contract – When the tenant breaks the lease and moves out before the end of the lease term.
- Eviction Started – When the eviction process is started, the tenant still occupies the unit.
- Evicted – When the tenant was evicted from the premises, and the unit is vacant.
Lease Duration
The Lease Duration section is straightforward. Enter the start and end dates based on the lease and any applicable amendments. Remember to make sure the start date is the commencement date of the lease.
NOTE: When a lease is extended, it is important to update the Lease End Date. If you find that a recently renewed lease is not showing up in the rent roll, double-check the Lease End Date to ensure it was updated to reflect the new end date.
Invoicing
STRATAFOLIO makes invoicing quick and easy when this section is completed. The Accounting Customer is the tenant’s name as it appears in the QuickBooks account. When invoices are created, this will be used to post them to the QuickBooks file.
The Accounting Classification is used if Classes are set up in this QuickBooks account. We recommend setting up a class per asset or building, and then subclasses for the units in those buildings. If this is blank, there are either no classes set up or there is no integration yet.
Lease Rate
USE LEASE DATES VS CUSTOM DATE RANGE
Selecting Use Lease Dates uses the dates entered in the Lease Duration section above and applies the Lease Rate to the entire lease period. Typically, this will apply to residential rentals when the lease does not include rent escalations.
Selecting Enter Custom Date Range is often used for commercial property rentals when the lease includes rent escalations. If you select this option, you will enter the date range for the first lease rate only. You will add any additional lease rates after entering the basic lease information and have saved the lease. Detailed information can be found in the article, How to Input Lease Rates in STRATAFOLIO.
BASE RENT (required)
Enter the dollar amount for the base rate of the lease. Triple Net, NN, and N leases do not include CAM, Real Estate Taxes, or Insurance here. Those will be added under the OpEx Tab after you enter the basic lease information and save the lease.
BASE RATE (required)
There are two options under Base Rate:
- Per RSF (Annually)
This option indicates that the amount entered for the Base Rent is a rate per rentable square footage. STRATAFOLIO will calculate the monthly and annual rates based on the square footage entered for the Unit. - Flat Rate (Monthly)
For this option, the Base Rent amount entered should match the monthly amount stated in the lease.
LEASE AMOUNT CONFIRMED (optional)
“Yes” will always be checked for the Lease Rate entered on this page.
When you add additional Lease Rates (after you finish entering the basic lease information and click Save at the bottom of this window), you will have the option to check this button to confirm the lease rate, or leave it unchecked to receive an email notification a month before the new rate takes effect. Leaving the button unchecked will notify you that the lease rate is unconfirmed. Then you will update any lease rate escalations that may need adjustment due to negotiations with the tenant or changes to the Consumer Price Index (CPI).
LEASE RATE NOTES (optional)
Use this box for any notes about the Lease Rate. It is often used to note where the lease rate can be found, for example, “Original Lease – Years 1-5.”
LATE CHARGES (optional)
Enter any notes about Late Charges for this lease. An example entry for this box would be “Late Charges – $100 or 10% of any amount not paid, whichever is greater. NSF Fee – $25.00.” If there is no mention of it in the lease, “Late Charges – Lease is silent.” STRATAFOLIO does not automatically calculate or apply late charges or fees for tenants. This topic often leads to discussions between the parties to a commercial lease before enforcement. Should you need to move forward with charging the tenant a late fee, we recommend one of the following options:
- Create a one-time invoice
- Update the current invoice and add the late charge
- Add the late fee/charge to the next month’s invoice
PAYMENT DUE MONTHLY ON DAY (optional)
Enter the day the payment is due. For example, “1” is entered to indicate that rent is due on the first day of the month.
INCOME ITEM (optional but required for invoicing)
Select the Income Item to which the Base Rent will be posted in QuickBooks when the Invoice is created. The drop-down should include a list of all Income Items created and active in the QuickBooks account. The first part of the name is the Income Item. The name after the dash is the QuickBooks account name that this will post to.
GRACE PERIOD (optional)
If there is a grace period for rent, enter it here. For example, if the rent is due on the first of the month, but not late until the fifth, enter 5 in this space.
Lease Expiration Alerts and Lease Renewal
You can learn more about lease articles on our article How Lease Alerts Work.
The Lease Expiration Alert (Days Prior) entered here will trigger an email to you a certain number of days before the lease expires. Often, notice for renewal is specified in the lease, but you can enter any number of days you would like. You will receive the email as a timely reminder that the lease is up for renewal. This is optional if the Enable Lease Expiration Alert option is set to No, but required if set to Yes.
The best practice is to add an additional 30 days to the notice the tenant must give. This allows the notice to arrive in time to decide whether to honor the renewal option. For instance, if the lease states that a 180-day or 6-month notice must be given, the Onboarding team will enter 210 days in this field. This gives the landlord a 30-day notice before the notification is required.
LEASE RENEWAL OPTIONS (optional)
This property can be set to Yes, No, or left blank. If your lease clearly states renewal options, set this property to Yes. If it clearly states that no options are given, select No.
LEASE RENEWAL STATUS (optional)
Options in the dropdown menu include:
- Communication Started
- Renewing
- New Lease Signed
- Not Renewing
LEASE RENEWAL NOTES (optional)
It is helpful to include notes on the lease’s renewal options in this section. For example, “Original Lease – 5 options to renew for 5 years each at rates stated in Section 12.3.” If the options are executed, this section needs to be updated. If more options are added in amendments, they would also be listed.
Lease Restrictions
RESTRICTIONS/EXCLUSIVE USE (optional)
This property can be set to Yes, No, or left blank. If your lease has any restrictions or exclusive use options, setting this property to Yes, will allow you to find all your leases that have this quickly.
RESTRICTIONS/EXCLUSIVE USE NOTES (optional)
Closing Out Your Lease
Fill out this part of the form when a tenant vacates to ensure that the lease status is automatically updated to “Expired”.
SECURITY DEPOSIT (optional)
If applicable, record the amount of the security deposit paid by the tenant in the Closing Out Your Lease section of the Edit Lease form.
DEPOSIT WITHHELD (optional)
This box will be used when you close the lease. You can enter any amount of the security deposit not returned to the tenant.
REFUNDED DEPOSIT (optional)
This box will also be used when you close the lease to indicate the amount of the security deposit that was refunded to the tenant.
TENANT MOVE-OUT DATE (optional)
When the tenant vacates the unit, enter the move-out date here. This will also change the lease end date to that date and make the lease Expired.
LEASE CLOSING NOTES (optional)
You can enter any notes related to closing the lease in this box. We recommend noting any unusual circumstances that may have led the the lease termination, such as “Early termination on 12/15/2020 due to bankruptcy.”
Save the Lease Information
Once all the information above has been entered, click Save at the bottom of the pop-up window, and you will return to the All Units page.
NOTE: It may take a few seconds for your new lease to reflect in STRATAFOLIO. If you do not see it right away when navigating to the unit or lease list, wait a moment and refresh the page.
Creating a Draft Lease
STRATAFOLIO now gives you the flexibility to create and save a lease in Draft mode before all the required information is available. This makes onboarding faster and more flexible, especially when you are in the early stages of lease setup and do not have all the details on hand yet.
What Is a Draft Lease?
A Draft lease is an in-progress lease record that you can save with partial information and return to complete later. Think of it as a placeholder that keeps your work organized while you wait for missing details, such as the final lease dates, lease rate, or tenant information.
Once you are ready, simply return to the lease, fill in the remaining fields, and update the Lease Status to move it out of Draft. At that point, all standard validations will apply automatically, just as they do for any other lease in STRATAFOLIO.
NOTE: Once a lease is moved out of Draft status, all standard validations will apply automatically. Draft leases will not appear in Rent Collection or on the Rent Roll.
How to Create a Draft Lease
- Navigate to the left-side navigation menu. Click on Properties.
- Click on the Units link.
- From inside the Units index page, click the […] More Options button on the same row as the unit you want to add the lease to.
- Click + Add Lease.
- On the lease form, set the Lease Status field to Draft.
- Enter whatever information you have available. You do not need to complete every required field while the lease is in Draft status.
- Click Save at the bottom of the window. Your Draft lease will be saved and available for you to return to at any time.
How to Complete and Activate a Draft Lease
When you are ready to finalize the lease, follow these steps:
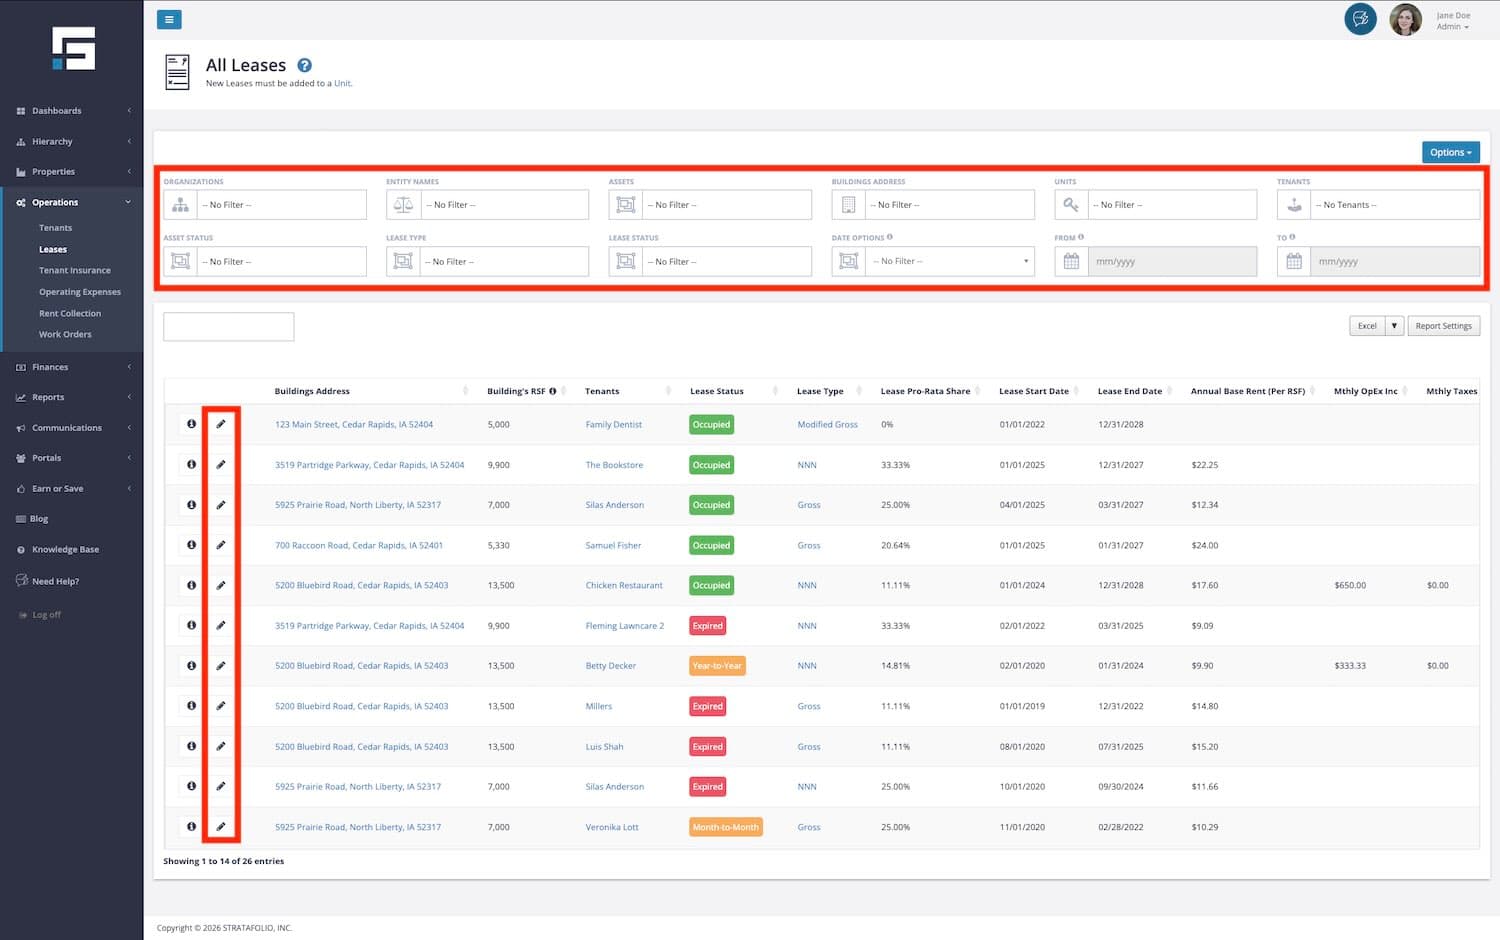
- Navigate to Operations in the left-side navigation menu.
- Select Leases.
- Locate your Draft lease in the list. You can use the filters above the table to search by status, entity, asset, or building.
- Click the pencil icon to open and edit the lease.
- Complete all remaining required fields.
- Update the Lease Status from Draft to the appropriate active status, such as Future Lease or Occupied.
- Click Save. All standard validations will now apply to the lease.
Important Notes About Draft Leases
- Draft leases do not appear on the Rent Roll. Until the lease is moved out of Draft status, it will not be included in your Rent Roll report.
- Draft leases do not appear in Rent Collection. No invoices will be generated or collected for a lease while it remains in Draft status.
- Standard validations apply after Draft. Once you change the Lease Status from Draft to any other status, all required fields will be validated automatically.
- Unit availability is unaffected. A unit assigned to a Draft lease will reflect the appropriate availability status, giving you clearer visibility into your portfolio as you plan ahead.
TIP: Draft leases are especially helpful when you are onboarding a new property with multiple units and need to reserve units or capture early lease details before the final paperwork is complete. You can save your progress, continue with other tasks, and return to finish the lease setup when you are ready.
How Are Unit Statuses Assigned Based on Lease Status
STRATAFOLIO automatically assigns a Unit Status to each unit based on the Lease Status of the lease attached to it. You do not need to set or update the Unit Status manually. STRATAFOLIO keeps it current for you any time a lease is added, updated, or changed.
You can see the Unit Status for all of your units from the Units page. To get there, select Properties from the left-side navigation menu, then select Units.
The Unit Status filter at the top of the Units page makes it easy to quickly sort and view your units by their current status. This is especially helpful if you have a large portfolio and want to see at a glance which units are available, occupied, or already spoken for.
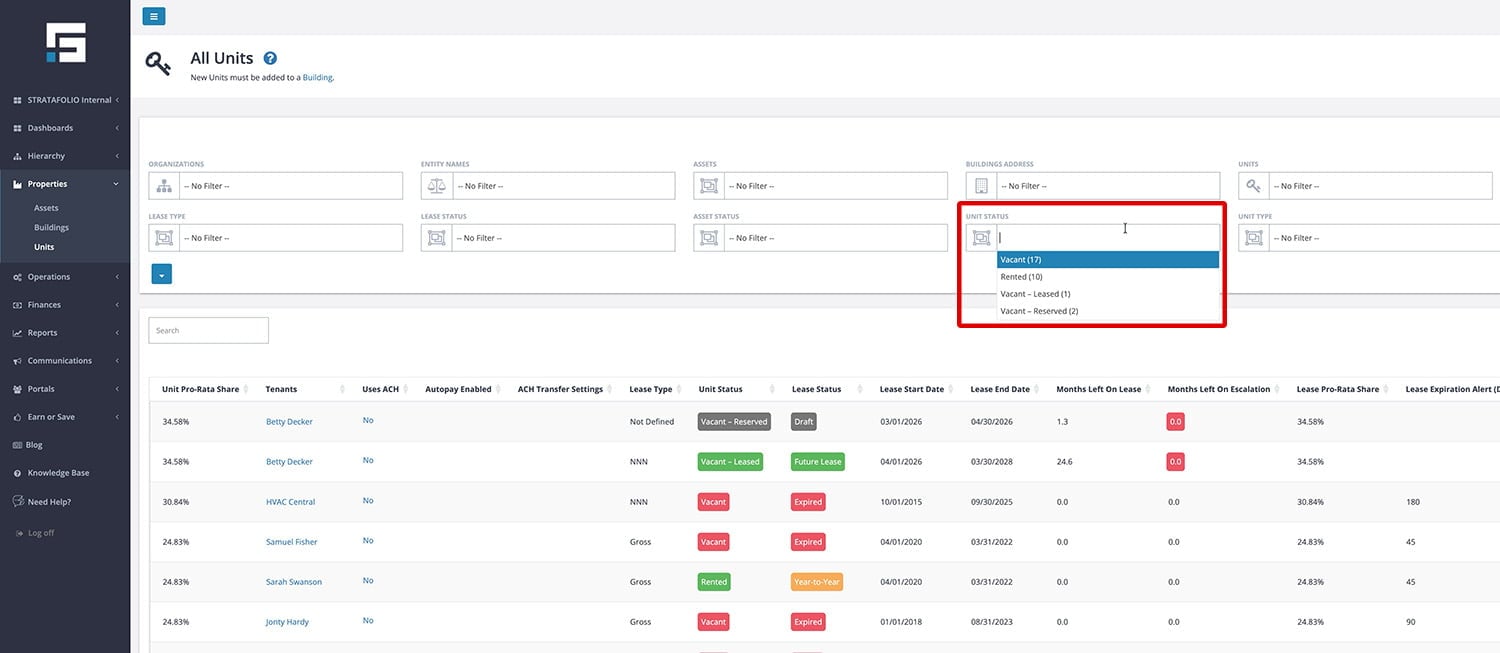
The available Unit Statuses in STRATAFOLIO are:
- Vacant – The unit has no active lease and is available for rent.
- Rented – The unit has an active lease and is currently occupied by a tenant.
- Vacant – Leased – The unit is currently vacant but already has a Future Lease in place.
- Vacant – Reserved – The unit has a Draft Lease. The lease is in progress but has not yet been finalized. This helps you quickly distinguish between units that are truly available and those that are actively being worked on.
NOTE: The Unit Status dropdown filter is displayed only on the Units index page. It does not appear on the Leases page. The Unit Status filter is unique to the Units page and is not available on other pages under Properties in the left-side navigation menu.
View Lease Information
After entering all the initial information from the lease, go back to the Unit, click the 
This will bring you to the Lease Abstract page, where a series of tabs contain additional lease information. To review or verify the information that was entered, simply click through the tabs.
Editing Rentable Square Footage
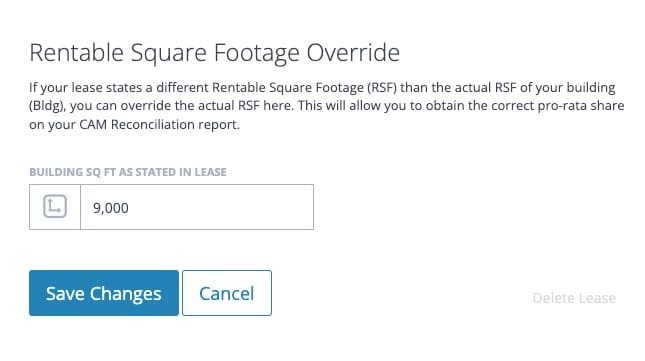
Override the Rentable Square Footage used for a lease when the square footage stated in the lease differs from the actual building’s rentable square footage. This ensures accurate pro rata calculations, especially for CAM Reconciliation reporting.
When to use Rentable Square Footage Override
You should update the Rentable Square Footage Override when:
- The lease specifies a different rentable square footage than the building record
- CAM charges need to be calculated based on the lease-stated square footage
- Pro rata share calculations do not match the lease terms
This override affects how STRATAFOLIO calculates the tenant’s share of expenses and reporting totals.
How Can I Edit Rentable Square Footage or RSF?
Follow these steps to update the Rentable Square Footage for a lease:
- From the left side navigation menu, go to Operations.
- Select Leases.
- Locate the lease you want to update.
- Click the pencil icon to edit the lease.
- Scroll to the bottom of the lease edit screen.
- Locate the Rentable Square Footage Override section.
- Enter the RSF as stated in the lease.
- Click Save Changes.
Once saved, STRATAFOLIO will use this overridden value instead of the building’s default rentable square footage for calculations tied to this lease.
How to Input and Track Lease Rates
Tracking lease rates is essential to your business. This will help you avoid missed lease escalations.
It is important to enter all your Lease Rates in STRATAFOLIO, as it helps ensure you will be notified when leases are about to expire and rent escalations are due. Additionally, having the Lease Rates in STRATAFOLIO allows you to invoice from STRATAFOLIO, saving you time and ensuring that escalations are automatically updated on the invoice.
How to Add a Lease Rate
Navigate to the Lease
To add a lease rate, first navigate to the lease you need to update. Start at the left-hand navigation panel and select Operations, then Leases. Next, select the i next to the lease you want to update.
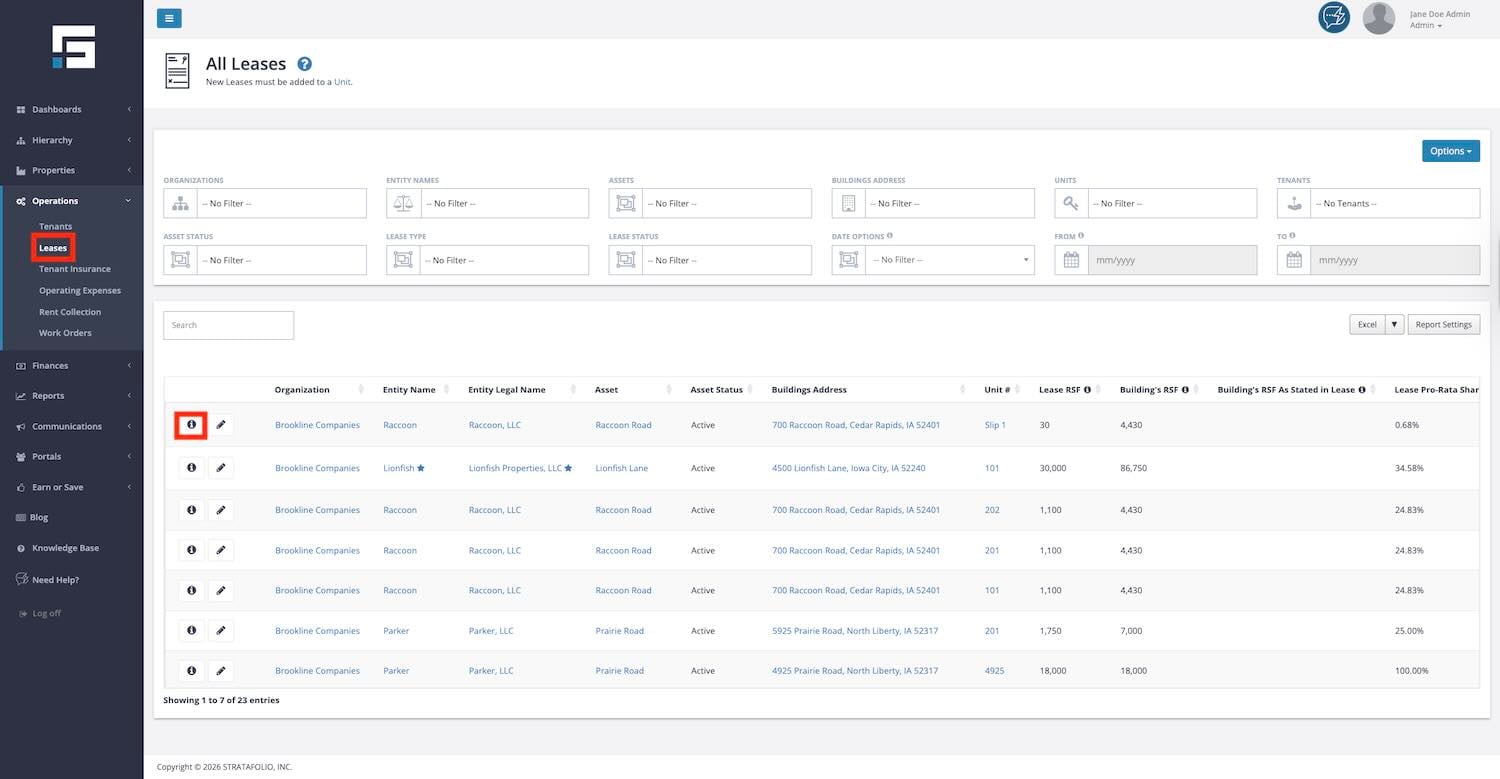
Add a Lease Rate
Once on the lease details page, navigate to the Lease Rates tab. On the Lease Rates tab, you will see a list of the lease rates already added to STRATAFOLIO. Select the Add a Lease Rate button to add an additional lease rate.
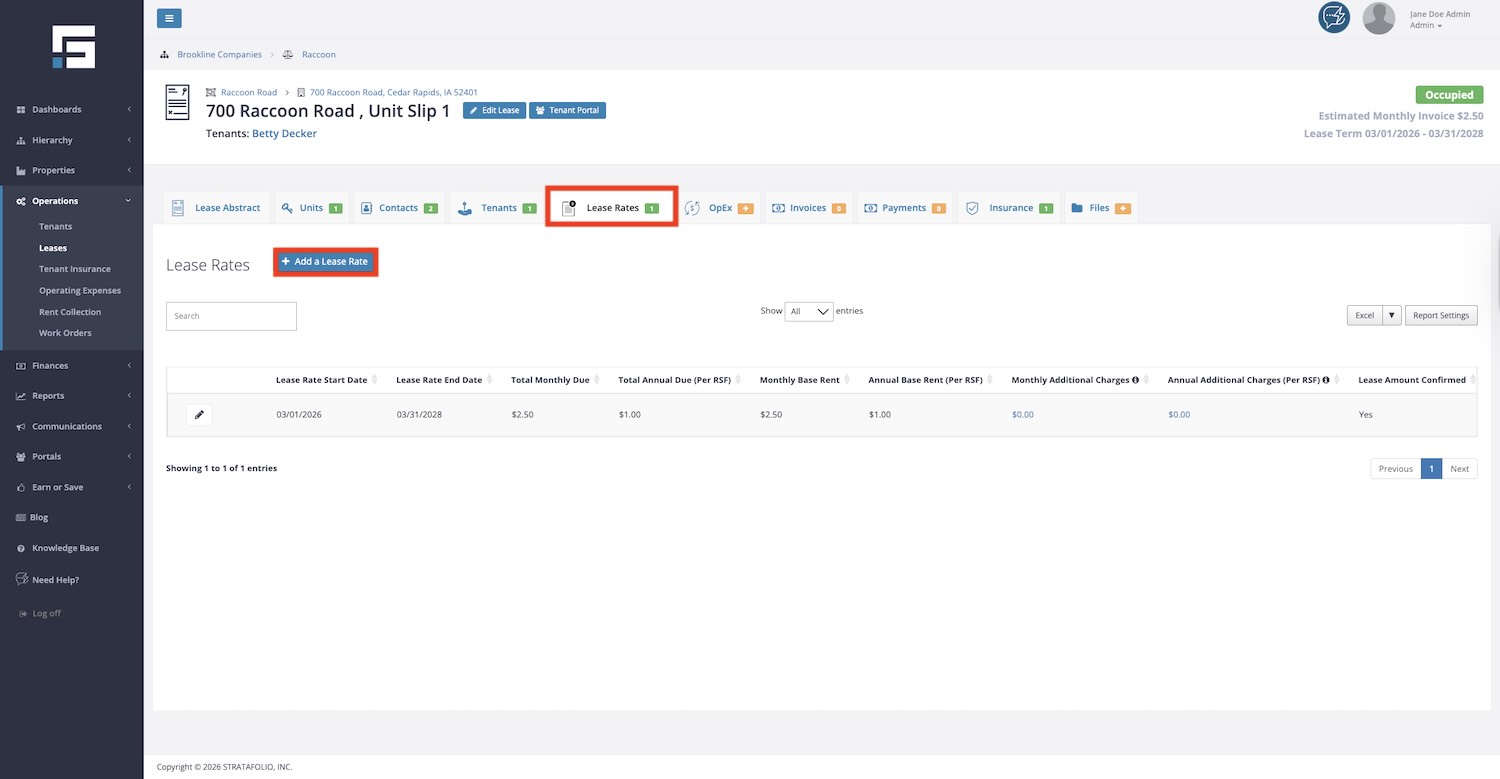
NOTE: You can also edit any of the Lease Rates from this page by selecting the pencil button next to one of the lease rates.
Enter Lease Rate Information
The Add a Lease Rate pop-up appears after selecting the Add a Lease Rate button. Three sections of the Add Lease Rate pop-up window are discussed below. Red asterisks on the screen of the platform indicate the required information.
Lease Rate
The first section requires basic lease rate information and offers space to include additional notes about the lease rate. Information to enter in this section includes:
- Lease Rate Start and End Dates – The start and end dates will automatically populate to the next 1 year from the prior lease rate entered. You can update these fields as needed.
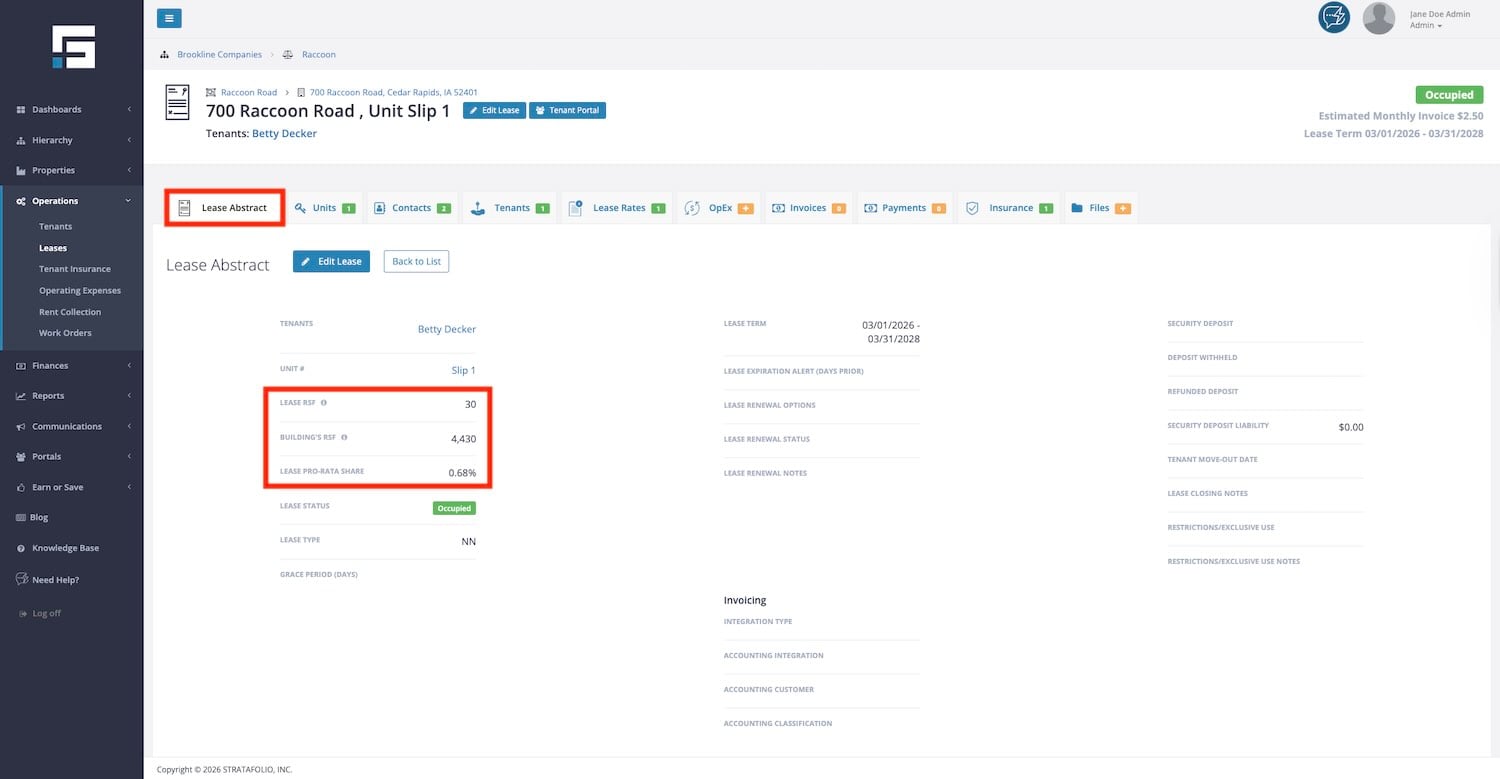
NOTE: These dates must be within the dates entered for the Lease Term. (Find the Lease Term on the Lease Abstract tab in the image above.) - Base Rent and Base Rate – First, select the Base Rate that applies: Per RSF (Annually) or Flat Rate (Monthly). Then enter the corresponding Base Rent in dollars.
- Lease Amount Confirmed Button – Check this button to confirm the lease rate, or leave it unchecked to receive an email notification a month before the new rate goes into effect. Leaving the button unchecked will allow you to be notified and then update any lease rate escalations that may need adjustment due to negotiations with the tenant or changes to the Consumer Price Index (CPI).
- Lease Rate Notes – Use this box for any notes about the Lease Rate. It is often used to note where the lease rate can be found, for example, “Original Lease – Years 1-5.”
- Late Charges – Use this box for any notes about Late Charges for this lease. An example entry is: “Late Charges – $100 or 10% of the amount due, whichever is larger. NSF Fee – $25.00”. If no late fee is stated in the lease, “Late Charges – Lease is silent.”
- Payment Due Monthly on Day – Enter the day the payment is due. For example, “1” indicates that rent is due on the first day of the month.
Invoicing
The next section is for Invoicing through STRATAFOLIO. In this section, you should select the Income Item that corresponds with the Income Item you have set up in your QuickBooks. This is the line item that you post the income for rent to in QuickBooks. If this was entered for a prior Lease Rate, it will automatically carry over to this new rate.
Advantages of invoicing directly from STRATAFOLIO:
1. STRATAFOLIO will automatically capture Lease Rate escalations.
2. STRATAFOLIO offers bulk invoicing, which allows you to invoice across all your QuickBooks integrations at one time.
3. STRATAFOLIO syncs the invoices with your QuickBooks accounts.
4. Accepting invoice payments in STRATAFOLIO streamlines the process and syncs with QuickBooks.
5. STRATAFOLIO offers an ACH Payment Integration, which streamlines the rent collection process.
Additional Charges
The final section of the Add a Lease Rate pop-up lets you add Additional Charges to the rate. Examples include an extra monthly garbage fee for a restaurant, repayment of a rent deferment from a prior period, or an additional monthly parking fee. Additional Charges appear in a separate line on the invoice, but are NOT part of operating expenses.
To add an Additional Charge to the invoices, choose Add Line Item or Add Additional Charge Type. If there is already an Additional Charge Type created, select the Add Line Item. If not, you will need to create the item with the Add Additional Charge Type.
Once the Add Line Item is selected, add the required information for the Additional Charges:
- Additional Charge Type – Select the charge types from the drop-down menu that have been created. If none are correct, select the Add Additional Charge Type button to add a new charge type. Then come back and select the correct charge type.
- Amount and Amount Rate – Enter the amount and choose the rate: Per RSF (Annually) or Flat rate (Monthly).
- Income Item and Income Classification – Select the Income Item corresponding to the income item on the invoice in QuickBooks. If an additional charge is added, examples include “Storage,” “Garbage,” or “Parking Rent.” Select the Income Classification if applicable.
- Note – Add a note if needed for this rate.
Saving the Lease Rate
Once all the above information has been entered, select the Add Lease Rate at the bottom of the pop-up window, wait for your page to refresh, and the new Lease Rate will appear at the bottom of the list.
Lease Rates Tips and Tricks
Some additional tips and tricks to make adding Lease Rates easier.
- After entering the first additional lease rate, you can follow the steps above and select Add New Lease Rate. This will enter the next rate, starting on the day following the last rate entered. Each lease rate will be for one year unless the end date is changed.
- At the bottom of the Add New Lease Rate page is a button labeled “Create Another Lease Rate After Saving”. If there are multiple lease rates to add, select this button. When saving the page, a new one will appear for you to enter the next lease rate. This is especially helpful when a lease escalates yearly!
- The lease rate end date cannot be set past the lease’s end date. If you enter a date past the end of the lease, an error message will pop up, preventing the lease rate from being saved.
- The lease rate cannot start before the lease begins, either. The same error message will appear if the date is outside the lease start and end dates.
- When amending or renewing a lease, no new lease needs to be entered. Update the lease terms before you can enter the new lease rates.
Handling Escalations or Lease Start Dates That Don’t Align with the Due Date
How STRATAFOLIO Determines Which Lease Rate to Apply
STRATAFOLIO uses the lease rate’s due date to determine which rate to apply when generating invoices. If rent is due on the 1st of the month, the lease rate valid on the 1st will be used, even if an escalation occurs later in the same month.
When You Need to Preserve a Mid-Month Escalation Date
If the escalation must remain on a date other than the due date (for example, the 10th), you will need to manually calculate and combine the prorated amounts into a single lease rate for that month.
Scenario 1: Rent Due on the 1st, Escalation on a Different Day (e.g., the 10th)
First option: Add an additional lease rate for the escalation month
- Calculate the prorated rent for the 1st–9th and add it to the rent from the 10th through the end of the month, depending on how the lease specifies the prorated calculations.
- This will need to be added as a separate lease rate every time there is an escalation.
Second option: Change the lease due date to match the escalation date
- This is not recommended as it changes the lease agreement.
Third option: Manually update the invoice when it’s created
- Leave the lease rate as due on the 1st and the escalation on the 10th.
- When creating the invoice, manually update it to add the additional rent at the new rate.
Fourth option: Move the escalation to the 1st (preferred when the lease doesn’t specify a date for the escalation)
- Leave the lease rate as due on the 1st and update the escalation to occur on the 1st of the month.
Scenario 2: Lease Starts Mid-Month, Rent Due on the 1st, Escalation Date Unclear
The lease is dated to start on the 10th of the month. Monthly rent is due on the 1st. The lease states that escalations occur annually, but the exact date of escalation is unclear.
First option: Add an additional lease rate for the escalation month
- Calculate the prorated rent for the 1st–9th and add it to the rent from the 10th through the end of the month, depending on how the lease specifies the prorated calculations.
- This will need to be added as a separate lease rate every time there is an escalation.
Second option: Manually update the invoice when it’s created
- Leave the lease rate as due on the 1st and the escalation on the 10th.
- When creating the invoice, manually update it to add the additional rent at the new rate.
Third option: Move the escalation to the 1st (preferred when the lease doesn’t specify a date of the escalation)
- Leave the lease rate as due on the 1st and update the escalation to occur on the 1st of the month.
Scenario 3: Lease Starts Mid-Month with Prorated Rent Language in the Lease
The lease is dated to start on the 10th of the month. Monthly rent is due on the 1st. The lease contains terminology similar to:
“If the Rent Commencement Date is other than the first day of a calendar month, then the Monthly Rent for that first month will be prorated based upon the actual days of said month and shall be due on the Rent Commencement Date. Any prepaid rent due hereunder shall be applicable to the full calendar month after the Rent Commencement Date.”
Option 1: Add an additional lease rate for the escalation month
- Calculate the prorated rent for the 1st–9th and add it to the rent from the 10th through the end of the month, depending on how the lease specifies the prorated calculations.
- This will need to be added as a separate lease rate every time there is an escalation.
Option 2: Move the escalation to the 1st (preferred when the lease doesn’t specify a date of the escalation)
- Leave the lease rate as due on the 1st and update the escalation to occur on the 1st of the month.
Final Recommendation
The right approach depends on the specific lease terms. When possible, address ambiguous escalation or commencement dates at the lease drafting or amendment stage to prevent recurring workarounds.
Tenant Pro-Rata Share
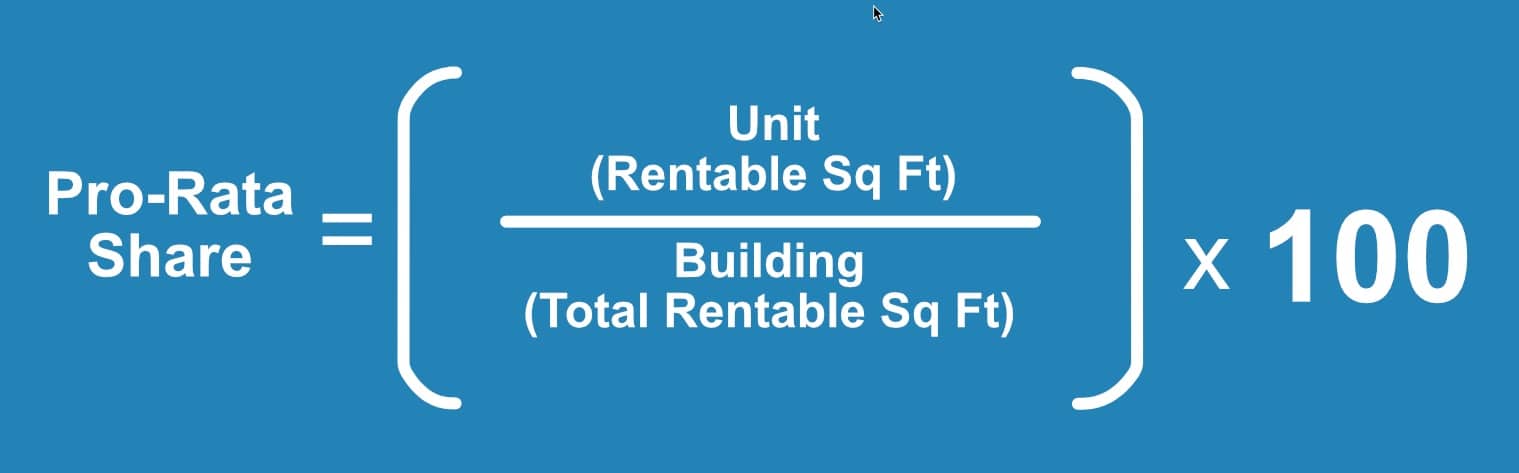
In NNN leases, each tenant pays their share of the property’s rent. This is known as their pro-rata share. When you enter a lease into STRATAFOLIO, the system automatically calculates the lease’s pro-rata share for you. You can calculate the tenant’s pro rata share of a lease by dividing the unit’s square footage by the building’s rentable square footage (RSF).
What Does Pro-Rata Share Control in STRATAFOLIO?
In STRATAFOLIO, a tenant’s pro-rata share drives how shared expenses, such as CAM, taxes, insurance, and other allocatable OpEx categories, are divided among all tenants in a building.
Once the lease is set up with the correct rentable square footage and the building has an accurate total RSF, STRATAFOLIO automatically calculates each tenant’s share and applies it during billing and reconciliation. Again, tenant CAM percentages are not entered manually. There is no field to enter a tenant’s percentage of the building’s CAM.
How to Calculate Pro-Rata Share
Where to find the numbers used for the calculations of the lease’s pro-rata share in STRATAFOLIO.
NOTE: Please be careful when adding units or changing square footage. Changing one will affect the pro-rata share of every tenant in that building.
How to Override Tenant’s Pro-rata in STRATAFOLIO
In some cases, the denominator, or RSF, in the lease may differ from the sum of all the units in the building. This can happen if the math was rounded on the lease, additional building square footage was added, or many other reasons. In STRATAFOLIO, an override feature is possible if the pro-rata share in the leases differs from the calculated amount. You can find the override at the bottom of the Edit Lease screen if necessary. This overrides the pro-rata share for the lease by changing the RSF for only this one lease. It won’t display in the STRATAFOLIO table but will be included in the exportable report.
Pro-Rata Share in the CAM Reconciliation Report
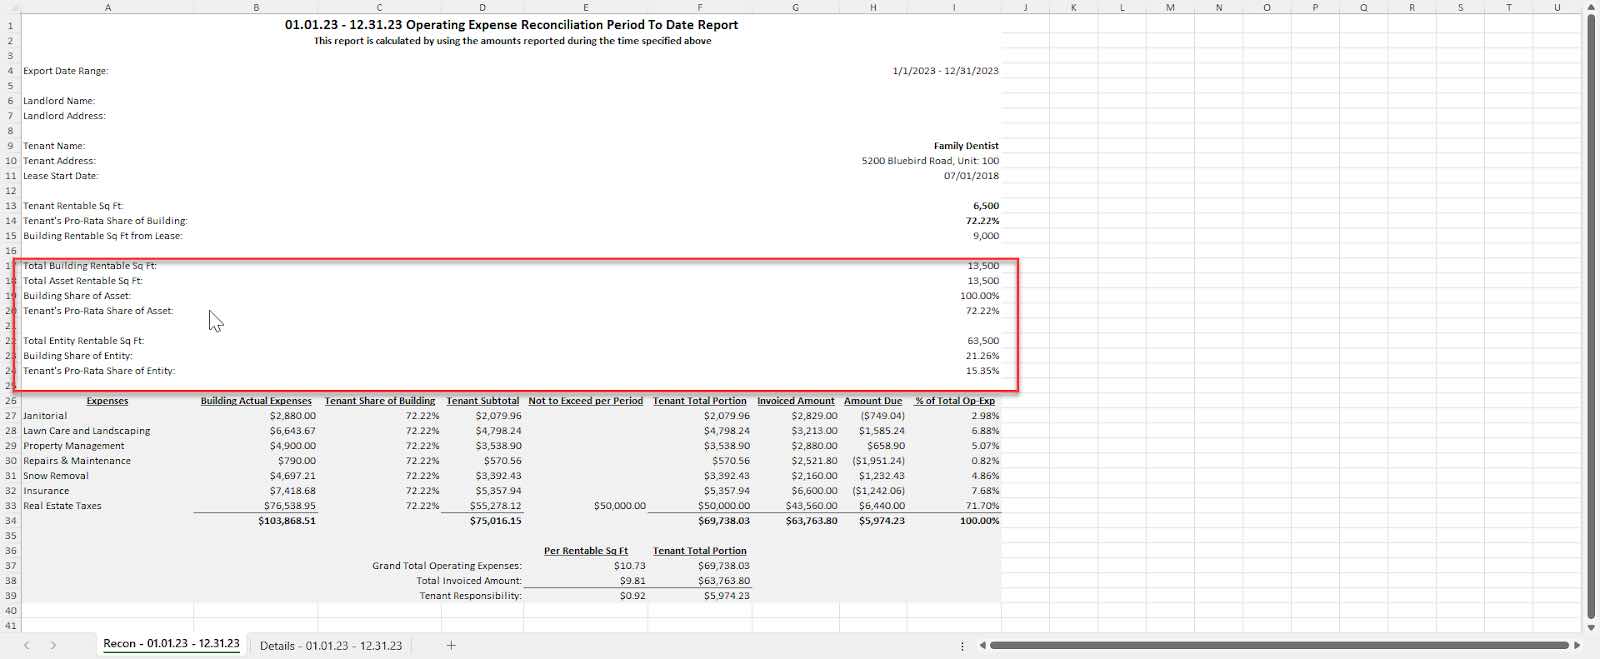
The CAM Reconciliation Report, when exported to Excel, contains various pro-rata share calculations for the building, the asset, and the entity. This feature enables easy calculations for any shared expenses at different levels. If this does not apply to you, you can hide or delete rows in the Excel report as needed.
How to Delete a Unit and Its Associated Records
Sometimes you may need to fully remove a Unit from STRATAFOLIO, not just the Tenant or Lease tied to it. A Unit usually has other records connected to it, so STRATAFOLIO will not let you delete the Unit while those connections still exist. To remove a Unit completely, you first clear the records connected to it. The right path depends on whether the Tenant has any ACH payment activity.
An important rule to know before you start:
A Tenant that has ACH payment activity cannot be deleted. If the Tenant has set up ACH and made a payment, STRATAFOLIO will block the deletion and show a message “This tenant cannot be deleted because it is linked to an ACH Integration.” This is expected behavior.
Because of this rule, follow the path that matches your situation.
If the Tenant has no ACH payment activity
You can remove the records in this order: Tenant, then Lease, then Unit. Open each record, find the Delete option at the bottom right of the edit form, and confirm. Start with the Tenant, then delete the Lease, and finish with the Unit.
If the Tenant has ACH payment activity
Because a Tenant with ACH payment activity cannot be deleted, you will swap in a temporary Tenant so you can still delete the Lease and the Unit. The original Tenant stays in your records along with its payment history.
Follow these steps:
- Open the Lease and remove the current Tenant.
- Add a temporary placeholder Tenant so the Tenant field is not blank. You can create a simple Tenant such as “Placeholder Tenant” for this purpose.
- Save the Lease.
- Delete the Lease.
- Delete the Unit.
After these steps, the Unit is removed. The original Tenant and its ACH payment history remain in STRATAFOLIO, since that record cannot be deleted.
IMPORTANT: Deleting is permanent and cannot be undone. Before you remove a Lease, remember that STRATAFOLIO recommends keeping leases for your historical records and for future leasing of the space. Only delete a Unit and its Lease when you are sure you no longer need that history.